1.
Set in the material palette the foreground color at the gold pattern (Is by the
materials) and the background at #5c4733.
File – open – new transparent image 650x450.
Selections – select all.
2.
Activate the image 20jaardlp – edit – copy.
Edit – paste into selection.
Selections – select none.
3.
Effects – Image effects – seamless tiling – default setting.
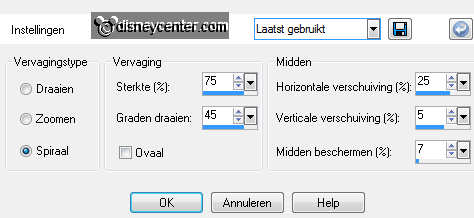
Adjust – blur – radial blur – with this setting.
4.
Effects – Image effects – seamless tiling – default setting.
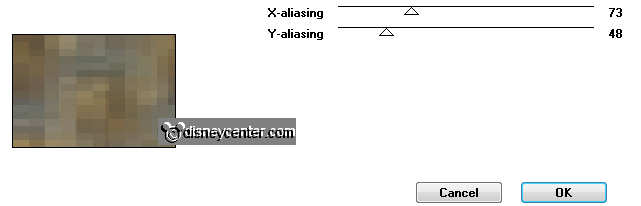
Effects – plug-ins – Factory Gallery H – Alias Blur – with this setting –
click OK.
5.
Effects – Edge effects – enhance.
Effects – plug-ins – Factory Gallery M – Motion Trail – with this setting –
click OK.

6.
Activate the image 20jaardlp.
Image – resize – 65% - all layers checked.
7.
Stay by the image – selections – select all.
Selections – modify – contract 5 pixels.
Selections – invert.
8.
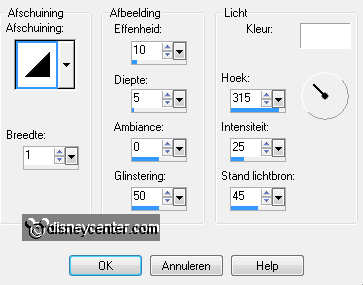
Activate flood fill tool – fill the selection with the gold pattern.
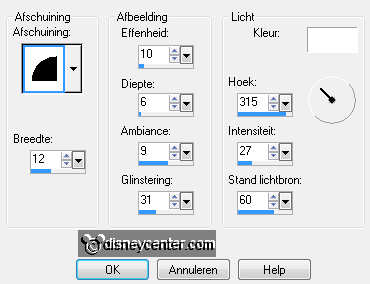
Effects – 3D Effects – Inner Bevel – with this setting.
Selections – select none.
9.
Edit - copy.
Edit – paste as a new layer on the image.
10.
Effects – plug-ins – MuRa’s Meister – Copies – with this setting - click
OK.
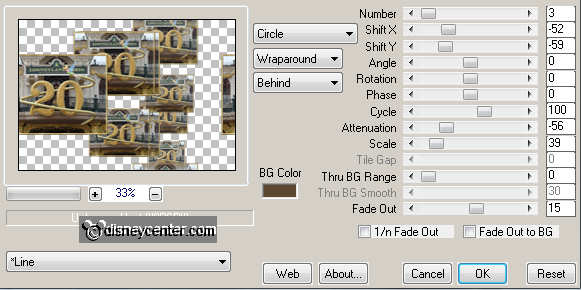
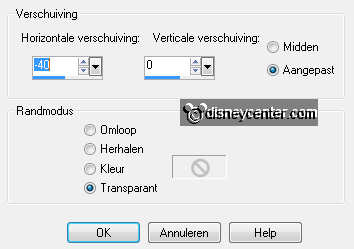
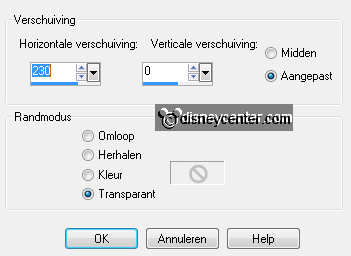
Effects – Image effects – offset – with this setting.
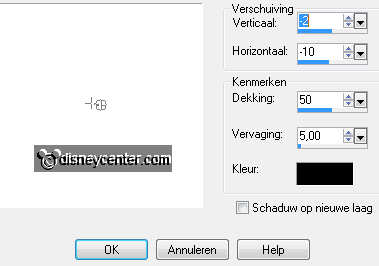
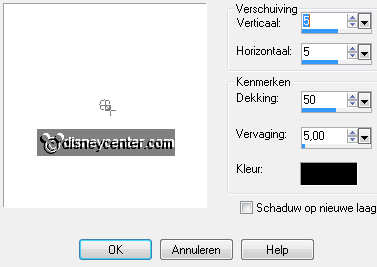
Effects – 3D Effects – drop shadow – with this setting.
11.
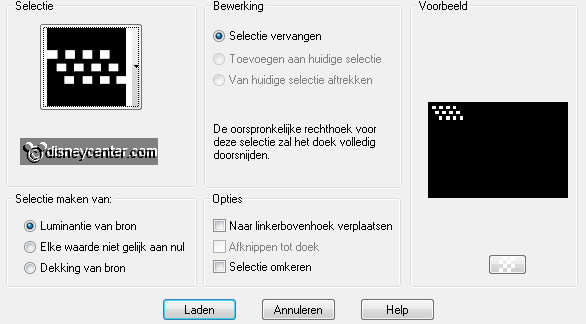
Selections – load/save selection – load selection from disk – look Emmy20 jaar –
with this setting.
Layers – new raster layer.
Activate the flood fill – fill the selection with the gold pattern.
12.
Selections – select none.
Effects – 3D Effects – drop shadow – settings are right.
Layers – duplicate.
Image – flip.
13.
Image – add border – symmetric – 15 pixels – color white.
Activate the magic wand – with this setting below and select the white border.

14.
Layers – new raster layer.
Fill with the flood fill the selection with the gold pattern.
Effects - 3D Effects - Inner Bevel - with these setting
Selections – select none.
15.
Image – add border – symmetric – 5 pixels – background color.
16.
Image – add border – symmetric – 15 pixels – color white.
Select with the magic wand – settings are right - the white border.
17.
Layers – new raster layer.
Fill with the flood fill the selection with the gold pattern.
Effects - 3D Effects - Inner Bevel - setting is right
Selections – select none.
18.
Activate text tool – with this setting.

Turn in the material palette the gold pattern, so this stands in the background
– and lock the foreground.
19.
Write now Magic – convert to raster layer.
Effects – 3D Effects – drop shadow – setting are right.
Activate move tool – set the text between the 2 little images – see example.
20.
Layers – new raster layer – put your watermark into the image.
Layers – merge – merge all.
21.
Activate the tube mickey20jaardlp – edit - copy.
Edit - paste as a new layer on the image.
22.
Effects – Image effects – offset – with this setting.
Layers – duplicate.
23.
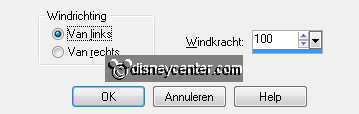
Effects – Distortion effects – Wind – with this setting.
Layers – arrange – move down.
24.
Activate the top layer.
Effects – 3D Effects – drop shadow – with this setting.
25.
Layers – duplicate and one more time.
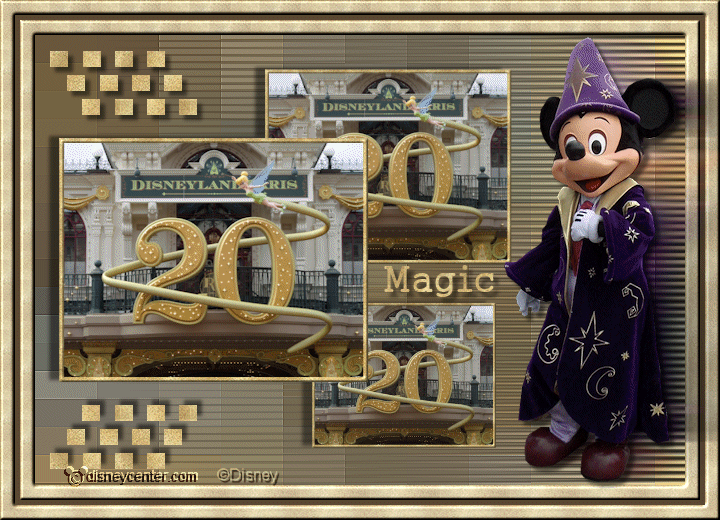
This is what you have now – see below.
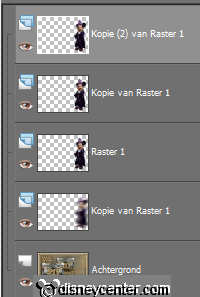
26.
Make in the layer palette active - copy of raster1.
Adjust – brightness and content – brightness/content – with this setting.
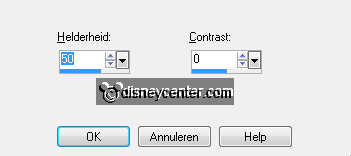
27.
Make in the layer palette active - copy(2) of raster1.
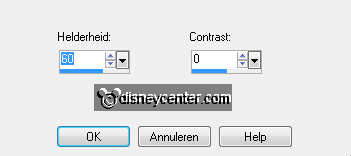
Adjust – brightness and content – brightness/content – with this setting.
28.
Make the bottom layer active - lock the 2 top layers.
Edit - copy merged.
29.
Open animation shop – edit – paste as a new animation.
Back in PSP – lock raster1 and open copy of raster1
Edit - copy merged.
30.
Back in AS – edit – paste after active frame.
Back in PSP – lock copy of raster1 and open copy(2) of raster1.
Edit - copy merged.
31.
Back in AS – edit – paste after active frame. (Be sure the last frame is
selected).
Animation – Frame properties – set this at 15.
32.
File – save as – give name – click 3 times at next and than at finish.