File - open new transparent image
700x500.
Set in the material palette the foreground color at #cb2239
and the background color at #405690.
Make from the foreground a gradient linear -
with this setting.
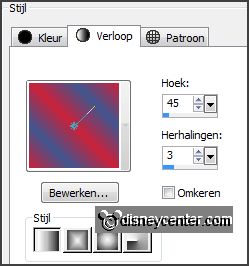
Activate flood fill tool -
fill the layer with the gradient.
2.
Effects – plug-ins – Carolaine and Sensibility – CS_Linear_H –
with this setting – click OK.
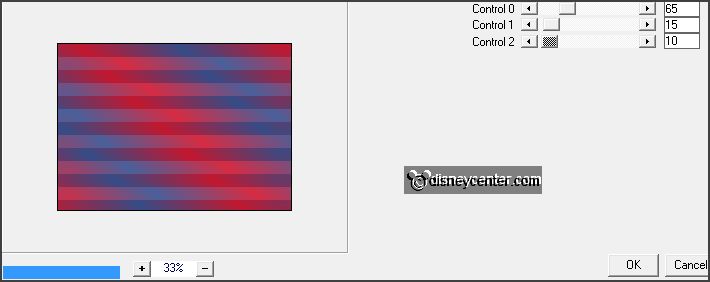
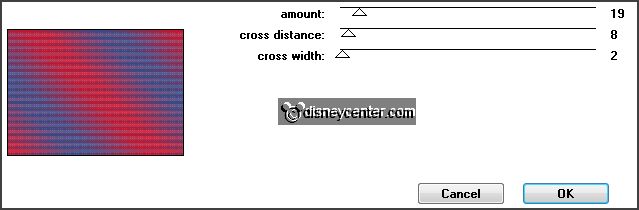
Effects – plug-ins – Penta.com – Dot
and Cross –
with this setting –
click OK.
Effects – Edge effects – enhance.
3.
Activate the tube sterE – edit - copy.
Edit - pasta as a new layer on the image.
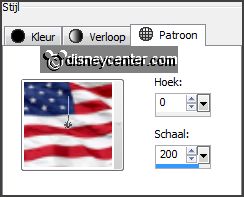
Set in the material palette the background to pattern –
with this setting.
4.
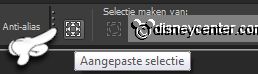
Activate the magic wand –
with this setting below – select the
star.

Fill the selection with the pattern.
Selections – select none.
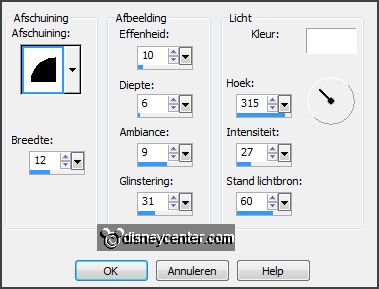
Effects – 3D Effects – Inner Bevel –
with this setting.
5.
Select with the magic wand in the middle of the star.
Selections – modify –contract 7 pixels.
6.
Activate the image 4thjuly – edit - copy.
Edit - pasta as a new layer on the image.
Selections – invert –click at the delete key.
Selection - select none.
Layers – arrange – move down.
7.
Activate raster 2.
Layers – merge – merge down.
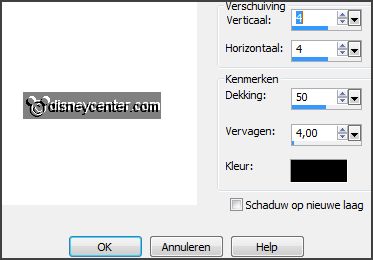
Effects - 3D Effects – drop shadow –
with this setting.
8.
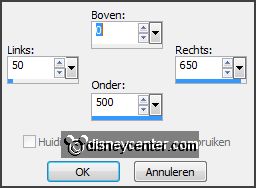
Activate selection tool – custom selection –
with this setting.
Selections – invert.
Layers – new raster layer.
Set the background back to color #405690 (blue).
Fill the selection with the background color.
Selections – select none.
9.
Image – add borders –
with this setting.
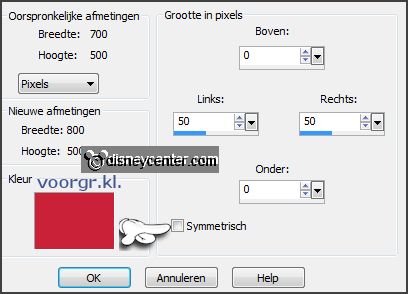
Image – add borders – symmetric 10 pixels –
color white.
Select with the magic wand – the red and blue border – left and right side.
Promote selection to layer.
Selections – select none.
Change in the layer palette the name in randen.
10.
Activate the tube mickey4thjuly – edit - copy.
Edit - pasta as a new layer on the image.
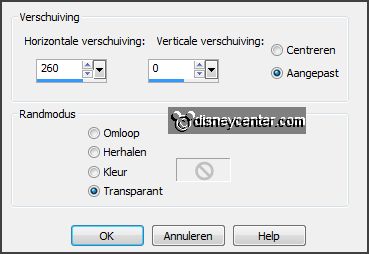
Effects – Image effects – offset –
with this setting.
Effects – 3D Effects – drop shadow – setting
is right.
11.
Activate text tool –
with this setting below.

Set in the material palette the foreground back to color and the background
color to white.
12.
Write 4 – change the size to 48 – write th –
convert to raster layer.
Activate move tool – move this right to the top – see example.
Effects – 3D Effects – drop shadow – setting
is right.
13.
Write of – convert to raster layer.
Place below – see example.
Effects – 3D Effects – drop shadow – setting
is right.
14.
Write july – convert to raster layer.
Place below – see example.
Effects – 3D Effects – drop shadow – setting
is right.
Layers - merge – merge down and 1 more time.
15.
Activate the tube Lacarolita_4th of July – edit - copy.
Edit - pasta as a new layer on the image.
Place this right at the bottom – see example.
Effects – 3D Effects – drop shadow – setting is right.
16.
Layers - new raster layer - put your watermark into the image.
Activate the bottom layer.
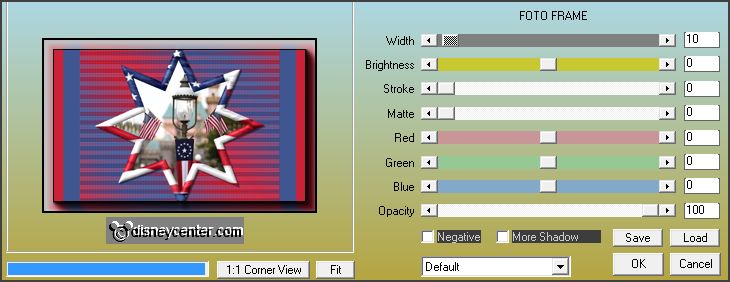
Effects – plug-ins – AAA Frames – Foto
Frame –
with this setting – click
OK.
17.
Activate the layer randen.
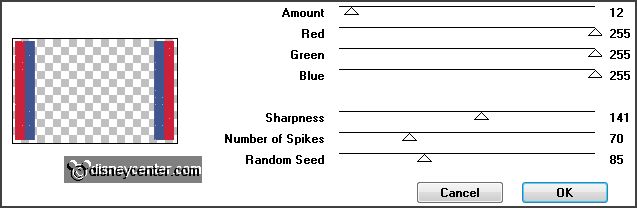
Effects – plug-ins – VM Natural –
Stardust –
with this setting – click
OK.
Edit – copy merged.
Open Animation Shop – edit – paste as a new animation.
18.
Back in PSP.
Click 1 time at Undo last command.

Repeat the plug-in - VM Natural – Stardust – now with Random Seed to 100 – the
others stay right.
Edit – copy merged.
In AS – paste after active frame.
19.
Back in PSP.
Click 1 time at Undo last command.
Repeat the plug-in - VM Natural –
Stardust – now with Random Seed op 115 – the
others stay right.
Edit – copy merged.
In AS – paste after active frame – be
sure the last frame is always selected.
20.
Animations – resize format animation –
with this setting.
File – save as – give name – click 3 times at next and than at finish.