
This
Tutorial is copyrighted to the Tutorial Writer, © Emmy Kruyswijk 2009.
This Tutorial
may
not be forwarded, shared or otherwise placed on any Web Site or group without written
permission from
Emmy Kruyswijk
Do you want to link my lessons?
Please send
me a mail.
Materials:
Download
here
2
Disney tubes,
1 mask, 1 animation, 1 tube, 1image, font Pump Demi Bold
LE.
filter:
Filter Unlimited - Sandflower
Specials - sparkle 3,
Screenworks - Holy Dot.
Download here
Put the plug-ins in the folder plug-ins, and the mask in the
folder mask.
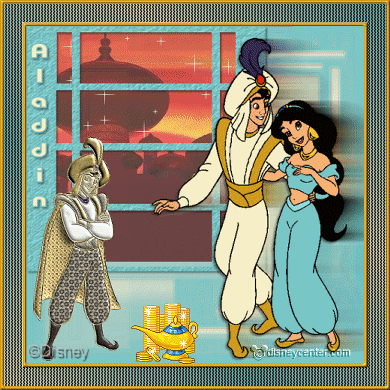
Aladdin.
foreground color #7bc6c6 and
background color #f7efc6
1. Open new image 600x600.
2. Fill this with the background color #f7efc6.
3. New raster layer - fill this with the foreground color #7bc6c6
4. Copy aladjasmine and paste as a new layer.
5. Place this in the left upper corner.
6. Copy the tube window and paste as a new layer.
7. Effects - 3D Effects - drop shadow with this setting.

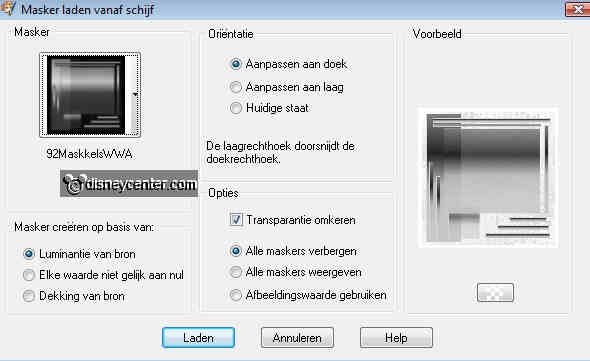
8. Layers - Load/Save Mask - Load Mask from Disk.
9. Stay at raster 2.
10. Look for 92MaskkelsWWA with this setting.
11. Layers - Merge - Merge group.
12. Give the same drop shadow as in point 7.
13. Effects - Edge Effects-enhance.
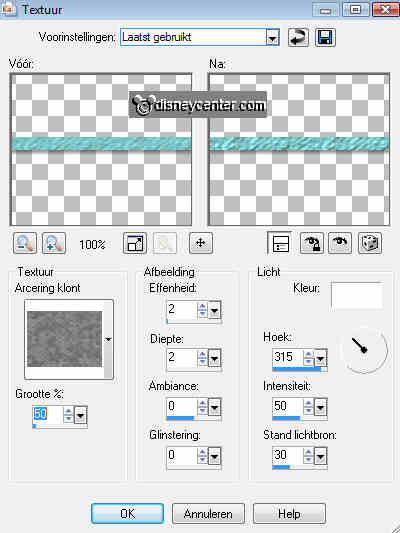
14. Stay at raster 4.
15. Effects - Texture effects - textur3 - Hatch lump.
16. Go to selection tool - selection - rounded rectangle - and draw a rectangle
as shown below.
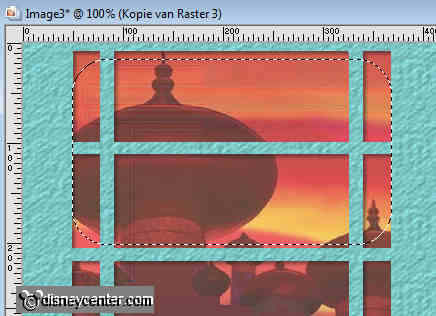
17. Stay at raster 3 - duplicate 3 times.
18. Lock the 2 copies on top and go back to the first copy.
19. Effects - Filter Unlimited - Sandflower Specials - sparkle 3 with this
setting.
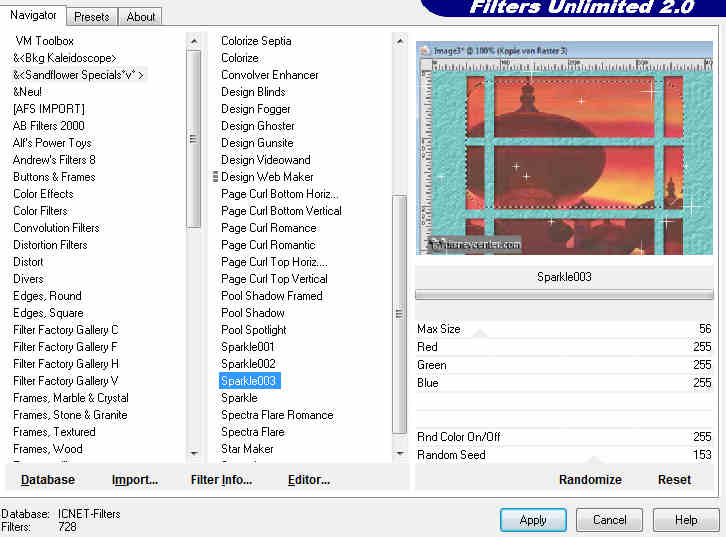
20. Lock copy of raster 3 and open copy(2) of raster 3.
21. Repeat point 19 but now random seed on 64.
22. Lock copy(2) of raster 3 and open copy(3) of raster 3.
23. Repeat point 19 but now random seed on 206.
24. Selections - select none.
25. Copy the tube Aladdin and paste as a new layer.
26. Place this at the right side on the bottom
27. Duplicate this layer.
28. Stay on the tube layer.
29. Effects - Distortion Effects - Wind from left 100.

30. Copy the tube aladdin1 and paste as a new layer.
31. Place this left at the bottom.
32. Go to text tool - font Pump Demi Bold LE - size 36 - direction vertical.

33. Write Aladdin - place this at the left side see example.
34. Give the same drop shadow as in point 7.
35. Put your watermark into the image.
36. Image - Resize 75%.
37. Image - Canvas size - width 460 - height 460.
38. Stay on group raster 2 - select the transparent border
39. New raster layer - Fill this with #ce9c21
40. Let selection stay.
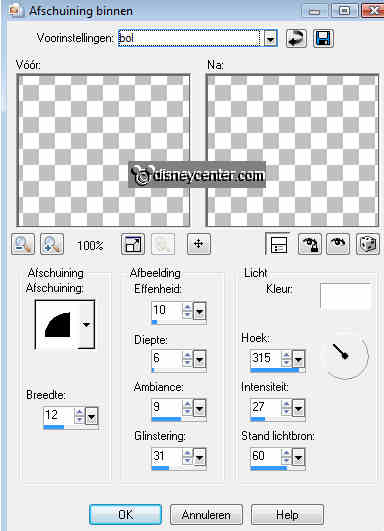
41. Effects - 3D Effects - Inner Bevel.
42. Selections - select none.
43. Image - Canvas size - width 510 - height 510.
44. Stay on group raster 2 - select the transparent border
45. Set the foreground color back to # 7bc6c6
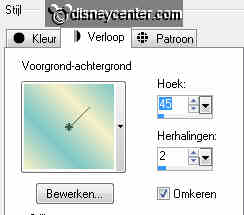
46. New raster layer - Fill this with gradient radial.
47. Let selection stay.
48. Effects- Screenworks - Holy Dot.
49. Selections - select none.
50. Image - canvas size - width 520 - height 520.
51. Stay at the layer above the group layer raster 2 - select the
transparent border
52. New raster layer - Fill this with #ce9c21
53. Give the same Inner Bevel as in point 41.
54. Selections - select none.
55.Lock all 3 copy layers with the sparkles.
56. Stay on the bottom layer.

57. Edit - Copy Merged
58. Open animation shop - paste as a new animation.
59. Back in PSP - lock raster 3 and open the copy of raster 3.
60. Edit - Copy Merged
61. Back in animation shop - paste after current frame.
62. Back in PSP - lock copy of raster 3 and open the copy(2) of raster 3.
63. Edit - Copy Merged
64. Back in animation shop - paste after current frame.
65. Back in PSP - lock copy(2) of raster 3 and open the copy(3) of raster 3.
66. Edit - Copy Merged
67. Back in animati0n shop - paste after current frame.
68. Open the animation cutil31313 - edit - select all.
69. Go back to the 4 frames of the image - edit - select all.
70. Click at the animation - copy
71. Click in the first frame of the image - paste in selected frame.
72. Place this in the middle of the bottom.
73. Animation - Properties of frame on 20.
74. Animation - Resize animation 75%.
75. File - save as - give name - click 3 times at next and than at finish.
Ready is the tag
I hope you like this tutorial.
greetings Emmy,
lesson written nov.2009
