1. Set the foreground in the material palette a light color from the
tube and the background at a dark color from the tube.
You can do this with your eyedropper on the color of your tube.
2. Open new transparent image 700x700.
3. Selections – select all.
4. Open from the scrapkit Magic by_Mago74 papier (18) – edit –
copy.
5. Edit – paste into selection.
6. Selections – select none.
7. Open uit de scrapkit Magic by_Mago74 ramka (10)
8. Image – resize – 2 times 50% - all layers checked.
9. Edit – copy
10. Edit – paste as a new layer on the image.
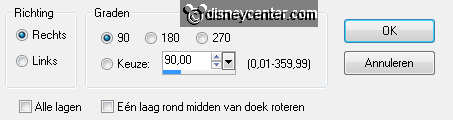
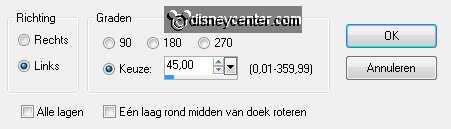
11. Image – free rotate – with this settings.
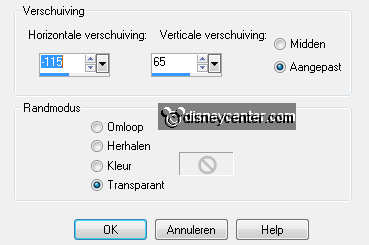
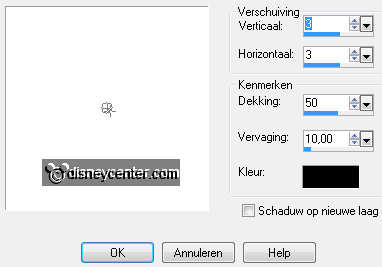
12. Effects – Image Effects – Offset – with this settings.
13. Edit – paste (stays in memory) as a new layer on the image.
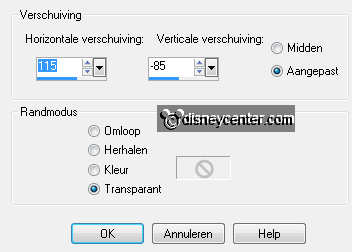
14. Effects – Image Effects – Offset – with this settings.
15. Make raster 2 active.
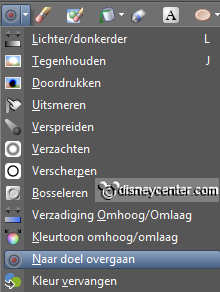
16. Activate the magic wand – with this settings.

17. Select inside the frame.
18. Selections – modify – expand 7px.
19. Open uit de scrapkit Magic by_Mago74 papier (9) –Image –
resize 25% - all layers checked.
20. Edit – copy.
21.Edit – paste as a new layer on the image.
22. Selections – invert – click at the delete key.
23. Selections – select none.
24. Layers – arrange – move down.
25. Effects – Artistic Effects – Solarize – threshold 145.
26. Make the top layer active.
27. Open your tube 480 high – edit – copy.
28. Edit – paste as a new layer on the image.
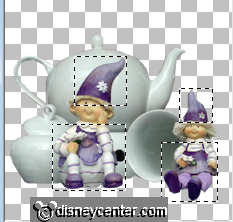
29. Activate Move Tool – place the tube at the left
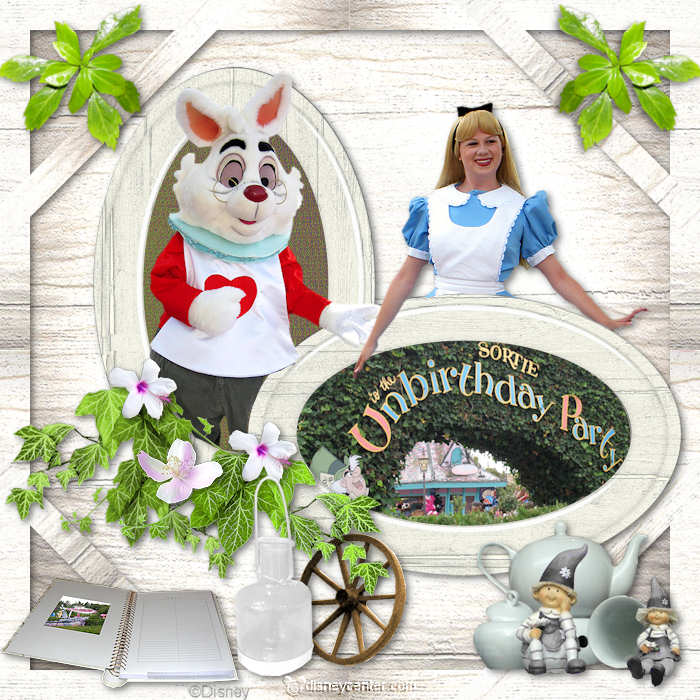
frame. see example.
30. Set the opacity of this layer at 35
31. Activate free hand selection tool (lasso) – point to point.
32. Make a selection as below.
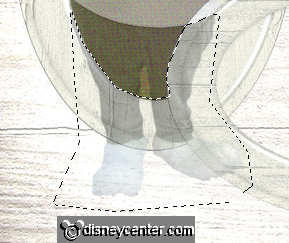
33. Click at the delete key.
Selections - select none.
34. Set the opacity of this layer back to 100.
35. Make raster 3 active.
36. Activate selection tool – rectangle - and make a selection as
below.
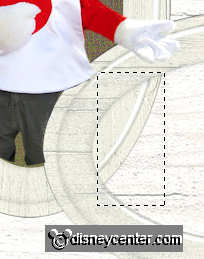
37. Make raster 2 active – click at the delete key.
38. Selections – select none.
39. Make raster 3 active.
40. Activate the magic wand –the settings are good.
41. Select inside the frame.
42. Selections – modify – expand 7px.
43. Open your image 400 width– edit - copy.
44. Edit – paste as a new layer on the image.
45. Activate Move Tool – move the layer at the layer on the selection.
46. If the image stay good – selections – invert.
47. lick at the delete key.
48. Selections – select none.
49. Layers – arrange – move down.
50. Make the top layer active.
51. Open tour tube 525 high – edit – copy.
52. Edit – paste as a new layer on the image.
53. Put the tube at the right frame – with the half above.
54. This may look different by other tubes
55. Activate free hand selection tool (lasso) – point to point.
56. Make a selection as below.
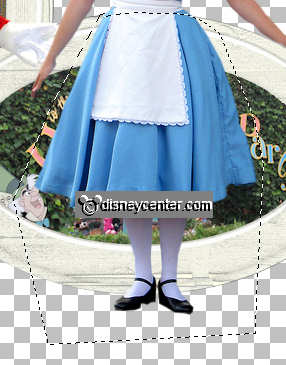
57. Click at the delete key.
58. Selections – select none.
59. Lock raster 1 – by clicking at the eye in the layers palette.
60. Stay at the layer above.
61. Layers – merge – merge all visible.
62. Open raster 1.
63. Effects – 3D Effects – drop shadow – with this settings.
64. Open from the scrapkit Magic by_Mago74 el (72) – Image – resize –
1 times 50% - 1 time 75% - all layers checked.
65. Edit – copy.
66. Edit – paste as a new layer on the image.
67. Put this at the left frame at the bottom – see example.
68. Effects – 3D Effects – drop shadow – settings are good.
69. Open uit de scrapkit Magic by_Mago74 el (71) – Image –
resize – 2 times 50% - all layers checked.
70. Edit – copy.
71. Edit – paste as a new layer on the image.
72. Put this right from the leaves – against the other frame.
73. Effects – 3D Effects – drop shadow – settings are good.
74. Layers - merge – merge down.
75. Open from the scrapkit Magic by_Mago74 el (20 – Image – resize 10%
- all layers checked.
76. Adjust – sharpness – sharpen.
77. Edit – copy.
78. Edit – paste as a new layer on the image.
79. Put this in the middle of the leaves – see example.
80. Effects – 3D Effects – drop shadow – settings are good.
81. Open from the scrapkit Magic by_Mago74 el (9) – Image –
resize 10% - all layers checked.
82. Adjust – sharpness – sharpen.
83. Image – mirror.
84. Edit – copy.
85. Edit – paste as a new layer on the image.
86. Put this left above the leaves – see example.
87. Effects – 3D Effects – drop shadow – settings are good.
88. Layers - duplicate
89. Put this right above the leaves.
90. Lock the 2 bottom layers, by clicking at the eye in the layers
palette.
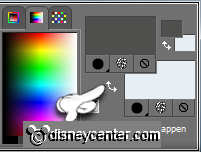
91. Stay at the layer above.
92. Layers – merge – merge all visible.
93. Open the 2 bottom layers.
94. Open from scrapkit Magic by_Mago74 el (57) – Image –
resize – 2 times 50% - all layers checked.
95. Edit – copy.
96. Edit – paste as a new layer on the image.
97. Image – mirror.
98. Effects – Image Effects – Offset – with this settings.

99. Effects – 3D Effects – drop shadow – settings are good.
100. Layers – arrange – move down.
101. Make the top layer active.
102. Change in the material palette the for- and background color by
clicking at the little arrow between the colors.
103. The dark color is now foreground color.
104. Open from the scrapkit Magic by_Mago74 el (69)
105. Activate selection tool – rectangle – make 4
selections – as below.
106. Go in the toolbar tools – to Change to Target Brush.
107. Set the size at 10.
108. Make all what is purple in the dark color.
109. If the purple color corresponds with your colors you can skip
step 105 t/m 108
110. Only not this - Open from the scrapkit Magic by_Mago74 el (69)
111. Selections – select none.
112. Image – resize – 2 times 50% - all layers checked.
113. Edit – copy.
114. Edit – paste as a new layer on the image.
115. Put this right at the bottom.
116. Effects – 3D Effects – drop shadow - settings are good.
117. Open from scrapkit by_Mago74 el (105) – Image –
resize – 2 times 50% -1 time 75% - all layers checked.
118. Edit – copy.
119. Edit – paste as a new layer on the image.
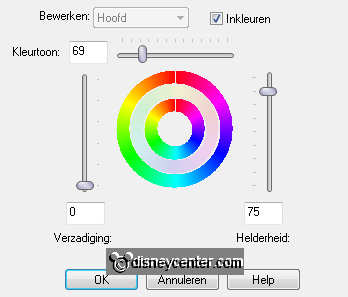
120. Adjust – Hue and Saturation –
Hue/Saturation/Lightness – with this settings.
121. Put this to the left of the wheel.
122. Effects – 3D Effects – drop shadow – settings are good.
123. Make raster 1 active.
124. Edit – copy.
125. Edit - paste as a new image.
126. Selections – select all.
127. Selections – modify – contract 30.
128. Selections – invert.
129. Effects – plug-ins – DC Special – PaternEditDo – click OK
130. In the layers palette – promote selection to layer.
131. Selections – select none..
132. Layers duplicate.
133. Image – free rotate – with this settings.
134. Layers - merge - merge down.
135. Edit – copy.
136. Be sure that the bottom layers is activated.
137. Edit – paste as a new layer on the existing image..
138. Effects – 3D Effects – drop shadow – settings are good.
139. Make the top layer active.
140. Open uit de scrapkit Magic by_Mago74 el (73) – Image – resize – 2
times 50% - 1 time 85% - all layers checked.
141. Edit – copy.
142. Edit – paste as a new layer on the image.
143. Put this in the left upper corner – see example.
144. Image – free rotate – left 5.
145. Effects – 3D Effects – drop shadow – settings are good.
146. Layers – duplicate
147. Image - mirror.
148. Open from the scrapkit Magic by_Mago74 el (88).
149. Activate free hand selection tool – point to point .
150. Make a selection – as below.

151. Open your image 250 width – edit – copy.
152. Edit – paste into selection.
153. Maybe you should before you paste rotate, I did not do this
154. Selections – select none.
155. Image – resize 20% - all layers checked.
156. Adjust – sharpness – sharpen.
157. Edit – copy.
158. Edit – paste as a new layer on the image.
159. Put this left at the bottom – see example.
160. Effects – 3D Effects – drop shadow - settings are
good.
161. Layers - new raster layer – put your name or watermark into
the image.
162. Layers – merge – merge all.
163. File – export – JPEG Optimizer.