Before you begins.......
Plug-ins : Install first your plug-ins before you open PSP and put
them in the folder plug-ins.
Open your tubes PSP.
Princess Aurora
1.
Open new transparent image 700x500.
Selections - select all
Copy Disneyland20California and paste as a new layer.
Selections - select none.
2.
Adjust - blur - Gaussian blur - radius 20. Repeat this.
Duplicate this layer - Image - flip.
Put the opacity of this layer at 50.
Layers - merge - merge down.
3.
Copy California1 and paste as a new layer.
Place this in the right upper corner.
Set the Blend Mode of this layer at screen.
4.
Copy castlecal and paste as a new layer.
Place this at the bottom left.
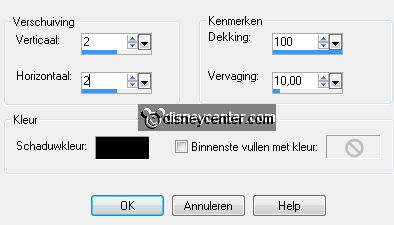
Effects - FM Tile Tools - Blend Emboss - default setting.
Layers - merge - merge all.
5.
Image - add border 20 color #4a6289
Image - add border 5 color #9ea19d
Image - add border 20 color #4a6289
6.
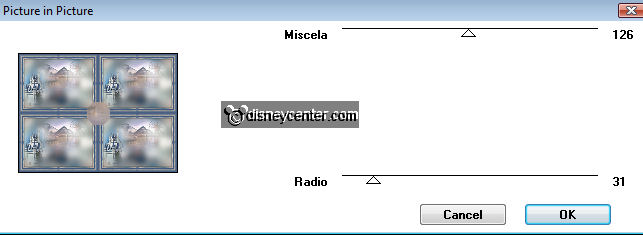
Select the first blue border.
Effects - Italia Editors Effect - Picture in picture - with this setting.
Effects - FM Tile Tools - Blend Emboss - default setting.
Selections - select none.
7.
Select the second blue border.
Repeat the Picture in picture and the Blend Emboss.
Selections - select none.
8.
Selections - select all - selections - contract 45
Effects - 3D Effects - Cutout with this setting.
Repeat Cutout but now with -2.
Image - add border 2 color #9ea19d.
9.
Copy disney-logo and paste as a new layer.
Place this left at the bottom.
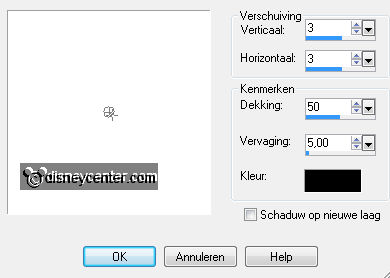
Effects - 3D Effects - Drop Shadow with this setting.
10.
Copy psp1FDI.tmp and paste as a new layer.
Image - Resize 75% - all layers not checked.
Place this right at the bottom.
11.
Layers - arrange - move down.
Lock raster 2 .
Copy Beauty with rose and paste as a new layer.
Place this also right at the bottom.
Give the same drop shadow as in point 9.
12.
Copy Sleeping Beauty 117 and paste as a new layer.
Place this as below.
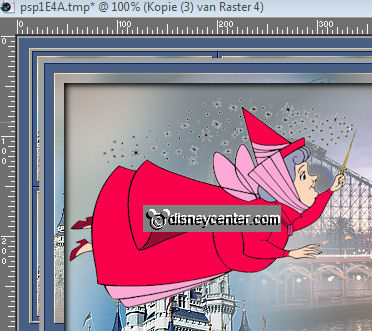
Duplicate this layer 3 more times.
Place them as below.
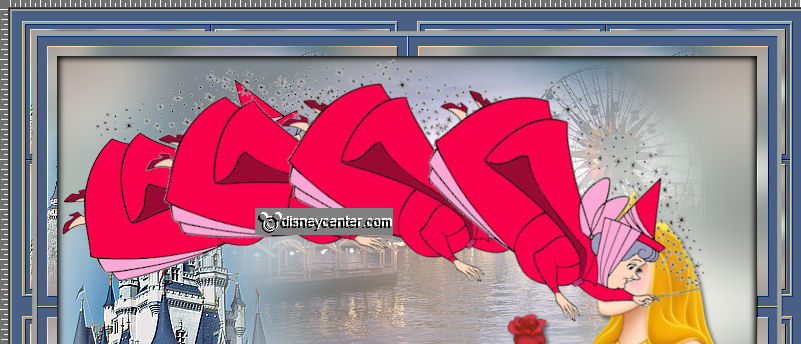
13.
Stay at copy of raster 4
Image - free rotate 20 right.
Stay at copy(2) of raster 4
Image - free rotate 40 right.
Stay at copy(3) of raster 4
Image - free rotate 60 right.
14.
Lock all layers, except the bottom, raster 1 and raster 2.
Edit - Copy merged.
Open Animation shop.
15.
In Animation Shop - paste as a new animation.
Back in PSP - Lock raster 2 and open raster 4
Edit - Copy merged.
Back in AS - paste after current frame. Be care that the last frame is always
selected.
16.
Back in PSP - Lock raster 4 and open copy of raster 4.
Edit - Copy merged.
Back in AS - paste after current frame.
17.
Back in PSP - Lock copy of raster 4 and open copy(2) of raster 4.
Edit - Copy merged.
Back in AS - paste after current frame.
18.
Back in PSP - Lock copy(2) of raster 4 and open copy(3) of raster 4.
Edit - Copy merged.
Back in AS - paste after current frame.
19.
Back in PSP - Lock copy(3) of raster 4 and open raster 3
Edit - Copy merged.
Back in AS - paste after current frame.
20.
In animation shop - Animation - Frame Properties,
Set the first frame at 100.
second, third, and fourth frame at 50
fifth frame at 75.
sixth frame at 150.
21.
Animation- Resize animation 75%.
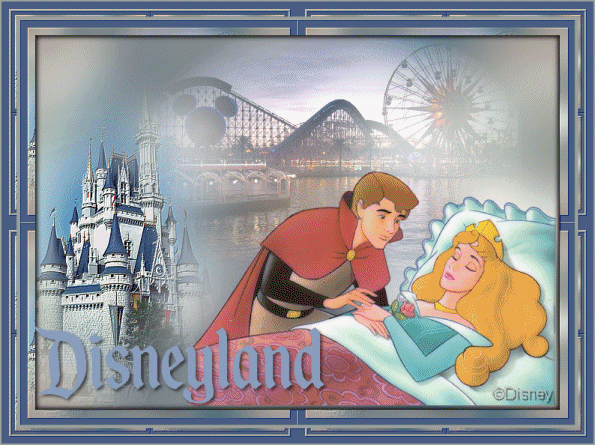
File - save as - give name - click 3 times at next and than finish.
Ready is the tag
I hope you like this tutorial.
greetings Emmy

Tutorial written
14-07-2011