
This
Tutorial is copyrighted to the Tutorial Writer, © Emmy Kruyswijk October 2011.
This Tutorial
may
not be forwarded, shared or otherwise placed on any Web Site or group without written
permission from
Emmy Kruyswijk
Do you want to link my lessons?
Please send
me a mail.
Materials:

1 misted tube
from
Kathy, 3
tubes, 1 misted tube, 1 selection all made by me, 1 tube
unknown,
2 pattern, 2 fonts
filter: AAA Frames - Foto Frames, Download
here
Before you begins......
Put the plug-ins in the folder plug-ins.
Put the selection in the folder selection and
the patterns in the folder patterns
Open the
tubes in PSP
Back in Time
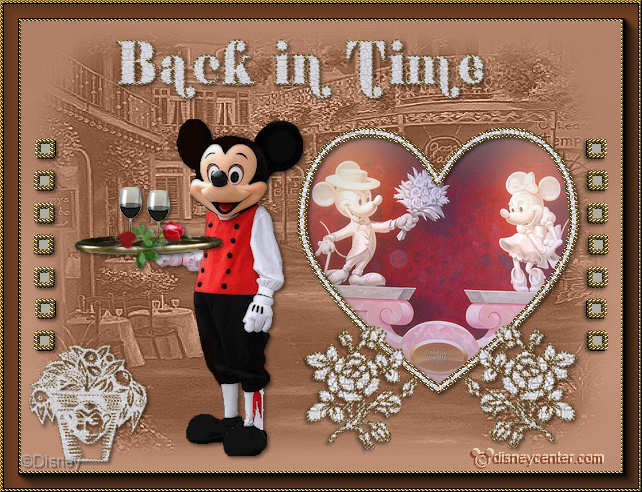
Foreground color #afada2 and background color #78492f
1.
Open new transparent image 6oox450.
Fill this with the background color.
New raster layer - fill this with the foreground color.
2.
Open JazzCafe and close the eye by watermark in the layers.

Make Mist active.
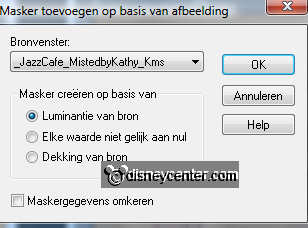
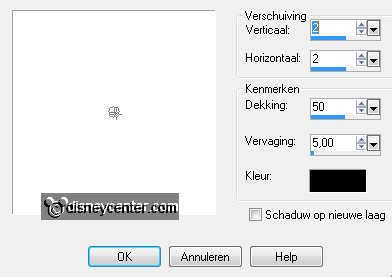
Layers - new mask layer - from Image - with this setting.
Layers - merge - merge group.
3.
Effects - Edge Effects - enhance.
Set the blend mode of this layer at op luminance (Legacy).
New raster layer.
Selections - load/save selection - Load selection from disk - look for
blokjesEmmy
Fill this with the foreground color.
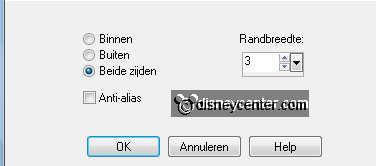
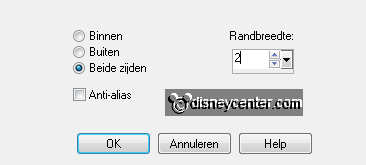
Selections - modify - select selection borders - with this setting.
Fill this with the gold pattern - angle 0 - scale 100.
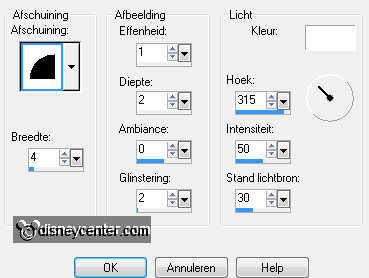
Effects - 3D Effects - Inner Bevel - with this setting.
Effects - 3D Effects - drop shadow - with this setting.
Duplicate this layer - image - mirror.
4.
Go to Preset Shape Tool and find Hart1 - turn the colors - foreground closed -
pull a heart of 270x250.

Convert to raster layer.
Select the heart with the magic want.
New raster layer - selections - modify - select selection borders - with this
setting.
Fill this with the gold pattern - angle 0 - scale 100.
New raster layer - selections - modify - select selection borders - now with 3.
Fill this with the pattern gebarsten verf - Angle 0 - scale 50.
Layers - arrange - move down
Selections - select none.
Layers - merge - merge down.
5.
Effects - 3D Effects - inner bevel - with same setting as in point 3.
Go to raster 3 - click with your magic wand in the middle of the heart.
Copy mmhart - paste as a new layer at the image.
Move it so, as in the example.
Selections - invert - click on the delete key of your keyboard.
Layers - merge - merge down.
Layers - merge - merge down.
6.
Set foreground on gold pattern and background on gebarsten verf pattern.
Go to text tool - font design3 - size 125 - stroke width 2.0 - line style on
dot.

Write the capital letter K - convert to raster layer.
Give the same drop shadow as in point 3.
Place this to the right side of the heart at the bottom.
Duplicate this layer - image - mirror.
Place this at the left side of the heart at the bottom.
7.
Copy miclord1 and paste as a new layer on the image.
Image - resize 80% - all layers not checked.
Give the same drop shadow as in point 3.
Place this left of the heart, see example.
Copy schaal and paste as a new layer on the image.
Give the same drop shadow as in point 3.
8.
Copy wijnglas and paste as a new layer on the image.
Image - resize 50% - all layers not checked.
Give the same drop shadow as in point 3.
Place this on the schaal - duplicate this layer - place this near the other
glass.
Copy V-Beautiful ValentineRose and paste as a new layer on the image.
Give the same drop shadow as in point 3.
Image - resize 50% - all layers not checked.
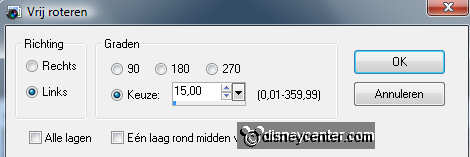
Place this also on the schaal - image - free rotate - left 15.
9.
Layers - merge - merge down and one more time. (take a look, if you move the
tube that everything goes with)
Go to text tool - everything stays right- change only the stroke width in 1.0
Write the capital letter H - You can also do something else.
Give the same drop shadow as in point 3.
10.
Chance the font in Shifty Chica - size at 72.
Write Back in Time -
Give the same drop shadow as in point 3.
Place this in the middle at the top.
11
New raster layer - set your watermark into the image.
Image - add border 3 - color white.
Select the white border - fill this with gold pattern.
Give the same inner bevel as in point 3.
Image - add border 15 - background color.
Effects - AAA Frames - Foto frames - with this setting.
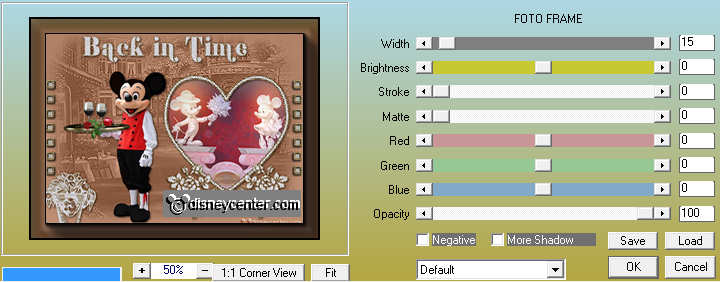
Image - add border 3 - color white.
Select the white border - fill this with gold pattern.
Give the same inner bevel as in point 3.
File - export - JPEG optimizer.
Ready is the tag
I hope you like this tutorial.
greetings Emmy,
Tested by Bep
Tutorial written
12-10-2011
