3 Disney tubes, 1 selection, font
Capsule,
filter: Alien Skin Eye Candy Impact - Glow 2.1 ,
Download
here
Before you begins.......
Plug-ins : Install first your plug-ins before you open PSP and put
them in the folder plug-ins.
The selection in the folder selections.
Open the font and minimize .
Open your tubes.
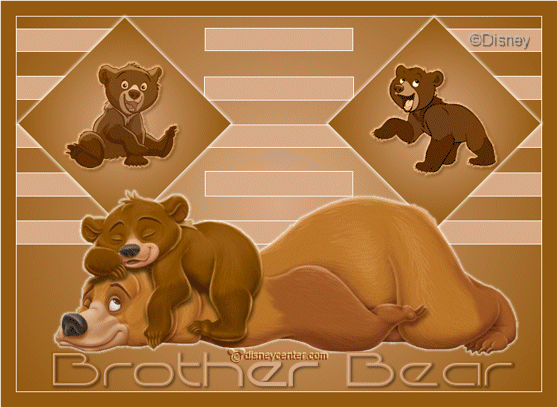
Brother Bear
foreground color #955910 and background color #d9ab88.
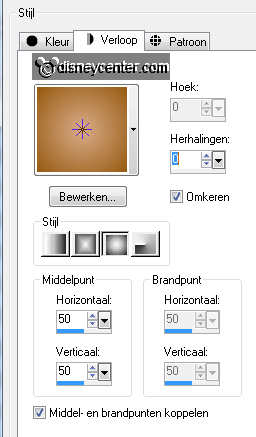
1.
Open new transparent image 700x500.
Fill this with the gradient sunburst - with this setting.
2.
New raster layer.
Selections - Selections load/save as - Selections load from disk- look for BR-7.
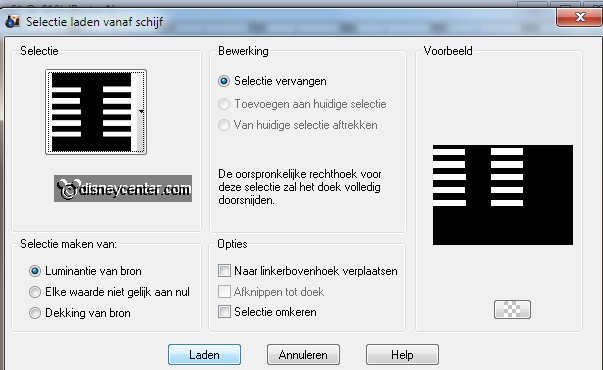
Fill this with the background color.
Selections - select none.
3.
Duplicate this layer - image - mirror.
Layers - merge - merge down.
Effects - enhance - enhance more.
4.
Image - add border 1 - color white.
Image - add border 20 - foreground color.
Image - add border 1 - color white.
5.
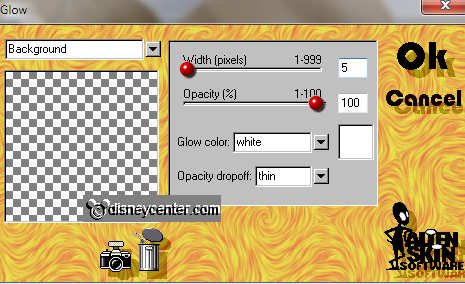
Copy GD_BrotherBear and paste as a new layer.
Place this 80 pixels from the bottom.
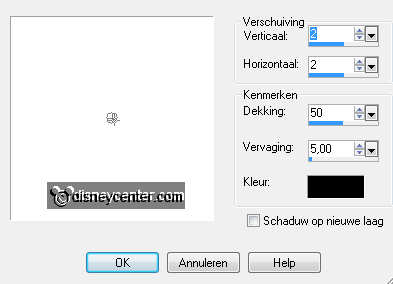
Effects - Alien Skin Eye Candy - Impact - Glow 2.1 with this setting.
6.
Go to text tool - font Capsule - size 72.
Write Brother Bear - place this below the tube.
Effects - 3D Effects - drop shadow with this setting.
7.
New raster layer - Go to selection tool - selection - square.
And pull a square of 200x200 - fill this with the gradient.
Selections - select nonen.
Image - free rotate 45 right.
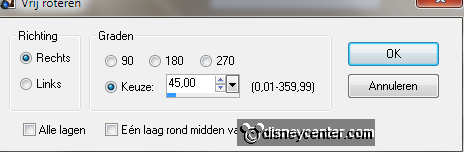
Plaace this in the left upper corner.

8.
Effects - Alien Skin Eye Candy - Impact - Glow 2.1- same setting as in point 5,only width
at 7.
Duplicate this layer - image - mirror.
Layers - merge - merge down.
Layers - arrange - move down - move down.
9.
Copy brother bear 2 and paste as a new layer.
Set the blend modes at luminance (Legacy)
Give the same Alien Skin - glow as in point 5.
Give the same drop shadow as in point 6.
10.
Copy brother bear 63 and paste as a new layer.
Set the blend modes at luminance (Legacy).
Give the same Alien Skin - glow as in point 5.
Give the same drop shadow as in point 6.
11.
Stay at the bottom layer.
Copy bbtotum and paste as a new layer.
Duplicate this layer 10 times.
Set the opacity of the original tube layer at 0, add 10 to each. The last copy
layer must have 100.
12.
New raster layer - put your watermark into the image.
Image - resize 75% - all layers checked.
Lock all totum layers, except the first.
Stay at the bottom layer
13.
Edit - copy merged. Open animation shop - paste as a new animation.
Back in PSP - lock the first layer and open the copy layer.
Edit - copy merged.
In AS - paste after active frame - Keep always the last frame is selected.
14.
Back in PSP - lock the copy layer and open the copy(2) layer.
Edit - copy merged.
In AS - paste after active frame
Back in PSP - lock the copy(2) layer and open the copy3) layer.
Edit - copy merged.
In AS - paste after active frame
Back in PSP - lock the copy(3) layer and open the copy(4) layer.
Edit - copy merged.
In AS - paste after active frame
Back in PSP - lock the copy(4) layer and open the copy(5) layer.
Edit - copy merged.
In AS - paste after active frame
Back in PSP - lock the copy(5) layer and open the copy(6) layer.
Edit - copy merged.
In AS - paste after active frame
Back in PSP - lock the copy(6) layer and open the copy(7) layer.
Edit - copy merged.
In AS - paste after active frame
Back in PSP - lock the copy(7) layer and open the copy(8) layer.
Edit - copy merged.
In AS - paste after active frame
Back in PSP - lock the copy(8) layer and open the copy(9) layer.
Edit - copy merged.
In AS - paste after active frame
Back in PSP - lock the copy(9) layer and open the copy(10) layer.
Edit - copy merged.
In AS - paste after active frame
15.
Edit - select all - Animation - Frame properties atop 75.
Put the first and last frame 125.
16.
File - save as - click 3 times at next and than at finish.
Ready is the tag
I hope you like this tutorial.
greetings Emmy

Tutorial written
06-06-2011