|

This
Tutorial is copyrighted to the Tutorial Writer, © Emmy Kruyswijk 2011.
This Tutorial
may
not be forwarded, shared or otherwise placed on any Web Site or group without written
permission from
Emmy Kruyswijk
Do you want to link my lessons?
Please send
me a mail.
Materials:
download
here
1 Disney tube,
3 tubes van
Marjan, 1 masker, 1
font
Metropolis NF
filters:
Xero - Fritillary,
FM Tile Tools - Blend Emboss.
Download
here
Before you begins.......
Filters : Install first your plug-ins before you open PSP and put
them in the folder plug-ins.
Put the mask in the folder mask.
Open your tubes in PSP
Open the font and minimize
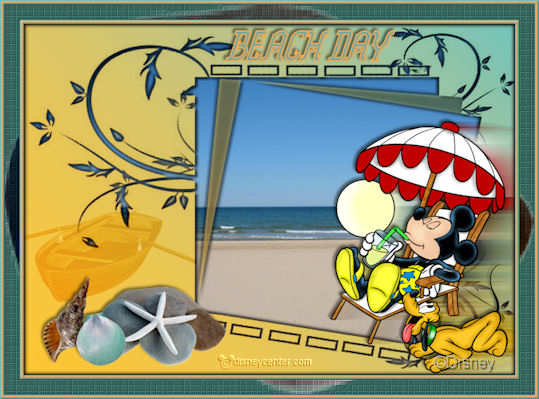
Beach Day
Foreground color
#eca950 and background color #79a8a0
1.
Open new image 700x500 - Selections - select all.
Copy the Beach - and paste in the selection.
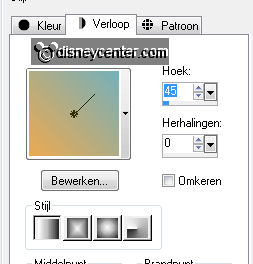
2.
New raster layer - Fill this with the gradient linear.
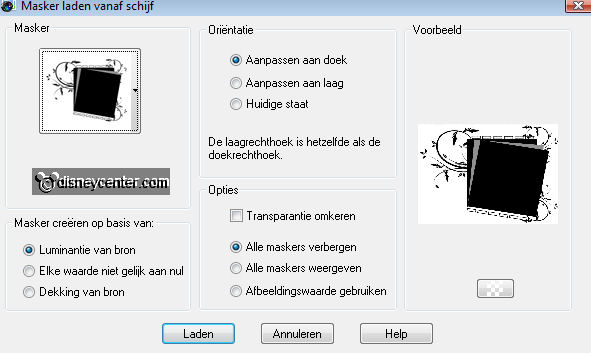
Layers - Load/Save Mask - Load Mask from Disk - with this setting.
Layers - merge - merge group.
3.
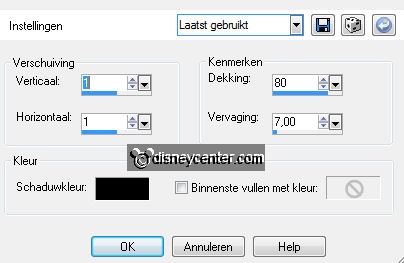
Effects -3D Effects - drop shadow with this setting.
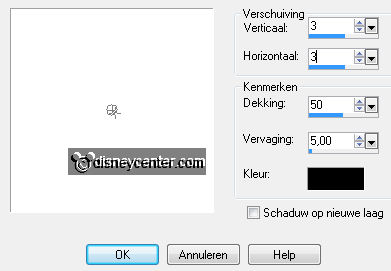
Repeat the drop shadow, but now with -3.
Duplicate this layer - Put the Blend mode on overlay.
Layers - merge - Merge down.
4.
Copy the row boat2 - and paste as a new layer.
Image - Resize 75% - Resize all layers not checked.
Place this left and 100 pixels of the bottom.
Put the Blend mode on Soft Light.
5.
Copy EL36 - and paste as a new layer.
Place this left in the corner. Image - Flip.
Give the same drop shadow as in point 3.
6.
Copy EL37 - and paste as a new layer.
Place this left near the other shell.
Image - Resize 50% - Resize all layers not checked.
Give the same drop shadow as in point 3.
7.
Copy EL40 - and paste as a new layer.
Place this near the second shell at the bottom.
Give the same drop shadow as in point 3.
Layers - arrange - move down.
Layers - merge - merge down -
Layers - merge - merge down.
8.
Copy Mickey 27 - and paste as a new layer.
Place this right at the bottom.
Duplicate this layer -
Give the same drop shadow as in point 3.
9.
Go back to the original tube layer.
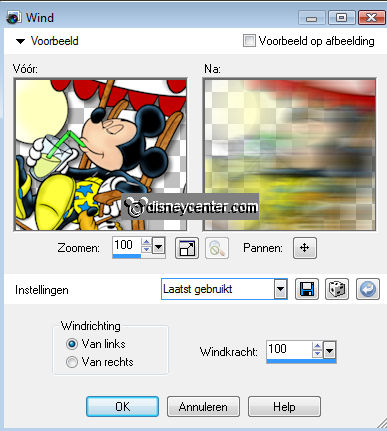
Effects - Distortion Effects - Wind - from right 100.
10.
Go to text tool - font Metropolis NF - size 60 - stroke width
1.
Set your foreground color on #eca950 and your background color on #79a8a0
Write - Beach Day - Convert to raster layer.
Give the same drop shadow as in point 3.
Place this at the top, between the 2 doodles of the mask.
11.
Image - add border 1 - color black.
Image - add border 2 - background color.
Image - add border 2 - foreground color.
Image - add border 2 - background color.
12.
Selections - select all - selections - modify - contract 7.
Effects - 3D Effects - Cutout - with this setting.
Repeat Cutout - but now with -1.
Selections - Invert.
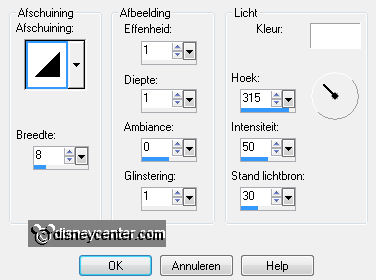
Effects - 3D Effects - Inner Bevel - with this setting.
Selections - select none.
13.
Image - add border 20 - background color.
Select the border - Copy EL40 - paste in the selection.
Selections - Promote selection to layer - Selections - select none.
Set the Blend mode of this layer on multiply.
14.
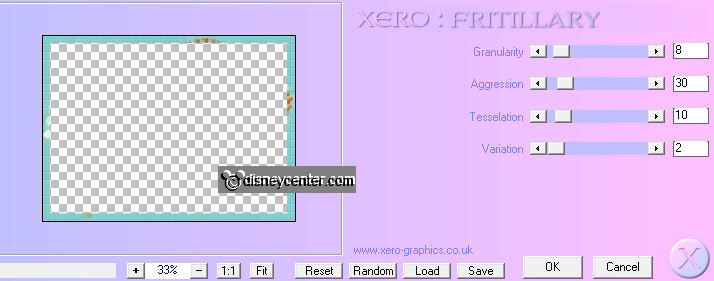
Effects - Xero - Fritillary - with this setting.
Effects - FM Tile Tools - Blend Emboss - default setting.
Repeat the FM Tile Tool - Blend Emboss.
15.
New raster layer - Put your watermark into the image.
Layers - merge - merge all layers.
16.
Image - add border 1 - color black.
Image - add border 2 - background color.
Image - add border 2 - foreground color.
Image - add border 2 - background color.
17.
Selections - select all - selections - modify - contract 6.
Selections - invert.
Give the same Inner Bevel as in point 12.
18.
Image - Resize 70% - Resize all layers checked.
File - export - jpeg optimizer.
Ready is the tag
I hope you like this tutorial.
greetings Emmy,

Tutorial written
06-02-2011
| 