|

This
Tutorial is copyrighted to the Tutorial Writer, © Emmy Kruyswijk 2011.
This Tutorial
may
not be forwarded, shared or otherwise placed on any Web Site or group without written
permission from
Emmy Kruyswijk
Do you want to link my lessons?
Please send
me a mail.
Materials:
download
here
3 Disney tubes, 1 mask, 1 font Renaissance. Animation shop.
Plug-ins: Filters Unlimited 2.0 - Paper Textures -
Japanese Paper,
Cybia - Screenworks - Grid Layout,
Xero - Porcelain,
Alien Skin Eye Candy 5 - Nature - Fire.
Download
here
Before you begins.......
Plug-ins : Install first your plug-ins before you open PSP and put
them in the folder plug-ins.
Put the mask in the folder Mask.
Open your tubes in PSP
Open the font and minimize
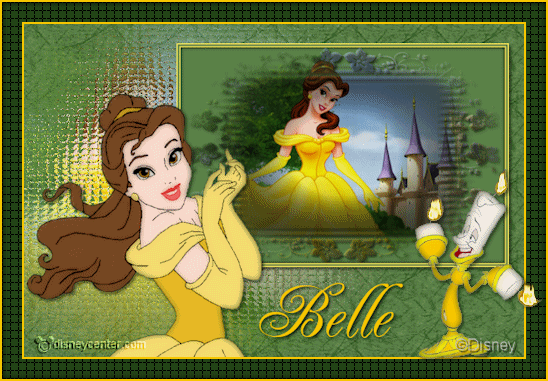
Beauty
Foreground color #f6c601 and background
color #5b8249
1.
Open a new image 600x400 - Fill this with the background color.
Copy the tube Disney Misted tube 30 and paste as a new layer.
2.
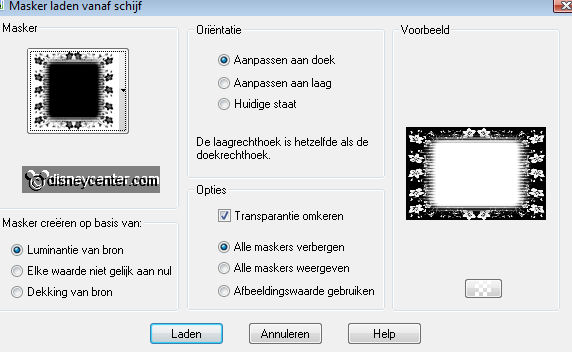
Layers - Load/Save Mask - Load Mask from disk.
Layers - merge - merge group.
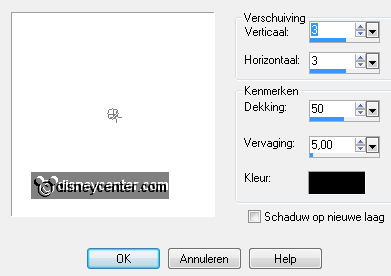
Effects - 3D Effects - drop shadow with this setting.
Repeat the drop shadow.
3.
Duplicate this layer - Set the blend mode at Multiply.
Layers - merge - merge down.
Layers - merge - merge down.
4.
Image - add border 2 - foreground color.
Image - add border 3 - background color.
Image - add border 2 - foreground color.
5.
Selections - select all - selections - modify - contract 7.
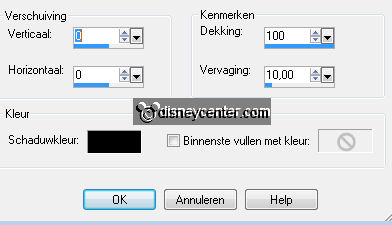
Effects - 3D Effects - Cutout - with this setting.
Selections - select none.
6.
Image - Resize 65% - resize all layers checked.
Open new image 600x400 - Fill with the background color.
Effects - Filters Unlimited 2.0 - Paper Textures - Japanese Paper - default
setting.
7.
Copy the tube Disney Misted tube 30 and paste as a new layer.
Move it to the left side.
Effects - Texture effects - Mosaic Glass - with this setting.
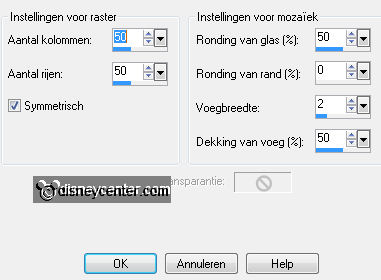
7.
Copy the previous image - and paste as a new layer.
Place this in the right upper corner. see example.
Give the same drop shadow as in point 2.
8.
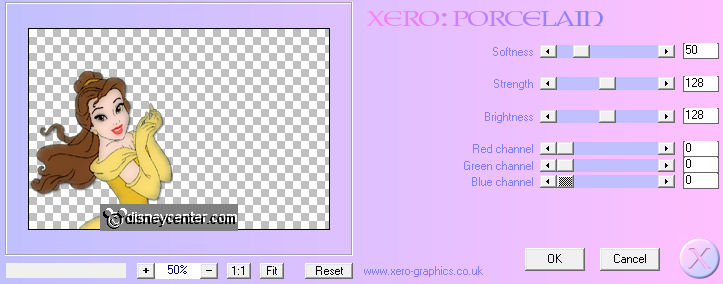
Copy the tube Beauty and the Beast111 and paste as a new layer.
Give the same drop shadow as in point 2.
Effects - Xero - Porcelain - with this setting.
9.
Go to text tool - font Renaissance - size 90 - change the colors - background #f6c601 -
foreground closed.
Write - Belle -
Give the same drop shadow as in point 2.
Place this at the bottom almost in the middle. see example.
Duplicate this layer - Layers - merge - merge down.
10.
New raster layer - Put your watermark into the image.
Layers - merge - merge all layers.
Image - Resize 500 - height adjusts to - resize all layers checked.
11.
Image - add border 2 - background color #f6c601
Image - add border 20 - foreground color #5b8249
Select the border - Effects - Cybia - Screenworks - Grid Layout - with this
setting.
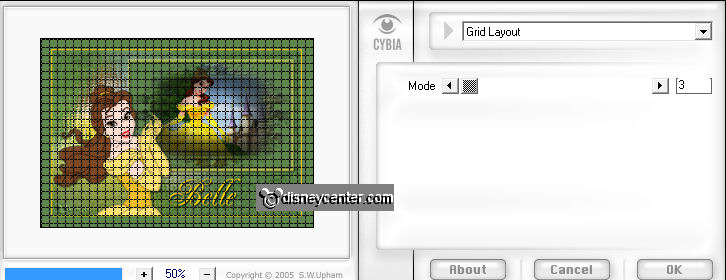
Selections - Promote selection to layer - set the blend mode of this layer at
multiply.
Selections - select none.
12.
Image - add border 2 - background color #f6c601
Selections - select all - selections - modify - contract 2.
Effects - 3D Effects - Cutout - with the same setting as in point 5.
Selections - select none.
13.
Copy the tube Beauty and the Beast 107 and paste as a new layer.
Place this right at the bottom, see example.
Give the same drop shadow as in point 2.
Effects - Xero - Porcelain - with the same setting as in point 8.
14.
Click at the Magic Wand - Freehand selection - Make the image larger with
Zoom-in.
Select the 3 Flames - hold the shift key.
Duplicate this layer twice.
Stay at raster 1 - Effects - Alien Skin Eye Candy 5 - Nature - Fire - with this
setting.
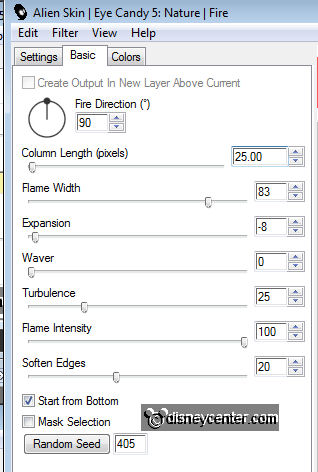
Stay at copy of raster 1 and repeat Alien Skin Eye Candy 5 - Fire - Everything
is right - click on the random Seed.
Stay at copy(2) of raster 1 and repeat Alien Skin again. Click only on the random Seed.
Selections - select none.
15.
Open animation shop.
Lock the top 2 layers - stay at the bottom layer.
Edit - Copy merged - in animation shop - paste as a new animation
Back in PSP - Lock raster 1 - and open copy of raster 1.
Edit - Copy merged - in animation shop
Paste after current frame - Watch that the last frame is always selected.
Back in PSP - Lock copy of raster 1 - and open copy(2) of raster
1.
Back in animation shop - Paste after current frame.
16.
File - save as - give name - click 3 times at next and than at finish.
Ready is the tag
I hope you like this tutorial.
greetings Emmy,

Tutorial written
11-03-2011
| 