This lesson is translated in
 by
Hélène
by
Hélène
Beware
foreground color #0c0c0c and background color #434038
1.
Open new transparent image 650x500.
Fill this with gradient linear - with this setting.

Open SD FN Moon - resize 50% - all layers checked.
Copy SD FN Moon and paste as a new layer.
Move this to the left upper corner.
2.
Open SD FN Skeleton - resize 50% - and 2 times more 65% - all layers checked.
Copy SD FN Skeleton and paste as a new layer.
Place this left - see example.
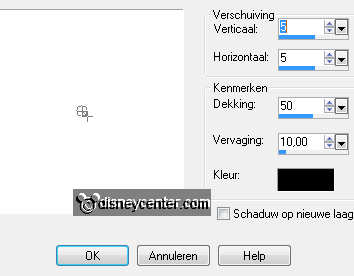
Effects - 3D Effects - drop shadow with this setting.
3.
Open SD FN Tree - resize 65% - all layers checked.
Copy SD FN Tree and paste as a new layer.
Place this right at the bottom.
Give the same drop shadow as in point 2.
4.
Open SD FN Tombstone - resize 50% - and one more time 50% - all layers checked.
Copy SD FN Tombstone and paste as a new layer.
Place this right for the tree.
Give the same drop shadow as in point 2.
Duplicate this layer - image - resize 75% - all layers not checked.
Place it diagonally for the other, see example.
Layers - merge - merge down.
5.
Open SD FN Tree2 - image - resize 50%- all layers checked.
Copy the tree2 and paste as a new layer.
Give the same drop shadow as in point 2.
Place this left - Layers - arrange - move down 4 times.
6.
Open SD FN Gate - resize 60% - all layers checked.
Make the top layer active.
Copy SD FN Gate and paste as a new layer.
Give the same drop shadow as in point 2.
Place this at the left side - see example.
7.
Copy junglegras and paste as a new layer.
Place this 20 pixels from the bottom.
Give the same drop shadow as in point 2.
Duplicate this layer - image - mirror.
Layers - merge - merge down.
Erase away any roots below the grass.
8.
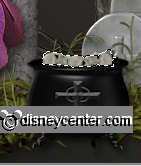
Open SD FN Cauldron - resize 50% - 1 time 75% - 1 time 65% - all layers checked.
Copy SD FN Cauldron and paste as a new layer.
Place it diagonally to the tombstones.
Give the same drop shadow as in point 2.
9.
Copy michalw1 and paste as a new layer.
Place this in the middle at the bottom.
Give the same drop shadow as in point 2.
10.
Copy word-art Beware and paste as a new layer.
Place this almost in the middle at the top.
11.
Make raster 9 (cauldron) active.
Go to selection tool - freehand selection - smart edge.
select the top part , see below,
Let selection stay - duplicate this layer - and lock this.
Stay at the layer below.
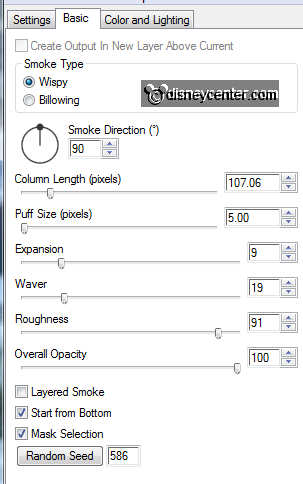
12.
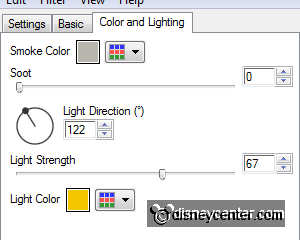
Effects - Alien Skin Eye Candy5 Nature - Smoke - with this setting.
Lock this layer and stay at the copy layer and this.
Repeat the Alien Skin - Smoke - click only at the random seed.
Selections - select none.
13.
Stay at raster 2.
Duplicate this layer and lock this.
Stay at the layer below.
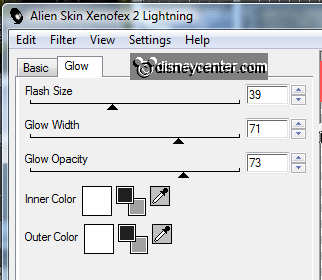
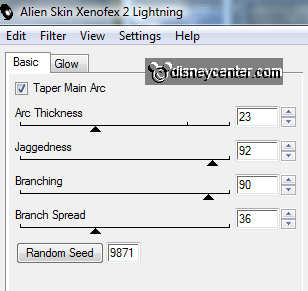
Effects - Alien Skin Xenoflex 2 - Lightning - with this setting.
Put setting at Old Horror Movie.
14.
Lock this layer and stay at the copy layer and this.
Repeat the Lightning - click only at the random seed.
Selections - select all - selections - modify - contract 2.
selections - invert - fill this with the foreground color.
Selections - select none.
15.
Make the top layer active.
Layers - new raster layer - put your watermark into the image.
Open Animatie Shop.
Lock the copy layers of raster2 (moon) and raster9 (cauldron).
Make the bottom layer active - Edit - copy merged.
16.
In AS - paste as a new animation.
Back in PSP - Open the copy layers and lock the raster 2 and 9.
Edit - copy merged.
In AS - paste after active frame.
17.
Edit - select all - Animation - Properties of frame at 20.
File - save as - click 3 times at next and than finished.
Ready is the tag
I hope you like this tutorial.
greetings Emmy
Tested by Shanna

Tutorial written
28-08-2011

