Foreground color #91a7e1 and background
color #293277.
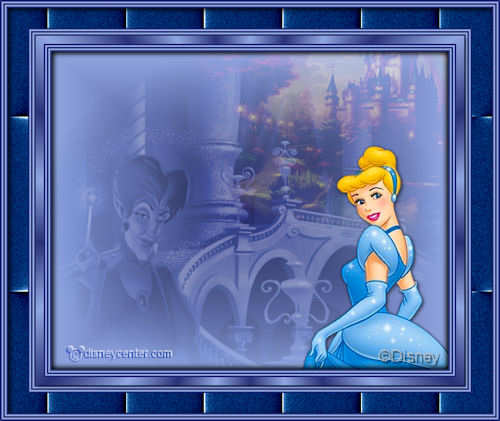
1. Open new image 500x400
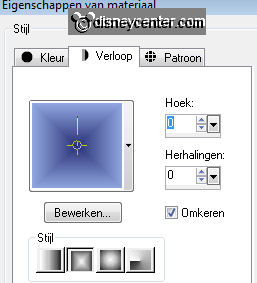
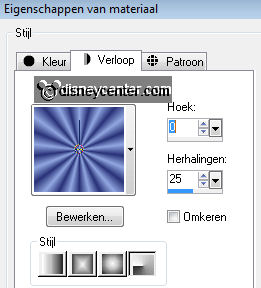
2. Fill this with the gradient rectangular with this setting.
3. New raster layer - Selections - select all.
4. Copy Disney Misted tube 35 - Paste in selection.
5. Selections - select none.
6. Set the Blend mode of this layer at Luminance.
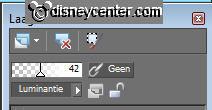
7. Set the opacity of this layer at 42.
8. Copy cinderellacastle and paste as a new layer.
9. Place this in the right upper corner.
10. Set the Blend mode of this layer at Lighten
11. Set the opacity of this layer at 62.
12. Copy the tube Image6Cinderella_LR and paste as a new layer.
13. Place this right at the bottom of the image.
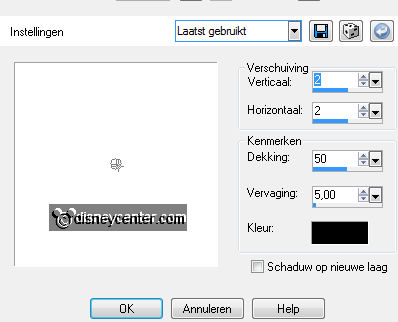
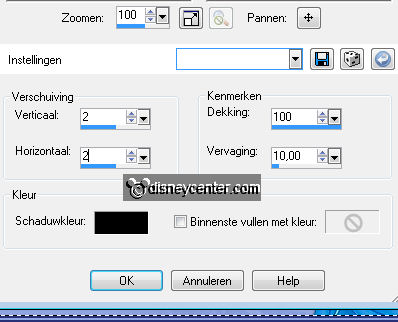
14. Effects - 3D Effects - drop setting with this setting.
15. Image - add border 2 - background color.
16. Image - add border 2 - foreground color.
17. Image - add border 2 - background color.
18. Image - add border 2 - foreground color.
19. Image - add border 2 - background color.
20. Selections - select all - selections - modify - contract 10.
21. Effects - 3D Effects - Cutout - with this setting.
21. Repeat Cutout but now horz. and vert. -2.
22. Selections - select none.
23. Image - add border 10 - foreground color.
24. Select the border - fill this with gradient radial.
25. Image - add border 2 - background color.
26. Image - add border 2 - foreground color.
27. Image - add border 2 - background color.
28. Image - add border 2 - foreground color.
29. Image - add border 2 - background color.
30. Selections - select all - selections - modify -
contract 10.
31. Effects - 3D Effects - Cutout - with the same setting as in point 21.
32. Selections - select none.
33. Image - add border 25 - foreground color.
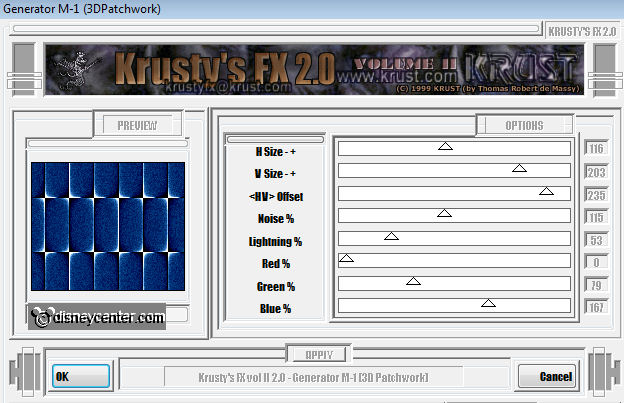
34. Select the border - Effects - Krusty's FX Vol II 2.0 - Generator M-1
(3DPatchwork) - with this setting.
35. Selections - select none.
36. Image - add border 2 - background color.
37. Image - add border 2 - foreground color.
38. Image - add border 2 - background color.
39. Image - add border 2 - foreground color.
40. Image - add border 2 - background color.
41. Selections - select all - selections - modify - contract 10.
42. Effects - 3D Effects - Cutout - with the same setting as in point 21.
43. Selections - select none.
44. New raster layer - Put your watermark into the image.
45. Layers - merge - merge all.
46. Image - Resize 500x421 - Resize all layers checked.
47. File - export - jpeg optimizer.