|

This
Tutorial is copyrighted to the Tutorial Writer, © Emmy Kruyswijk 2011.
This Tutorial
may
not be forwarded, shared or otherwise placed on any Web Site or group without written
permission from
Emmy Kruyswijk
Do you want to link my lessons?
Please send
me a mail.
Materials: download
here
2 Disney tubes, 4 tubes
from the scrapkit of Tamie and BD, 1 font Marquee
filter: Penta.com - Dot and Cross.
Download
here
Before you begins.......
Filter : Install first your plug-ins before you open PSP and put
them in the folder plug-ins.
Open your image in PSP
Open the font and minimize
This lesson is translated in
 by
Hélène by
Hélène
Blend Snow-white
Fore
ground #28522e
1.
Open a new image 700x500 - fill this with the foreground color.
Adjust - Add/remove Noise -
add noise - Uniform - Noise 10%.
2.
Copy Snowwhite126 and paste as a new layer.
Place this in the middle at the top.
Set the Blend mode of this layer on soft light - and the opacity at 30.
3.
Copy snwhite02 and paste as a new layer.
Place this at the left side at the top.
Duplicate this layer - image - mirror.
4.
Copy snwhite02a and paste as a new layer.
Place this between the 2 others at the top - duplicate - mirror.
Move it till it's one tree.
5.
Layers - merge - merge down
Layers - merge - merge down
Layers - merge - merge down
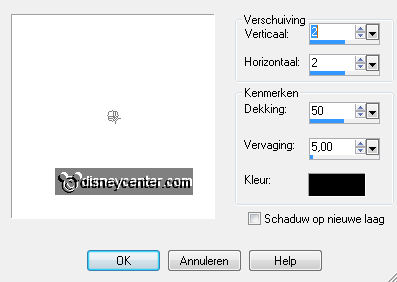
Effects - 3D Effects - drop shadow with this setting.
6.
Copy Wicked Witch_mc and paste as a new layer.
Place this just under the tree layer.
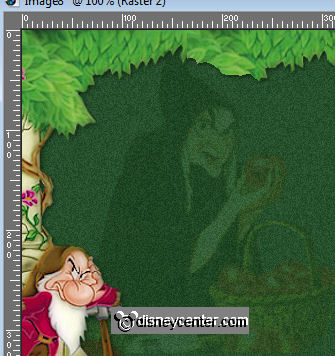
Set the Blend Mode of this layer on soft light - and the opacity at 26.
7.
Copy 0650-amlrmist-disneyprincessnowwhite and paste as a new layer.
Place this at the right side.
8.
Copy snw1,2,3,4 en 5 - and paste as a new layer.
Put them on the image where you like it. Or look to the example.
Give the same drop shadow as in point 5.
9.
Copy Disney_Dwatf_sad and paste as a new layer.
Place this left at the bottom.
Give the same drop shadow as in point 5.
10.
New raster layer - Put your watermark into the image.
Layers - merge - merge all.
11.
Image - add border 1 - color black.
Put you foreground at pattern gold.
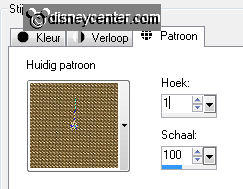
Image - add border 3 - color white
Select the border - fill this with the pattern gold.
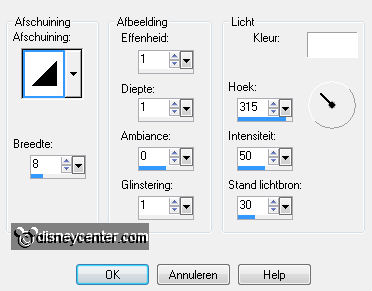
Effects - 3D Effects - Inner Bevel with this setting.
Selections - select none.
12.
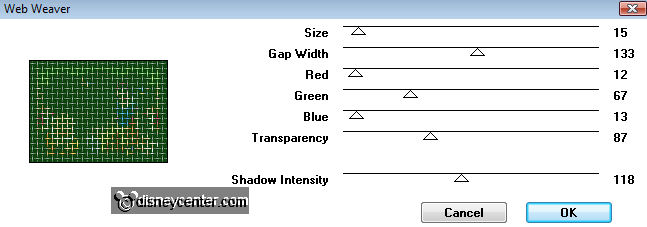
Image - add border 20 - foreground color.
Select the border - Effects - VM Natural - Weave no Distortion -
with this setting.
Selections - select none.
13.
Image - add border 3 - color white
Select the border - fill this with the pattern
gold.
Effects - 3D Effects - Inner Bevel with this setting as in point.11.
Selections - select none.
14.
File - export - jpeg optimizer.
Ready is the tag
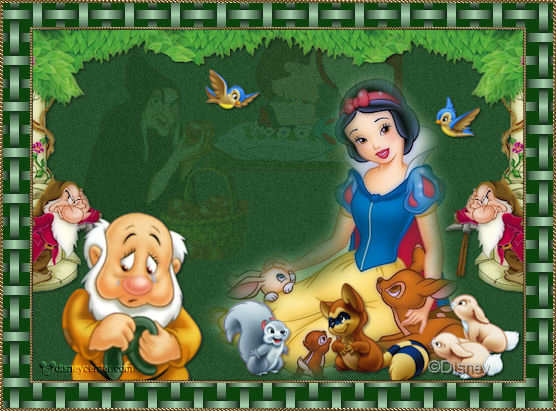
I hope you like this tutorial.
greetings Emmy,

Tutorial written
07-02-2011
| 