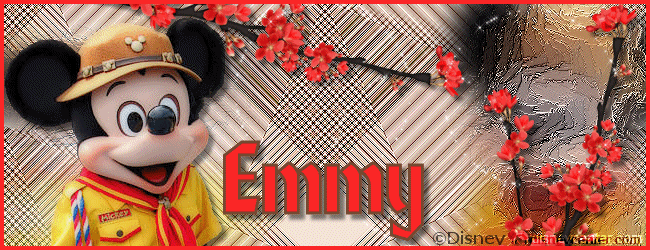
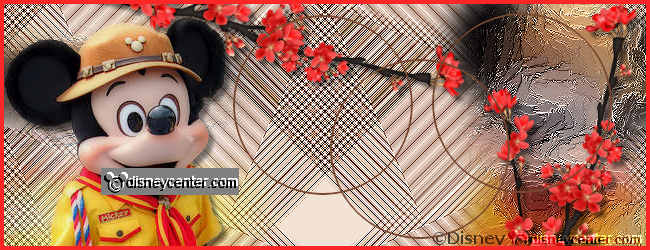
Banner
1.
File - new - open transparent image 650x235.
Set in the material palette the foreground on #f3e3d7 and the
background on #77472f.
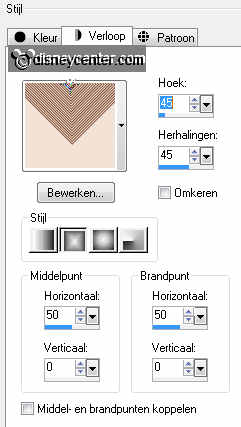
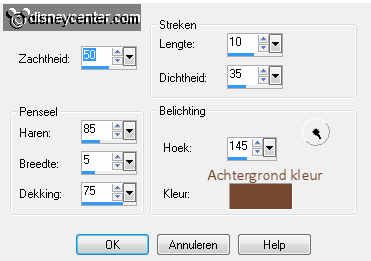
2.
Make from the foreground a gradient rectangle - with this
setting.
Activate flood fill tool - fill the layer with the
gradient.
3.
Layers - duplicate.
Image - mirror.
4.
Set in the layer palette the opacity of this layer on 50.
Layers - merge - merge down.
5.
Effects - Edge effects - enhance.
Effects - Image effects - seamless tiling - default setting.
Effects - Edge effects - enhance.
6.
Activate the tube micblossom - edit - copy.
Edit - paste as a new layer on the image.
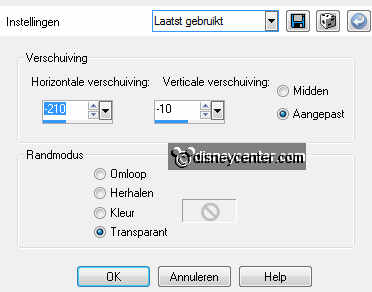
7.
Effects - Image effects - offset - with this setting.
Layers - duplicate.
8.
Effects - Distortion effects - wind - with this setting.

Repeat Distortion effects - wind - but now from
left.
Effects - Art Media effects - brush strokes - with this setting.
9.
Layers - arrange - move down.
Make the top layer active.
10.
Effects - 3D Effects - drop shadow - with this setting.
Layers - duplicate.
Image - resize 125% - all layers not checked.
11.
Effects - Art Media effects - brush strokes - setting are right.
Repeat - Art Media effects - brush strokes - setting are right -
change the color in foreground color.
Image-
mirror.
12.
Active the tube blossom - edit - copy.
Edit - paste as a new layer on the image.
Effects - 3D Effects - drop shadow - setting are right.
Image-
mirror.
Activate move tool - put the tube to the right.
13.
Active the tube blossom again - image - rotate left.
Image - flip.
14.
Edit - copy.
Edit - paste as a new layer on the image.
Activate move tool - and set the tube as in example at the top.
Effects - 3D Effects - drop shadow - setting are right.
15.
Change in the material palette the foreground gradient in
foreground color #fb2626.
Turn on the colors in the material palette.
16.
Activate text tool - with this setting.

Write the name - Layers - convert to raster layer.
Effects - 3D Effects - drop shadow - setting are right.
Set the name with the move tool in the middle from the bottom.
17.
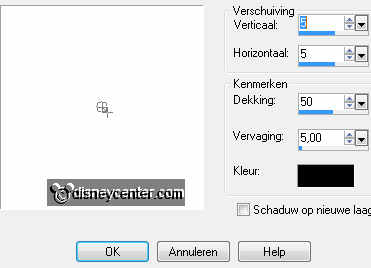
Layers - new raster layer - set your watermark into the image.
Selecti0ns - select all.
Selections - modify - contract 4.
Selections - invert.
18.
Layers - new raster layer.
Turn on the colors in the material palette.
Fill with the flood fill - the selection with the foreground color.
Selections - select none.
19.
Lock in the layer palette - the layer with the name.
Make the bottom layer active.
Layers - merge - merge all visible.
20.
Activate the bottom layer - edit - copy.
Open animation shop - edit - paste as a new animation.
Animation - insert frames - empty frames - with this setting.

Edit - select all.
21.
Back in PSP - active the top layer - edit - copy.
In animation shop - edit - paste as a new animation.
Animation - insert frames - Empty frames - with this setting.
Edit - select all.
22.
Open animation sparkles animation 1 patricia.
Animations - resize format of animation- with this setting.
Edit - select all.
23.
Edit - copy.
Edit - paste in selected frame. As below.
Edit - paste in selected frame.
Edit - paste in selected frame.
24.
Active the name - edit - copy.
Edit - paste in selected frame from the image.
File - save as - give name - click 3 times at next and than at
finish.
Avatar
1.
Go back to PSP.
Make the image active.
Go to crop tool - crop the image - as below.
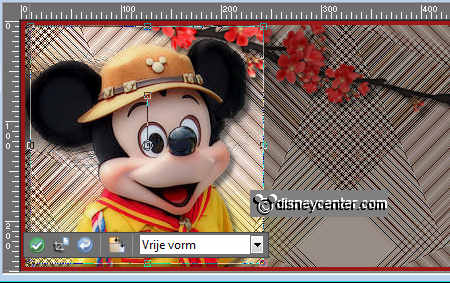
click at the green little circle.
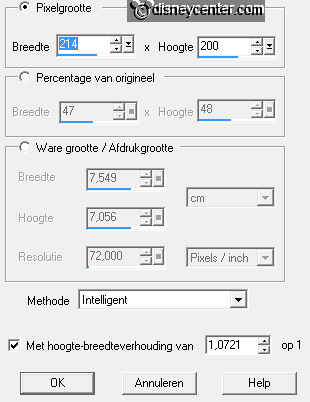
2.
Image - resize - pixels - 130x130 -high/width not checked - all
layers checked.
Selections - select all.
Layers - merge - merge all.
3.
Selections - modify - contract 4.
Selections - invert.
Layers - new raster layer.
Fill with the flood fill the selection with the foreground color (red).
Selections - select none.
4.
Layers - merge - merge all.
File - export - JPEG Optimizer.