|

This
Tutorial is copyrighted to the Tutorial Writer, © Emmy Kruyswijk 17-02-2012.
This Tutorial
may
not be forwarded, shared or otherwise placed on any Web Site or group without written
permission from
Emmy Kruyswijk
At all Disney creations must be copyrighted.
Do you want to link my lessons?
Please send
me a mail.
Needing:
1 mini kit -
download here.
2 tubes,
2 selections - made by me.
Plug-in:
Penta.com - Color Dot - download
here.
Before you begins.......
Open the tube in PSP,
put the plug-in in the folder
plug-ins and the selections in the folder selections.
Material

Brother
Bear
1.
File – open new transparent image 800x600.
Put in the material palette the foreground on
#8f5d2b and the background on
#442000.
2 .
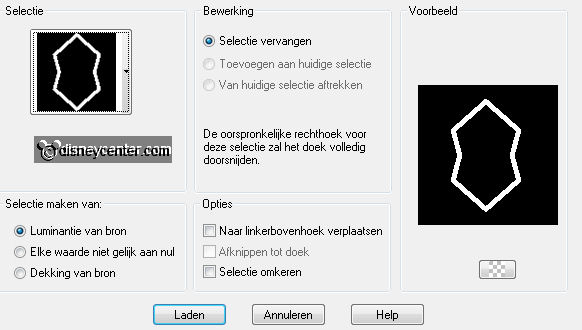
Selections - load/save selection - load selection from disk - look Emmybrbear1-
with this setting.
Convert to raster layer .
Activate flood fill tool - fill the selection with the foreground color.
3.
Activate the magic wand - with setting below - select inside the hexagon.

Selections - modify -contract 3 pixels.
Layers - new raster layer.
Fill the selections with the background color.
4.
Effects - plug-ins - Penta.com - Color Dot - with this setting.

Selections - select none.
Layers - arrange - move down.
Layers - merge - merge down.
5.
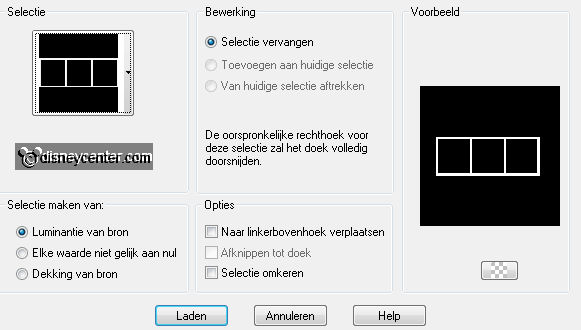
Selections - load/save selection - load selection from disk - look
Emmybrbear2- with this setting.
Layers - new raster layer.
Change in the material palette the foreground to #5a551b.
6.
Fill the selection with the foreground color.
Select with the magic wand into the squares - setting is right.
Selections - modify - contract 3 pixels.
7.
Layers - new raster layer.
Change in the material palette the
background to #cfc492.
Fill the selection with the background
color.
Selections - select none.
Layers - arrange - move down.
8.
Activate raster1 (frame layer).
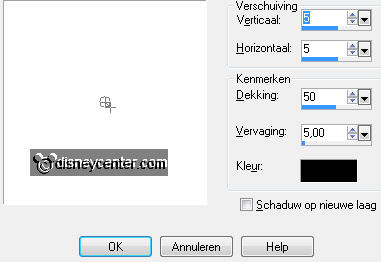
Effects - 3D Effects - drop shadow - with this setting.
Layers - merge - merge down.
9.
Activate the tube 02 - edit - copy.
Edit - paste as a new layer on the image.
Activate move tool - and move the tube in the left square - see example.
Effects - 3D Effects - drop shadow - setting is right.
10.
Activate the tube brother bear1 - edit - copy.
Edit - paste as a new layer on the image.
Image - mirror.
Move the tube in the right square.
Effects - 3D Effects - drop shadow - setting is right.
11.
Open from the mini kit mzimm_daysgonby_mini_leaf.
Image - resize 12% - all layers checked.
Edit - copy - Edit - paste as a new layer on the image.
12.
Image - mirror.
Move the tube halve in the middle square - see example.
Effects - 3D Effects - drop shadow - setting is right.
13.
Layers - duplicate.
Image - resize
85% -
all layers not checked.
Image - mirror.
Put the tube a little down.
14.
Open from the kit mzimm_daysgonby_mini_dogrose.
Image - resize 20% - all layers checked.
Edit - copy - Edit - paste as a new layer on the image.
15.
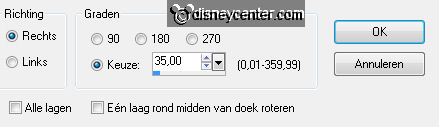
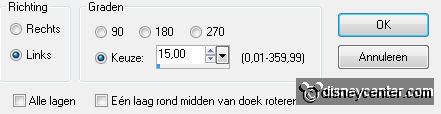
Image - free rotate - with this setting.
Put th e tube
at the leaf in the middle square - see example.
Layers - arrange - move down.
Effects - 3D Effects - drop shadow - setting is right.
16.
Layers - duplicate.
Put the tube a little down - see example.
Layers - arrange - move up.
Move a little with the leaves till you find it good.
17.
Open from th mini kit mzimm_daysgonby_mini_paper_flower.
Image - resize 20% - all layers checked.
Edit - copy - Edit - paste as a new layer on the image.
Put the tube left at the leaves - see example.
Effects - 3D Effects - drop shadow - setting is right.
18.
Layers - duplicate.
Image - resize
85% - all layers not checked.
Put the tube a little left and down.
19.
Activate eraser tool - with this setting.

And erase the part below ,
where the figures at (leaf stalks).
Lock in the layer palette the bottom 4 layers.
20.
Make the top layer active.
Layers - merge - merge all visible layers.
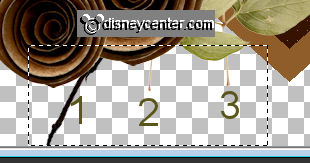
21.
Open the bottom 4 layers.
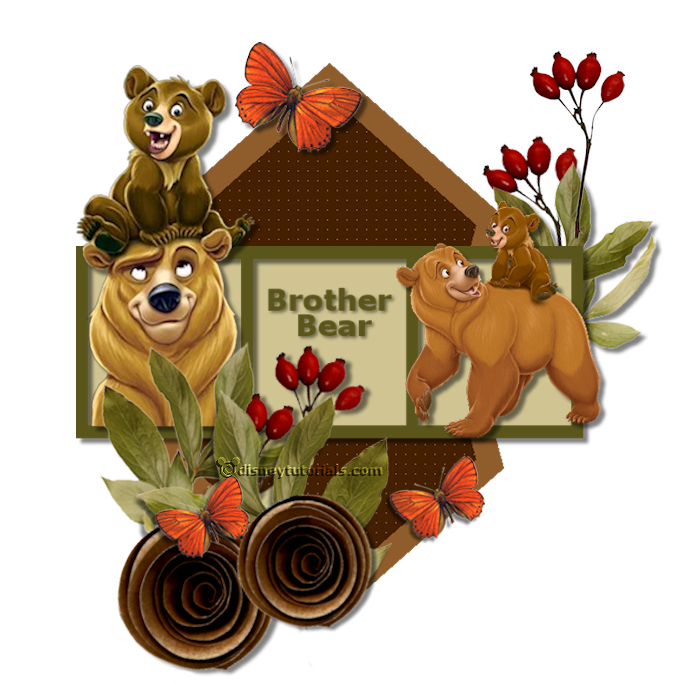
This is what you should have till now - see below.
22.
Activate the tube blad (leaves) - (is still dwarfed on your work).
Image - resize
75% - all layers not checked.
Put the tube right at the top - see below.
Effects - 3D Effects - drop shadow - setting is
right.
23.
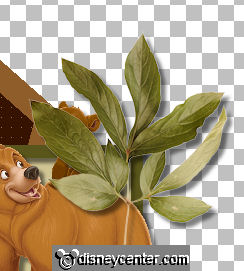
Activate the tube dogrose (branch with berries - is still dwarfed on your work)
Edit - copy - Edit - paste as a new layer
on the image.
Put the tube right at the top of the leaves.
Effects - 3D Effects - drop shadow - setting is right.
24.
Layers duplicate.
Image - resize
85% - all layers not checked.
Image - free rotate - with this setting.
25.
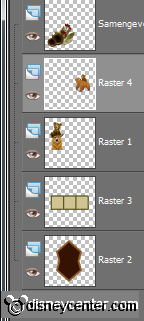
Activate raster5 (leaves) - layers - arrange - move up.
Activate the top layer.
Layers - merge - merge down - 1 more time.
Put this layer below raster2.
Activate the top layer.
26.
Open from the mini kit mzimm_daysgonby_mini_butterfly.
Image - resize
15% - all layers checked.
Edit - copy - Edit - paste as a new layer
on the image.
Put the tube somewhere where you likes him.
Effects - 3D Effects - drop shadow - setting is right.
27.
Layers - duplicate.
Image - resize
75% - all layers not checked.
Image - mirror.
Put the tube right - below the frame - see example.
28.
Layers - duplicate.
Put this tube links on 1 of the buttons.
29.
Activate text tool - look for a font - size 30 pixels - and write
Brother Bear.
Convert to raster layer.
30.
Effects - 3D Effects - drop shadow - setting is right.
Layers - new raster layer - put your watermark into the image.
31.
Layers - merge - merge all visible layers.
File - export - PNG Optimizer.
Ready is the tag
I hope you like this tutorial.
greetings Emmy
Tested by Nelly

tutorial written 17-11-2012
| 