
This
Tutorial is copyrighted to the Tutorial Writer, © Emmy Kruyswijk 2009.
This Tutorial
may
not be forwarded, shared or otherwise placed on any Web Site or group without written
permission from
Emmy Kruyswijk
Do you want to link my lessons?
Please send
me a mail.
Materials:
Download
here
1 Disney
tubes,
Diverse tubes.
filter: Alien Skin Eye Candy 5 -
Nature - Fire
Download here Under Eye Candy
Put the plug-ins in the folder plug-ins,
This lesson is translated in
 by
Hélène
by
Hélène
Cactus.
foreground color #d5e5d9 and background color #698f78
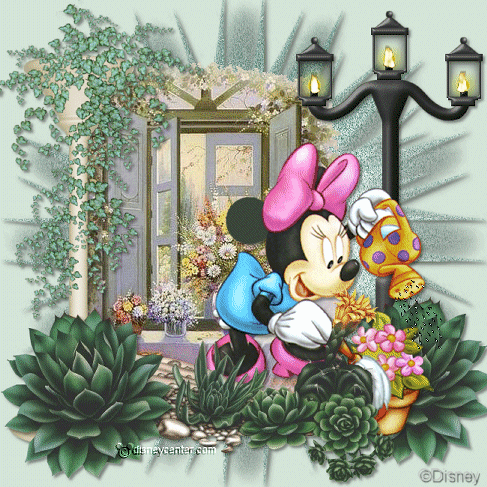
1. Open new image 650x650.
2. Fill this with the foreground color.
3. Copy the tube Splash and paste as a new layer.
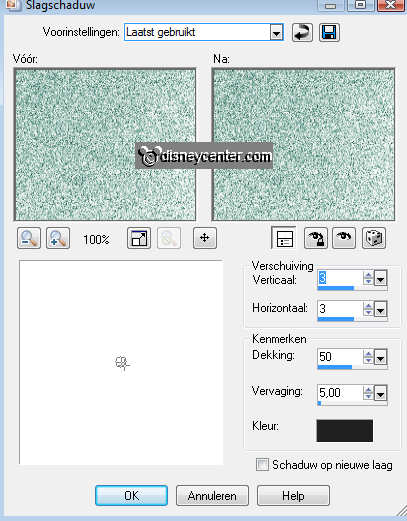
4. Effects - 3D Effects - drop shadow with this setting.
5. Copy the tube window2 and paste as a new layer.
6. Place this a little to the left 100 pixels from the left side.
7. Copy the tube RR-lamp post and paste as a new layer.
8. Give the same drop shadow as in point 4.
9. Place this to the right side. About 150 - 175 pixels from the bottom.
10. Go to selection tool - freehand selection - and select the 3 lamps
inside the lantern. see below.
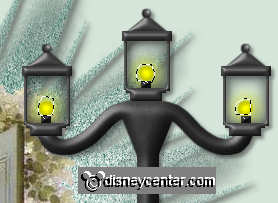
11. Duplicate this 9 more times.
12. Lock the 8 top layers and stay at the first one.
13. Effects - Alien Skin Eye Candy 5 - Nature - Fire with this setting.
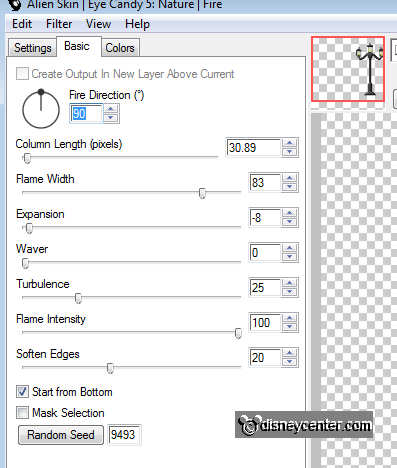
14. Lock the first layer and open the second layer.
15. Repeat point 13 - only click on the random seed.
16. Lock the second layer and open the third layer.
17. Repeat point 13 - only click on the random seed.
Repeat 13 (random seed) till you have all done the layers. Remember to lock
one layer and open the other layer.
18. Selections - select none.
19. Copy the tube outlawbydesignft318 and paste as a new layer.
20. Give the same drop shadow as in point 4.
21. Place this at the left side.
22. Copy the tube Minnie25_dede and paste as a new layer.
23. Give the same drop shadow as in point 4.
24. Place this right below at the window. tube
25. Copy the tube PC-Cactus_KK and paste as a new layer.
26. Give the same drop shadow as in point 4.
27. Place this left at the bottom.
28. Copy the tube cactus1 and paste as a new layer.
29. Give the same drop shadow as in point 4.
30. Place this right at the bottom.
31. Layers - arrange - move down and move down.
32. Put your watermark into the image.
33. Stay at the bottom layer (raster1) and lock the copy layers of the lamp
(lantern).
34. Edit - Copy merged.
35. Open animation shop - paste as a new animation.
36. Back in PSP - lock the first layer of the lamp and open the second layer.
37. Edit - Copy merged.
38. Back in animation shop - paste after current frame.
39. Back in PSP - lock the second layer of the lamp and open the third layer.
40. Edit - Copy merged.
41. Back in animation shop - paste after current frame. Make sure the last frame
is always selected.
42. Back in PSP - Repeat Copy Merged until all 10 layers are done.
43. Back in animation shop - Repeat paste after current frame until all 10
layers are done.
Don't forget to lock one layer and open the other layer.
44. Edit - Copy merged.
45. Open now the animation water in animation shop.
46. Edit- select all - of the animation water - copy
47. Click in the image - paste into selected frame.
48. Place this op under the nozzle of the watering.
49. Animation - Resize the animation 75%.
50. File - save as - give name - click 3 times at next and than at finish.
Ready is the tag
I hope you like this tutorial.
greetings Emmy,

Tutorial written
17-11-2009
