|

This
Tutorial is copyrighted to the Tutorial Writer, © Emmy Kruyswijk November 2008.
This Tutorial
may
not be forwarded, shared or otherwise placed on any Web Site or group without written
permission from
Emmy Kruyswijk
Do you want to link my lessons?
Please send
me a mail.
Materials:
1 tube, font Bauhaus 93,
filters: Filters Unlimited 2.0 - Paper Texture - Canvas Fine,
Alien Skin Eye Candy5 Impact - Gradient Glow,
Toadies - Plain Mosaic Blur, Xero - Simplicity, Penta - Dot and Cross
Materials
download
here
Download
Alien Skin Eye Candy5 Impact - Gradient Glow
Filter Unlimited
Put the plug-ins in the folder plug-ins.
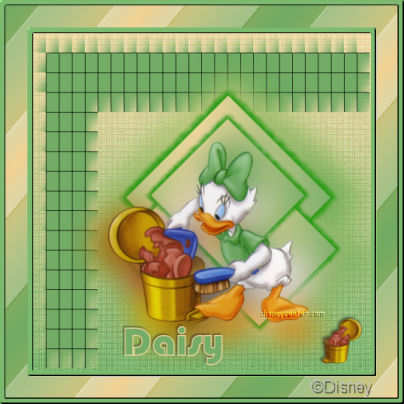
Daisy Duck
1. Open new image 600x600
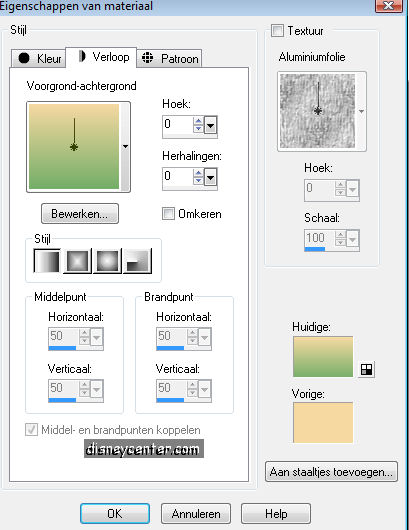
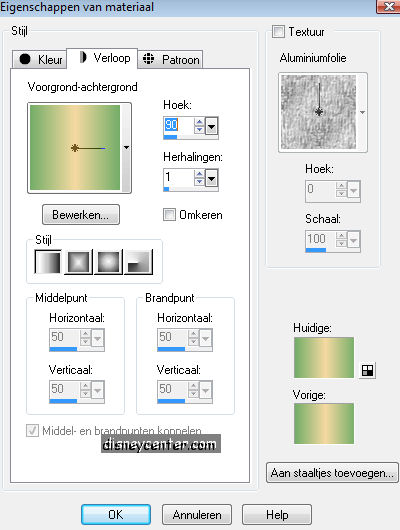
2. Flood fill this with the gradient. Take 2 colors from the tube. I
choose #73ad67
as foreground and #f5d9a1 as background.
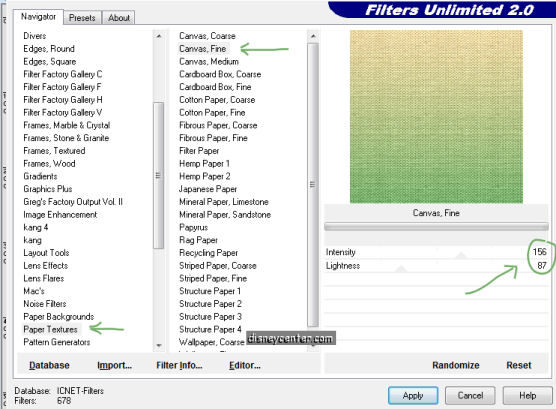
3. Go to Effects - Filters Unlimited 2.0 - Paper Texture - Canvas
Fine
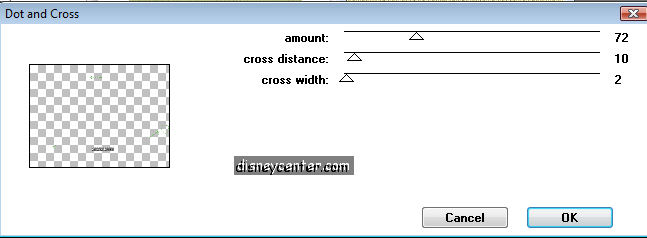
4. Go to Effects - Penta - Dot and Cross
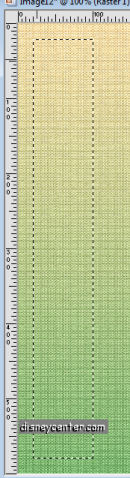
5. Go to Selection tool - selection - rectangle and make a rectangle.
Start by 20 - 100 see below.
6. New raster layer - flood fill with the foreground color. Select
none.
7. Effects- 3D Effects - Drop Shadow 2-2-50-5.00
8. Duplicate this layer and lock this. Stay at the other layer.
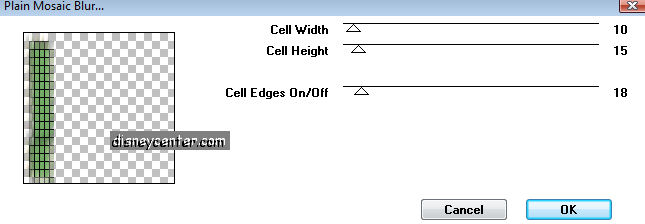
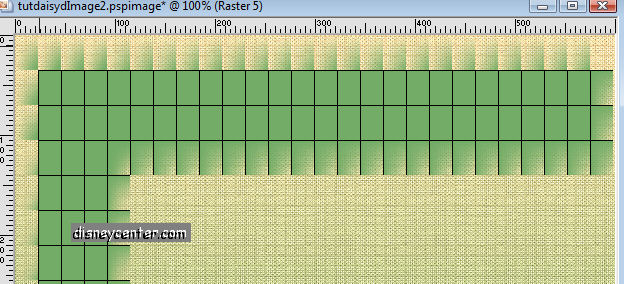
9. Effects - Toadies - Plain Mosaic Blur.
10. Unlock the duplicate layer. Image - Free Rotate 90
degrees left.
11. Repeat point 9.
12. Place this upstairs, see below.
13. Go to selection tool - selection - square and make a square 300x300
14. New raster layer flood fill with gradient.
15. The same drop shadow as in point 7.
16. Image -free rotate - 45 degrees left.
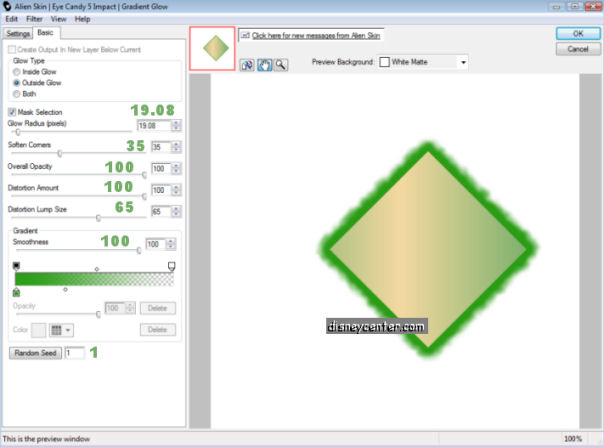
17. Go to Effects -Alien Skin Eye Candy5 Impact - Gradient Glow
18. Duplicate this layer
19. Image - Resize format with 75 %. Resize all layers unchecked.
20. Place this left under the square.
21. Duplicate this layer again and place this right under the square.
22. Duplicate again and this time place it in the middle of the
square, see below..

23. Lock the first 3 layers.
24. Make one of the square active.
25. Layers - Merge - Merge all visible.
26. Unlock the other layers.
27. Stay at the merge layer.
28. Duplicate this layer and lock the duplicate layer. Stay at the
other layer.
29. Go to Adjust - Blur -Gaussian Blur.

30. Unlock the duplicate layer.
31. Image - Resize format with 85 %. Resize all layers unchecked.
32. Copy the daisy tube and paste as a new layer and place this just
under the squares.
33. Repeat point 28, 29, 30 and 31.
34. Put your watermark into the tag.
35. Go to layers - merge - Merge all layers.
36. Put your name into the tag. I have chosen for Daisy. Font
Bauhaus93 size 72. Use the 2 colors (fore- and background).

37. Layers - merge - Merge all layers.
38. Image - Resize format with 75 %. Resize all layers checked.
39. Go back to the daisy tube and click at the trashcan tube
40. Edit - copy - paste as a new image.
41. Resize this 2x with 50 %.
42. Copy the little trashcan and paste as a new layer.
43. Place this in the right corner below.
44. Give the same drop shadow as in point 7.
45. Image - Add border 7 color white. Select the border.
46. Flood fill the selected border with the foreground color.
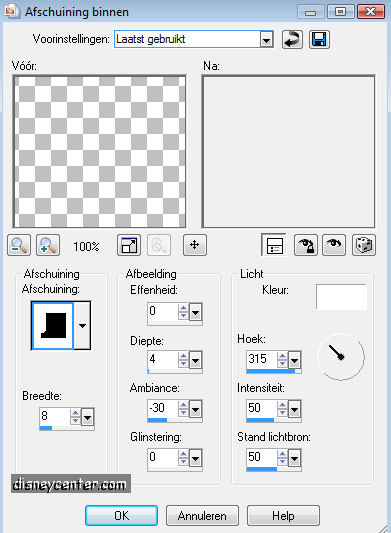
47. Let selection stay and go to Effects - 3D Effects -
Inner Bevel.
48. Selection - Select none.
49. Image - Add border 30 Flood fill with the background border.
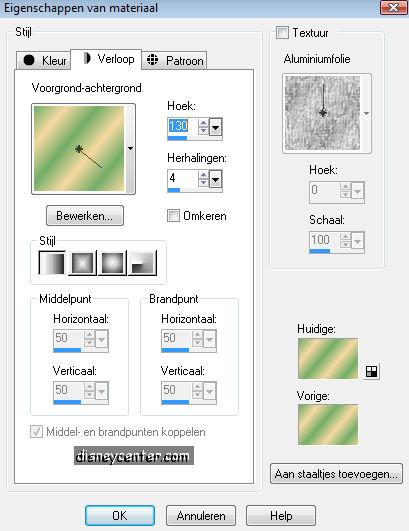
50. Select the border, Flood fill with the gradient. See below.
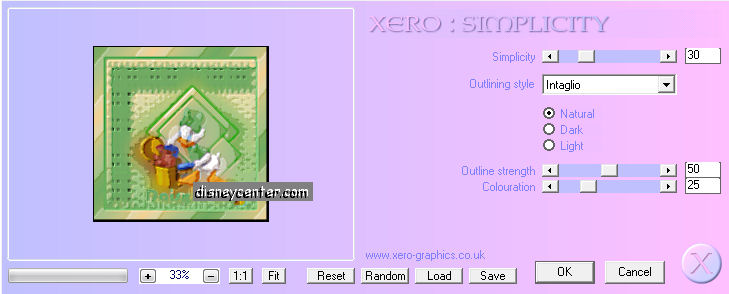
51. Let selection stay, go to Effects -Filter Xero - Simplicity.
52. Selection - Select none.
53. Repeat point 45, 46, 47 and 48.
54. Image - Resize image with 75 %.
55. Save as jpg.
Ready is the tag
I hope you like this tutorial.
greetings Emmy,
Tutorial written
24-10-201010
| |