|

This
Tutorial is copyrighted to the Tutorial Writer, © Emmy Kruyswijk August 2010
This Tutorial may not be forwarded, shared or otherwise placed on any Web Site
or group without written
permission from
Emmy Kruyswijk
Do you want to link
my lessons?
Please send
me a mail.
Materials:
download here
1 tube from Wendyke, 1 cute animation,
filters: Cybia - ScreenWorks, CPK Designs - Glass,
Penta.com - Dot and Cross,
Put the plug-in in the folder plug-ins,
Disneyland

1. Open a new image 600x600.
2. Flood fill this with the foreground color #ede6dd.
2. Copy the tube Disneyland6 and paste as a new layer. Move this to the right.
(With the hand to the end)
4. Duplicate this layer - Image - Mirror
5. Lock the bottom layer. Stay at 1 of the other layers.
6. Layers - Merge -
Merge visible.
7. Opacity of this layer 10
8. Go to selections tool- selections - star1
9. Draw a star in the left upper corner
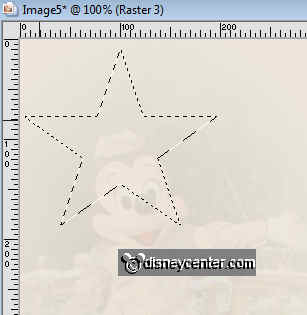
10. New raster layer - Flood fill this with the background color #4e6109.
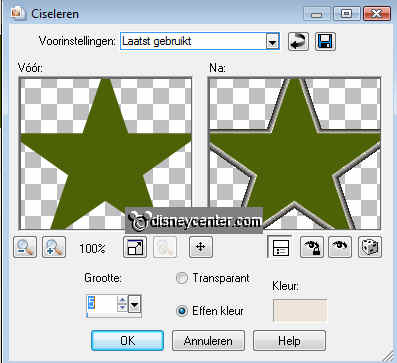
11. Effects -3D Effects - Chisel.
12. Selections - select none.
13. Repeat point 9 t/m 12, but now in the lower right corner.
14. Image - Flip - place the star below.
15. Go to selections - selections - rectangle
16. Draw a small rectangle (line) from the center of the star down fill with the
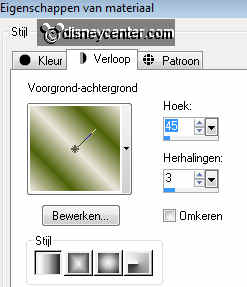
gradient
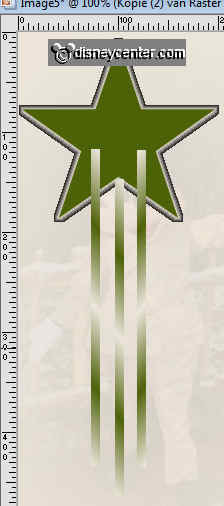
17. Duplicate this layer and place this left from the first line.
18.
Duplicate this layer and place this right from the first line.
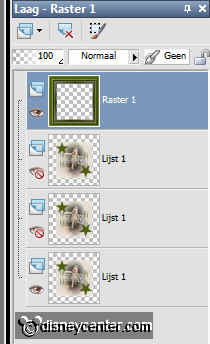
19. Lock all layers, except the 3 layers of the lines.
20. Stay at 1 of the other layers - Layers - Merge - Merge visible.
21. Pull this layer below the stars layers.
22. Duplicate this layer - Image - Flip - Mirror.
23. Go to the first Merge Lines
24. Duplicate this layer 2 more times.
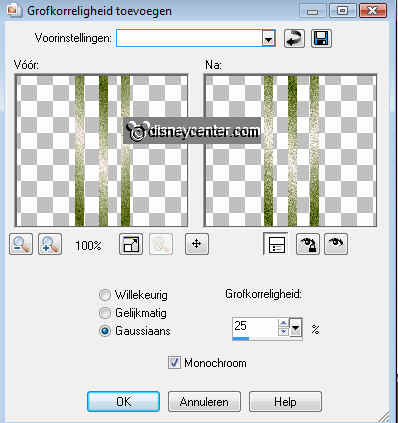
25. Go to the first duplicate layer - Adjust - Add/remove Noise -
Add Noise - Gaussian 25
26. Go to the second duplicate layer -
Adjust - Add/remove Noise -
Add Noise - Gaussian 35
27. Go to the third duplicate layer -
Adjust - Add/remove Noise -
Add Noise - Gaussian 45
28. Repeat point 23 t/m 27, but now with the copy merged.
29. Stay at the upper layer.
30. Copy the disneyland6 tube and paste as a new layer.
31. Lock the second and the third copy layer of the 2 lines layers.
32. Stay at 1 of the other layers - Copy Merged.
33. Open animation shop - paste as a new animation.
34. Back in PSP lock the first copies of the 2 lines layers and open the second
copies of the 2 lines layers - Copy Merged
35. Back in animation shop - paste after current frame.
36.
Back in PSP lock the second copies of the 2 lines layers and open
the third copies of the 2 lines layers - Copy Merged.
37. Back in animation shop -
paste after current frame.
38. In animation shop - Edit - Select all.
39. Animation - Resize Animation 75%.
40. Edit - Select all - Copy - close image.
41. Back in PSP - paste as a new image.
42. Go
further
with this picture.
43. Image - Canvas Size - Width and Height at 500.
44. Click on the transparent layer - flood fill it with the gradient as in point 16.
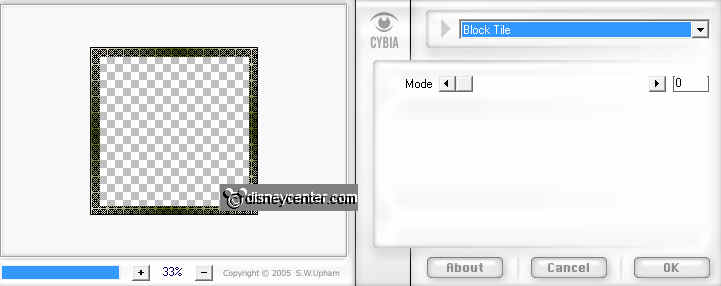
45. Effects - Cybia-ScreenWorks - Block Tile - default settings.
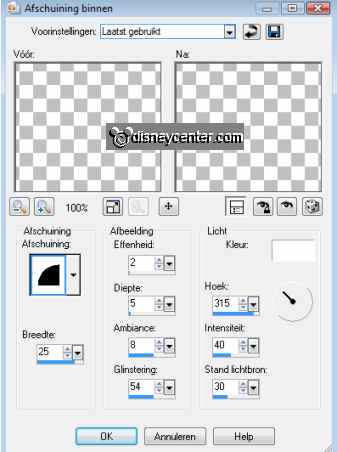
46. Effects - 3D Effects - Inner Bevel.
47. selections - select none.
48. Image -
Canvas Size - Width and Height at 520.
49.
Click on the transparent layer - flood fill it
with the
background color
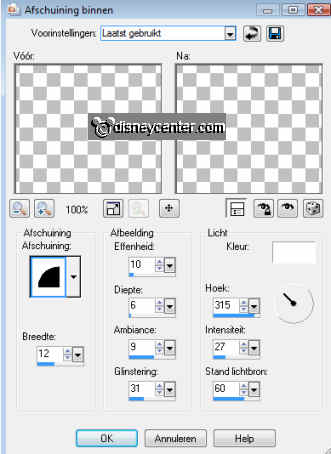
50. Effects - 3D Effects - Inner Bevel.
51. Selections - select none.
52.
Image -
Canvas Size - Width and Height at 570.
53.
Click on the transparent layer - flood fill it with the
background color
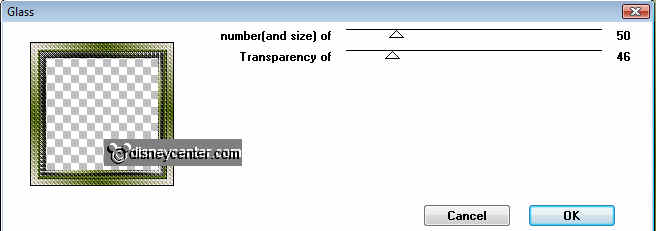
54. Effects- CPK Designs-Glass.
55. Effects - 3D Effects - same Inner Bevel as in point 46.
56. Selections - select none.
57.
Image -
Canvas Size - Width and Height at 590.
58.
Click on the transparent layer - flood fill it with the
background color
59. Effects - 3D Effects - Inner Bevel as in point 50.
60.
Image -
Canvas Size - Width and Height at 640.
61.
Click on the transparent layer - flood fill it with the
background color
62. Effects - Penta.com - Dot and Cross - default settings.
63. Selections - select none.
64. Put your watermark into the image.
64a. Go to Text tool - Verdana size 24 and write Disneyland -
place this left below.
65. Lock the second and third layer - see below
66. Stay at 1 of the other layers - Copy Merged.
67. Go to animation shop - Paste as a new animation.
68. Back in PSP - Lock the first layer and open the second layer - Copy Merged
69. Go to animation shop - Paste after Current Frame.
70.
Back in PSP - Lock the second layer and open the third layer -
Copy Merged
71. Back in animation shop -
Paste after Current Frame
72. In animation shop open the cute animation - Edit - select all.
73. Back to the 3 frames of the image - Edit - select all.
74. Copy the cute animation
75. Click in the first frame of the image - paste in selected frame -
place this in the upper star.
76. Repeat this and paste in the star below. (Check whether they are in all 3
frames.)
77. Animation - the frames are still selected - Resize animation
75%
78. File - save as - Give a name.
Ready is the tag
I hope that you like this tutorial.
greetings Emmy,
Tutorial written
24-08-2010
| |