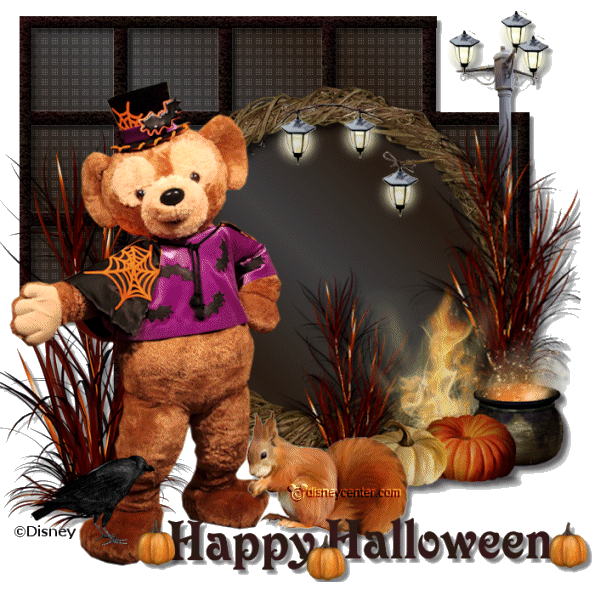
1.
File – open new transparent image 700x700.
Set in the material palette the foreground onp #291c13 and the background on #404040.
2.
Activate the tube raamwerk (framework) – edit – copy.
Edit – paste as a new layer on the image.
3.
Activate move tool – move the tube in the left upper corner.
Activate the magic wand – with the settings below – select the squares in the raamwerk
(framework).

Selection – modify – selections – expand 5 pixels.
4.
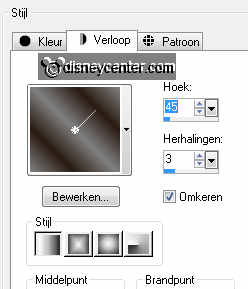
Make from the foreground a gradient linear - with this setting.
Layers – new raster layer.
Activate flood fill tool – fill the selection with the gradient.
5.
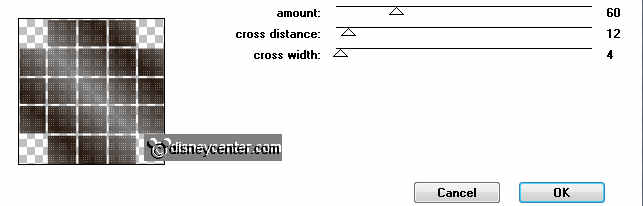
Effects - plug-ins – Penta.com – Dot and Cross – with this setting.
Layers – arrange – move down.
Selections – select none.
6.
Layers – merge – merge down.
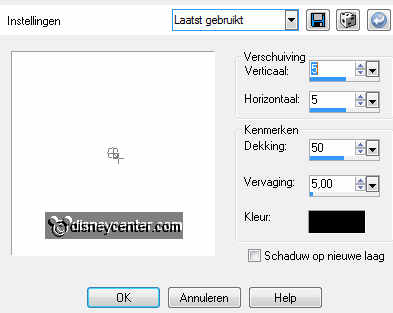
Effects – 3D Effects – drop shadow – with this setting.
Activate the top layer.
7.
Activate the tube rietenkrans (Wicker wreath – edit – copy.
Edit – paste as a new layer on the image.
Effects – 3D Effects – drop shadow – setting is right.
8.
Activate selection tool – selection – circle.
And make a circle – as below.
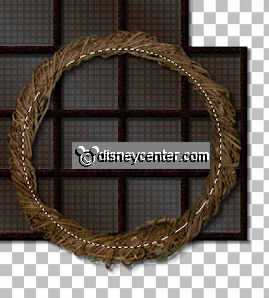
Layers – new raster layer.
9.
Fill the selection with the gradient – setting is right.
Layers – arrange – move down.
Layers – merge – merge down.
Selections - select none.
10.
Activate the tube herfst1 – edit – copy.
Edit – paste as a new layer on the image.
Move this in the right bottom corner.
Effects – 3D Effects – drop shadow – setting is right.
11.
Activate the tube struik – edit – copy.
Edit – paste as a new layer on the image.
Move this in the left bottom corner.
Effects – 3D Effects – drop shadow – setting is right.
12.
Activate the tube duffyhalw2 – edit – copy.
Edit – paste as a new layer on the image.
Place these links at the bottom – see example.
Effects – 3D Effects – drop shadow – setting is right.
13.
Activate raster 5 (herfst1 tube) .
Layers – arrange – move up.
14.
Activate the tube kraai2 – edit – copy.
Edit – paste as a new layer on the image.
Place it on the foot of Duffy. Use your own tube, find a beautiful place.
Effects – 3D Effects – drop shadow – setting is right.
15.
Activate the word-art EmmyHHW – edit – copy.
Edit – paste as a new layer on the image.
Place this right at the bottom – see example
Activate raster2.
16.
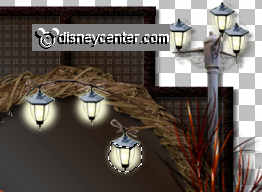
Activate the tube lantaarnpaal – edit – copy.
Edit – paste as a new layer on the image.
17.
Layers – duplicate.
Layers – merge – merge down.
Effects – 3D Effects – drop shadow – setting is right.
18.
Layers – new raster layer – put your watermark into the image.
Make the bottom layer active.
Layers – merge – merge all visible.
19.
Activate the tube lampjes – edit – copy.
Edit – paste as a new layer on the image.
20.
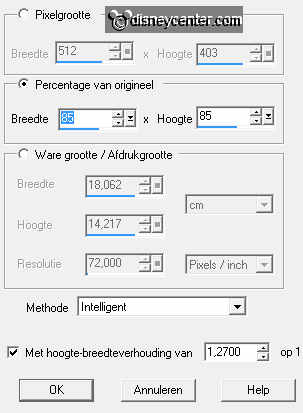
Image – resize 110% - all layers not checked.
Place this up the Wicker wreath.
21.
Layers – duplicate.
Layers – merge – merge down.
Effects – 3D Effects – drop shadow – setting is right.
22.
Layers - duplicate - and one more time.
Activate free selection tool – freehand selection – from point to point – with
this setting.

23.
Make the first layers (from the lights) active – and make a selection as below.
Make the second lights layer active – and make a selection round the middle
light.
Make the third layer active – and make a selection round the last light.
24.
Make now the first light layer again active.
Adjust – brightness and contrast – brightness/contrast – with this setting.
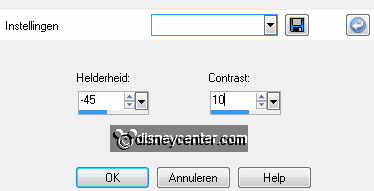
25.
Make the second light layer active.
Adjust – brightness and contrast – brightness/contrast – now brightness on -55
– contrast the same
26.
Make the third light layer active.
Adjust – brightness and contrast – brightness/contrast – now brightness on -65
– contrast the same
Selections – select none.
27.
Lock the 2 top layers in the layer palette.
Make the bottom layer active.
Edit – copy merged.
28.
Open Animation Shop – edit – paste as a new animation.
Back in PSP –Lock the first light layer and open the second layer.
Edit – copy merged.
29.
In AS – edit – paste after active frame.
Back in PSP – lock the second layer and open the third layer.
Edit – copy merged.
30.
In AS – edit – paste after active frame. (Be sure the last frame is always
selected.)
Animation – resize format of animation 85% - with this setting.
Animation- Frame properties - all frames on 5.
31.
File – save as – give name – click 3 times at next and than at finish.