foreground color #ab7355 and background color #ff0000.
1. Open a new image 400x400
2. Flood fill with the foreground color #ab7355.
3. Copy the tube Dumbo006 and paste as a new layer.
4. Duplicate this layer twice.
5. Stay at the first tube layer.
6. Effects - Distortion Effects - wind.
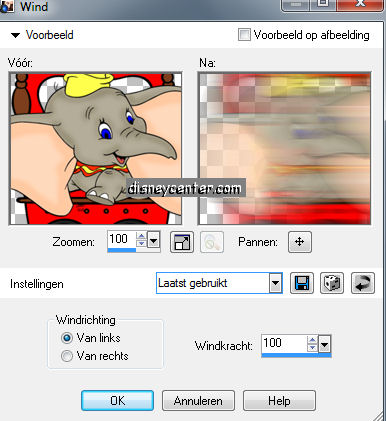
7. Repeat Distortion Effects - wind - but now checked from right.
8. Stay at the copy of the tube layer (2e).
9. Effects - Distortion Effects - Pixelate.

10. Go to the 2e copy of the tube layer(3e) - image - resize
75%.
11. Layers - Merge - Merge all Flatten.
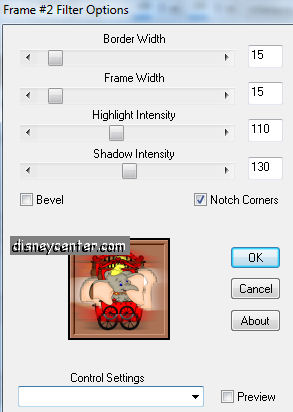
12. Effects - Bordermania - Frame #2 with these settings.
13. Image - resize 50%.
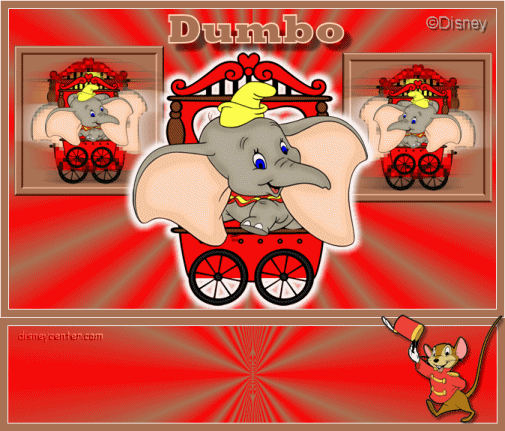
14. Copy this image Shift + D -Image - Mirror.
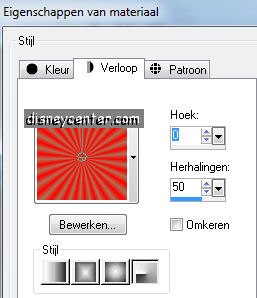
15. Open a new image 650x400.
16. Flood fill this with gradient radial.
17. Copy the small image and paste as a new layer.
18. Place this left 50 pix. of the top. (The image that look right)
19. Copy the other small image and paste as a new layer.
20. Place this right 50 pix. of the top. (the image that look left)
21.Copy the tube Dumbo006 and paste as a new layer.
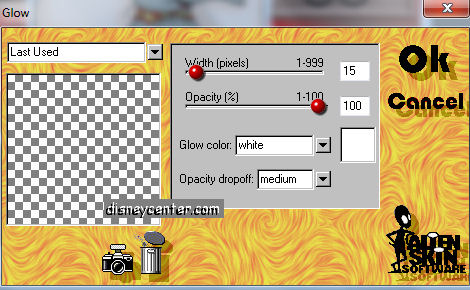
22. Place this in the center with the wheels at the bottom.
23. Effects - Alien Skin - Glow 2.0 with this setting.
24. Go to text tool Rockwell Extra Bold size 125
points (no pixels)

fore- and background color are invert for the text.
25. Write Dumbo and place this in the center of the top.
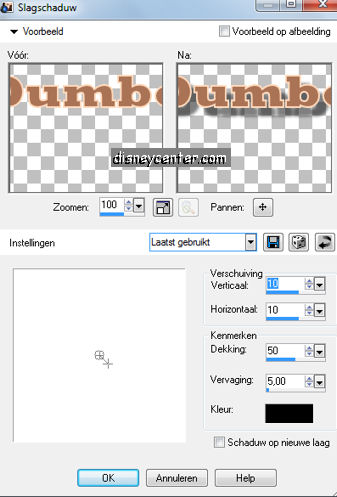
26. Effects - 3D Effects - drop shadow.
26. Image - add border 1 color white.
27. Image - add border 10 foreground color #ab7355.
28. Image - add border 1 color white
29. Image - Canvas Size

30. Select the brown part below.
31. Selections - Modify - Contract 10 - new raster layer - flood fill this with
white.
32. Selections - Modify - Contract 1 - flood fill with the gradient from point 16.Only
now the repeats at op 75.
33. Selections - select none.
34. Put your watermark into the image.
Now we do the animation. I've make the animation for you. Only place the little
mouse tubes.
35. Copy the tube dumbomuis and paste as a new layer.
36. Place this right at the bottom.
37. Copy the tube dumbomuis1 and paste as a new layer.
38. Place this near the other one..
39.Repeat this 2 tubes till the border is completed. (see below)

39a. Image - resize 75%.
40. Lock all layers of the tube dumbomuis and dumbomuis1, except the first.
41. Stay at the bottom layer.
42. Click at the blue border of the image - Copy Merge.
Open now animation shop.
43. Paste as a new animation.
44. Back in PSP. Lock the first tube layer and open the second. Copy Merge.
45. Back in animation shop - paste after current frame. Watch that you have
selected always the last frame.
46. Back in PSP. Lock the second tube layer and open the third. Copy Merge.
47. Back in animation shop - paste after current frame.
48. Back in PSP. Lock the third tube layer and open the fourth. Copy Merge.
49. Back in animation shop - paste after current frame.
50. Back in PSP. Lock the fourth tube layer and open the fifth. Copy Merge.
51. Back in animation shop - paste after current frame.
52. Back in PSP. Lock the fifth tube layer and open the sixth. Copy Merge.
53. Back in animation shop - paste after current frame.
54. Edit - Select all - Frame properties at 60.
55. File - save as......
56. Click 3 times at next and than at ready.