
This
Tutorial is copyrighted to the Tutorial Writer, © Emmy Kruyswijk 2009.
This Tutorial
may
not be forwarded, shared or otherwise placed on any Web Site or group without written
permission from
Emmy Kruyswijk
Do you want to link my lessons?
Please send
me a mail.
Materials:
mask starburst, tube, preset inner bevel
metaliek, 2 fonts,
download here
filter: FM Tile Tools-Blend Emboss, VDL
Adrenaline-Snowflakes,
filters here
Snow Fun
Open your fonts and minimize them.
Put your
mask in the mask folder and your filters in the folder plug-ins.
Put the preset inner bevel in de folder presets.
Take 2 colors from your tube. 1 light for the foreground and a
dark color for the background.
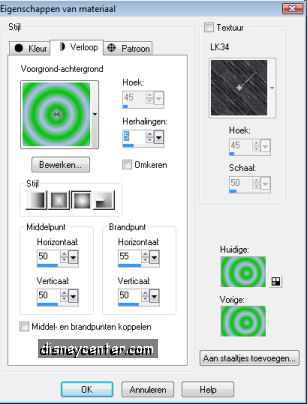
1. Open a new raster image 650x450 transparent
2. Flood fill this with the gradient.
3. New rater layer, flood fill with your background color.
4.
Layers-Load/Save mask-Load mask from disk- Starburst
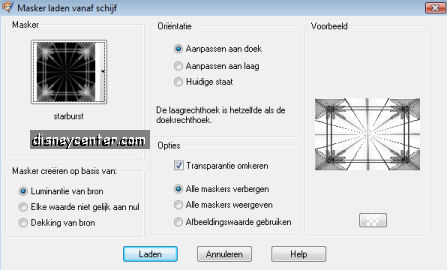
5. Layers-merge-merge group.
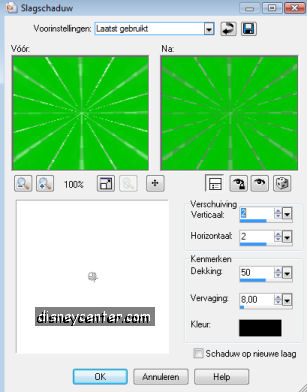
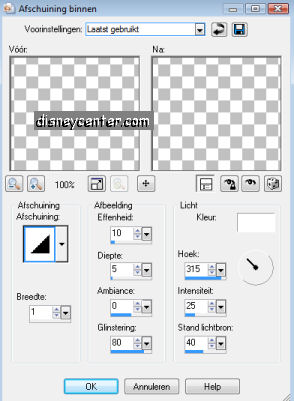
6. Effects-3D Effects-Drop Shadow with this
settings.
7.Effects-FM Tile Tools-Blend-Emboss-standard setting.
8. Copy your tube amd
paste as a new layer. Place it right.
9.Effects-3D Effects-Drop Shadow-H & V 3,
Opacity 50, Blur 8 color black
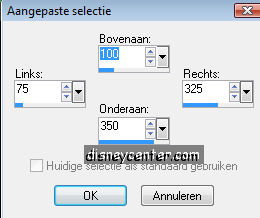
10.Go to your selection tool-Custom selection

11. With this setting.
12. New raster layer, flood fill with this color #6869a2
13. New
raster layer flood fill with white.
14. Selection-Modify-Contrast 3.
15.
Selection-Modify-Invert and click on the delete key of your keyboard.
16. Go
to your magic wand, select the blue square, copy your tube tree.
17.
Paste a a new layer and put him in the middle, selections-Invert and click at
the delete key.
18. Opacity of this layer at 50. Let selection stay.
19. Duplicate this layer twice.
20 Close the layers of copy 1 and 2(clicking on the eye in the layer palette).
21
Activate the original layer.
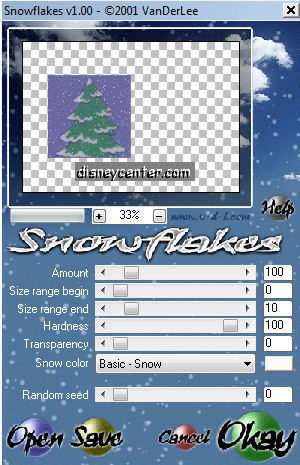
22. Go to Effects-VDL-Adrenaline-Snowflakes with
this settings.
23. Close this layer and open the layer of copy1. Repeat point 22, but now the
random seed at 50, All the others the same.
24. Close this layer and open the
layer of copy 2, repeat point 22, but now the random seed at 100, all others the
same.
25. Select none.
26. Go to your text tool, size 72 font Alominte Snow,
for and background at white, stroke width at 1, vector.
27. Write Snow Fun,
or something else, convert to raster layer.
28. Effects-3D Effects-Drop
Shadow H & V 2, Opacity 50, Blur 5, color black.
29. Go to your text tool
again, size 200 font KR Snow People, for and background at white, stroke width
at 2, vector.
30. Type the letter g, or another one, put this in the left
corner (see example upstairs). The same Drop Shadow as point 18.
Minimize
this image, we use that later.
With this we work later in the Animation Shop.
Now we make the border.
31. Activate the first layer
(gradient layer)
32. Edit-copy-paste as a new IMAGE.
33.
Image-Add border 25 white, select,
34. selections-Modify-Expand 2,
flood fill with #6869a2
35. Adjust-Add/Remove Noise-Add
Noise Gaussian at 10.
36. Effects-3D Effects-Inner Bevel-preset
inner bevel metaliek- with this setting.
Select none.
37. Image-Add border 2, white
38. Image-Add border 2, #6869a2
39. Image-Add border 2, white
40. Image-Add border 25, #6869a2, select, repeat point 35 and 36.
Select
None.
41. Image-Add border 2 white.
42.
Select all-selections Modify-Contract 58
43. Selections Invert.
44.
Edit-Copy and paste as a new image.
45. Put your watermark in the border of
in the image.
Now we go work in the Animation Shop.
46. Open Animation Shop.
47. Go back to PSP to your first image, close the copy 1 and 2 of the snow.
48.
Activate raster 3 (the layer of the snow) and click with the mouse button right
on the image, copy merged.
49 Go to Animation Shop and paste as a new
animation.
50. Back to PSP, close the first snow layer and open the second
snow layer, repeat point 48 and 49, but now paste after active frame.
51.
Back to PSP, close the second snow layer and open the third snow layer,
repeat point 48 en 49 paste after active frame.
52. Go back to PSP and copy
the frame (second image you made) and paste this as a new animation.
53. In Animation
Shop duplicate this frame two times.
55. Activate your snow image,
edit-select all-edit copy.
54. Activate your frame-edit-select all-click in your frame- paste into selected
frame.
56. Resize the image, go to Animation- Resize animation, 75%
57.
File-save as...give it a name,
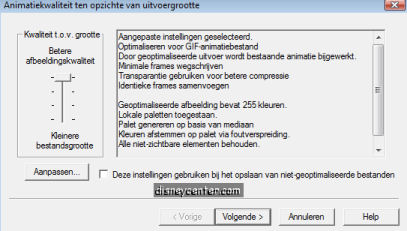
click on next, next, next and complete.
Ready is the tag
I hope that you like this tutorial.
greetings Emmy,

Tutorial written
09-11-2009