Foreground color white and background color #a3c4cc.
1.
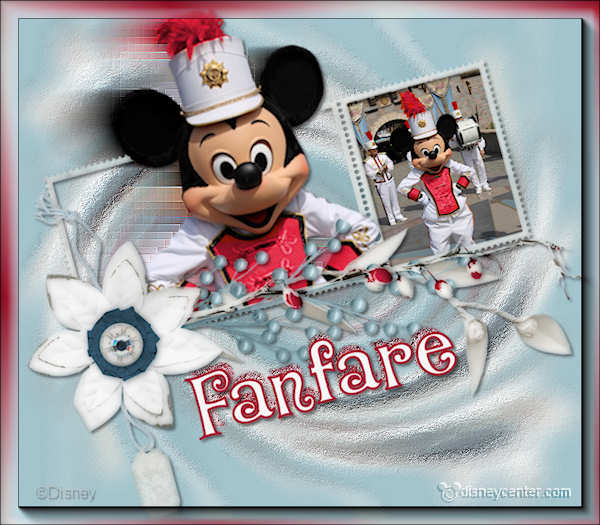
Open new transparent image 800x700
Fill this with the background color.
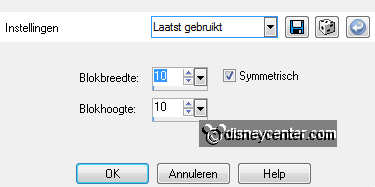
Open the cluster frame - image - resize 85% - all layers checked.
Copy this and paste as a new layer on the image.
2.
Adjust - blur - Gaussian blur - with this setting.
Effects - Art Media Effects - Brush strokes - with this setting.
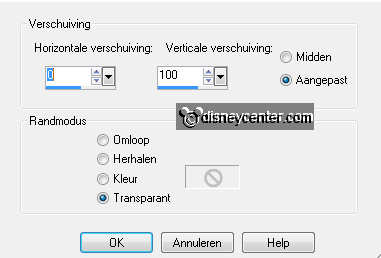
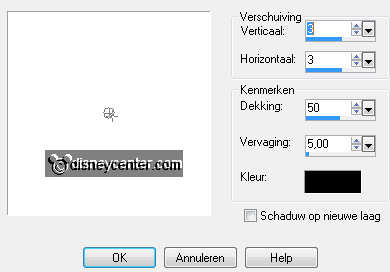
Effects - Image effects - Offset - with this setting.
3.
Duplicate this layer - image - mirror - image - flip.
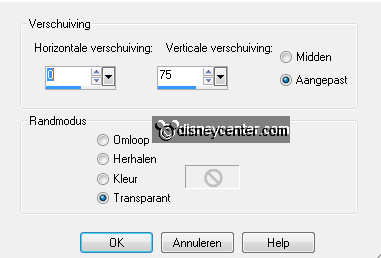
Effects - Image effects - Offset - with this setting.
Layers - merge - merge down.
4.
Effects - Image effects - Offset - with this setting.
Duplicate this layer - image - mirror - image - flip.
Layers - merge - merge down
5.
Effects - Distortion Effects - Twirl - with this setting.
Effects - Art Media Effects - Brush strokes - with the same setting
as in point 2.
Copy the cluster (is still resized) and paste as a new layer on
the image.
6.
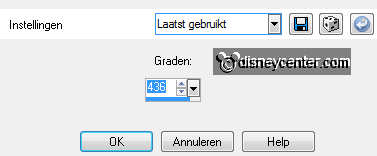
Image - free rotate - left 15.
Effects - Image effects - Offset - with this setting.

Lock the 2 bottom layers.
7.
Make the top layer active.
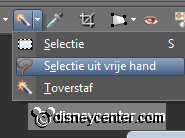
Go to Free Hand Selection - from point to point - and select this
part below.
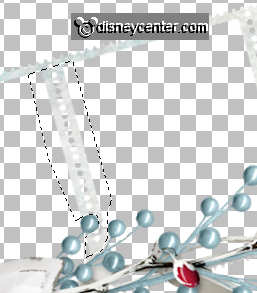
Click on the delete key
Selections - select none.
Open the 2 bottom layers.
8.
Copy micfanfare - and paste as a new layer on the image.
Image - free rotate - left 15.
Layers - arrange - move down.
9.
Make the top layer active (cluster) - set the opacity of this
layer for now at 50.
Go to eraser tool and erase the frame border. And a piece of the
right arm.
Set the opacity back to 100.
10.
Duplicate this layer - Effects - Distortion Effects - wind -
from right 100 .
Layers - arrange - move down.
Effects - Distortion Effects - Pixelate- with this setting.
11.
Make the layer above active
Effects - 3D Effects - drop shadow - with this setting.
Make the top layer active.
12.
Copy fanfare and paste as a new layer on the image.
Image - free rotate - left 15.
Lock the 2 bottom layers.
13.
Make the cluster layer active - click with the magic wand in the
right frame.
Selections - modify - expand 3.
Move the image on the selection.
If it stay right - selections - invert - click on the delete key.
Selections - select none
14.
Layers - arrange - move down.
Make the top layer active.
Effects - Xero - Porcelain - with this setting.

Give the same drop shadow as in point 11.
15.
Layers - merge - merge all.
Set the foreground color at #a71831 and the background color at
white.
Go to text tool - with this setting .

Write - Fanfare - convert to raster later.
Afbeelding - vrij roteren - links 15.
16.
Duplicate this layer.
Effects - Art Media Effects - Brush strokes - with the same setting
as in point 2.
Layers - arrange - move down.
17.
Make the top layer active.
Image - resize 95% - all layers not checked.
Give the same drop shadow as in point 11.
Layers - merge - merge down.
18.
Selections - select all - selections - modify - contract
10 - selections - invert..
Set the background color at #a71831.
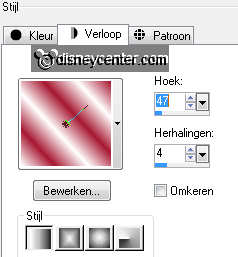
New raster layer - Fill this with gradient linear - with this
setting.
Selections - nselect none.
19.
Layers - merge - merge all.
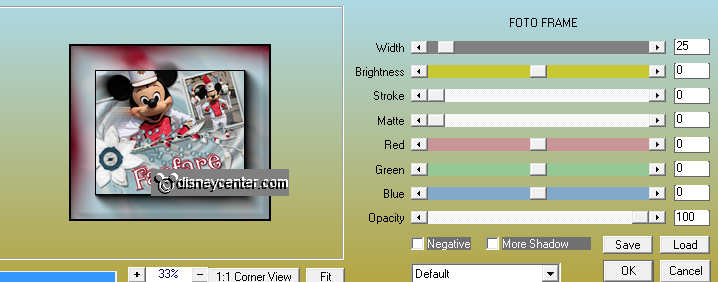
Effects - AAA Frames - Foto Frame - with this setting.
New raster layer - put your watermark into the image.
20.
Layers - merge - merge all.
Image - resize 75% - all layers checked.
File - export - JPEG optimizer.