Foreground color #a6b857 and background
color #355127
1. Open new image 500x400
2. Fill this with the background color.
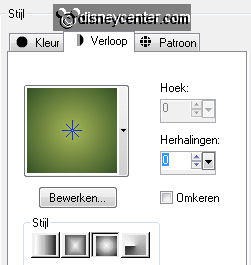
3. New raster layer - Fill this with gradient sunburst.
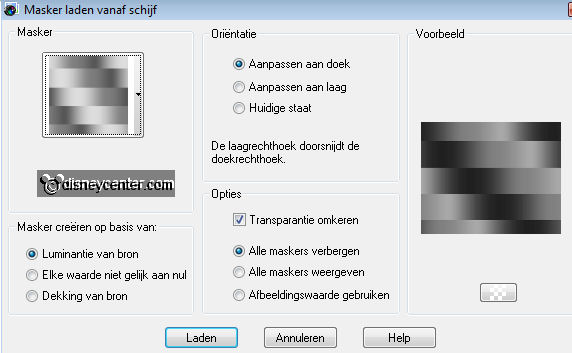
4. Layers - Load/Save Mask - Load Mask from Disk.
5. Layers - merge - merge down.
6. Copy Tinkerbell 7 and paste as a new layer.
7. Place this a little to the bottom.
8. Set the Blend Mode of this layer at Luminance Legacy
9. Set the opacity of this layer at 39.
10. Copy Disney Fairies 46 and paste as a new layer.
11. Place this right at the bottom.
12. Set the Blend Mode of this layer at Luminance.
13. Set the opacity of this layer at 53.
14. Image - add border 1 - background color.
15. Image - add border 5 - foreground color.
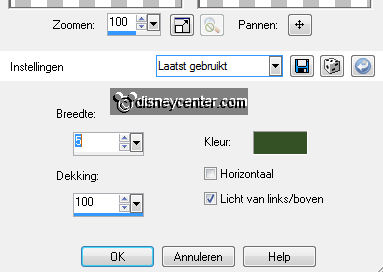
16. Select the border - Effects - Texture Effects - Blinds - with this setting.
17. Repeat point 16 and now horizontal also checked.
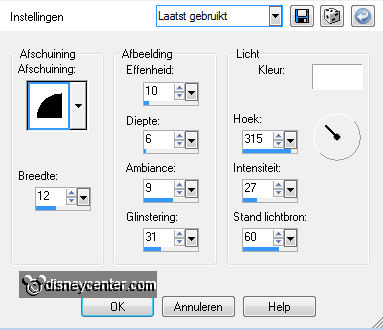
18. Effects - 3D Effects - Inner Bevel - with this setting.
19. Selections - select none.
20. Image - add border 20 - color white.
21. Select the border - Fill this with the background color.
22. Effects - Filters Unlimited 2.0 - Papers Textures - Japanese Paper -
default setting.
23. Selections - select none.
24. Repeat the points 15, 16, 17, 18 and 19.
25. New raster layer - put your watermark into the image.
26. Layers - merge - merge all.
27. Edit - copy.
28. Open Animation Shop - paste as a new animation.
29. Open new image 300x60.
30. Switch the fore- and background color.
31. Go to text tool - font Brush Script MT - size 48 and write Tinkerbell.

32. Convert to raster layer.
33. Duplicate this layer - Go to the first layer.
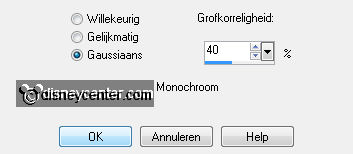
34. Adjust - Add/Remove noise - add noise - Gaussian.
35. Go to the second layer - repeat the noise but now at 50
36. Lock the top layer - select the other layer - edit -
copy merged.
37. Go tor animation shop - paste as a new animation.
38. Back in PSP - open the top layer and lock the other layer - select the top
layer - edit - copy merged.
39. Back in animation shop - paste after current frame.
40. Go to your image - Edit - duplicate selection. (2 frames now)
41. Open tinkerbellani - edit - select all - copy.
42. Back to your image - edit - select all - edit - paste into selected frame. Place
this left.
43. Go to your text - edit - select all - edit - copy.
44. Back to your image - edit - paste into selected frame. Place this right at
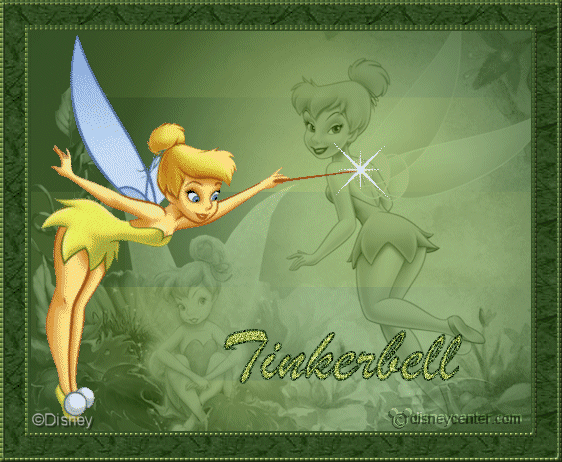
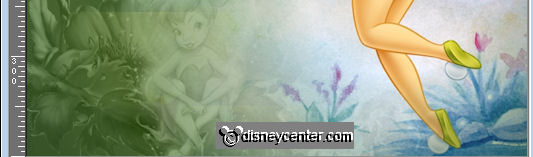
the bottom. See example.
45. Edit - Frame properties 75.
46. File - save as - give name - click 3 times at next and than at finish.