Set the foreground color at
#004336.
1.
Open the template Love Line.
Delete the 3 top layers.
2.
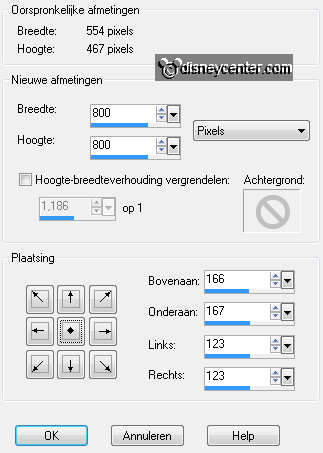
Image - canvas size - with this setting.
Delete the 2 bottom layers.
Lock the andere layers - by clicking at the eye in the layer palette.
3.
Activate layer frame 2 - open this.
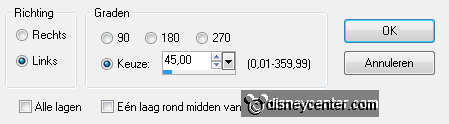
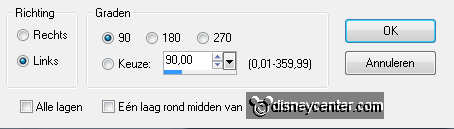
Image - free rotate - with this setting.
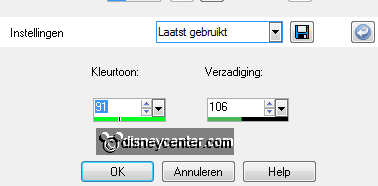
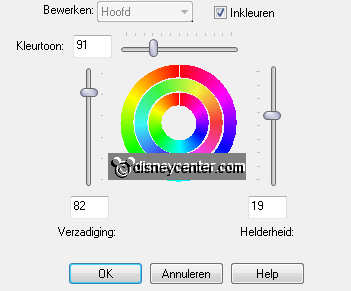
Adjust - Hue and Saturation - colorize - with this setting.
4.
Activate the magic wand - with this setting.

Select in the middle of frame 2.
5.
Selections - modify - expand 7.
Activate the image follow - edit - copy.
Edit - paste as a new layer on the image.
6.
Activate Move tool - move the image at the
frame.
Selections - invert.
Click at the delete key.
7.
Selections - select none.
Layers - arrange - move down.
8.
Make raster 2 active
Layers - merge - merge down.
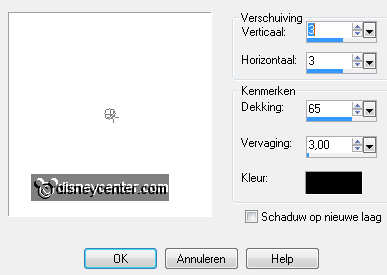
Effects - 3D Effects - drop shadow - with this setting.
9.
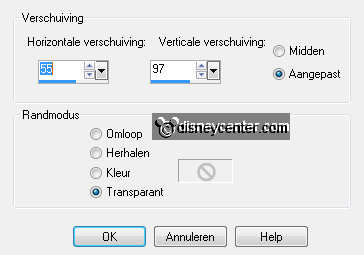
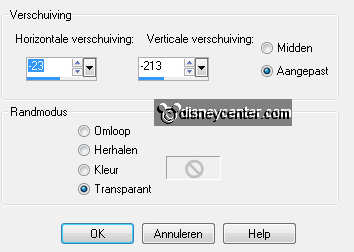
Effects - Image Effects - offset - with this setting.
Delete the layer Rectangel Shape out the template.
10.
Make Rectangel Frames active and open this.
Adjust - Hue and Saturation -
Hue/saturation/lightness - with this setting.
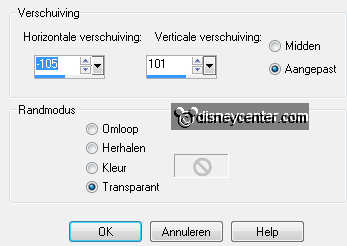
Effects - Image Effects - offset - with this setting.
11.
Activate the magic wand - settings are right - click inside the
4 frames.
Do this by holding down the shift key.
Selections - modify - expand 3.
12.
Layers - new raster layer.
Make follow1 active - edit - copy.
Edit - paste into selection.
13.
Selections - select none.
Layers - arrange - move down.
Make the layer above active
Layers - merge - merge down.
14.
Effects - 3D Effects - drop shadow - settings are right.
Delete the layer Top Shape1 from the template.
15.
Go to layer frame 1 - open this.
Adjust - Hue and Saturation -
Hue/saturation/lightness- settings are right.
16.
Image - free rotate - with this setting.
Make follow2 active - edit - copy.
17.
Activate the magic wand -
settings are right - click inside
frame 1.
Selections - modify - expand 3
Edit - paste as a new layer on the image.
18.
Activate move tool - move the image on the selection.
Selections - invert.
Click at the delete key.
Selections - select none.
19.
Layers - arrange - move down.
Layers - merge - merge down.
20.
Image - resize 85% - all layers not checked.
Effects - Image Effects - offset - with this setting.
Effects - 3D Effects - drop shadow - settings are right.
21.
Activate the tube follow3 - edit - copy.
Edit - paste as a new layer on the image.
22.
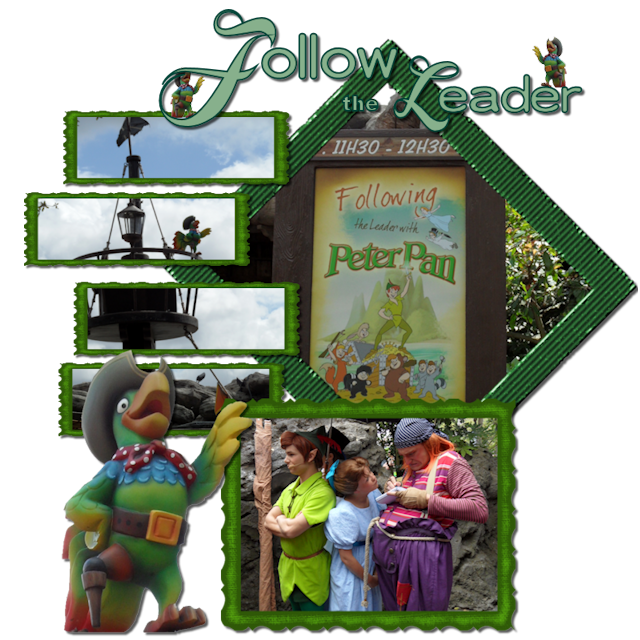
Put the tube left below - see example.
Effects - 3D Effects - drop shadow - settings are right.
23.
Layers - merge - merge all visible.
Put your image to the bottom.
24.
Activate word-art-follow - edit - copy.
Edit - paste as a new layer on the image.
Put this in the middle at the top - see example.
25.
Layers - new raster layer.
Put your watermark into the image.
Layers - merge - merge all visible.
26.
Image - resize 80% - all layers checked.
File - export - PNG optimizer.