
This
Tutorial is copyrighted to the Tutorial Writer, © Emmy Kruyswijk October 2011.
This Tutorial
may
not be forwarded, shared or otherwise placed on any Web Site or group without written
permission from
Emmy Kruyswijk
Do you want to link my lessons?
Please send
me a mail.
Materials:
download
here
1 image (is not
by the materials),1 accent from Anita, 2 patterns made by me.
filter: Tramages - Waffle, Simple - Top Left Mirror.
Download
here
Put the plug-ins in the folder plug-ins, put the
patterns in the folder pattern.
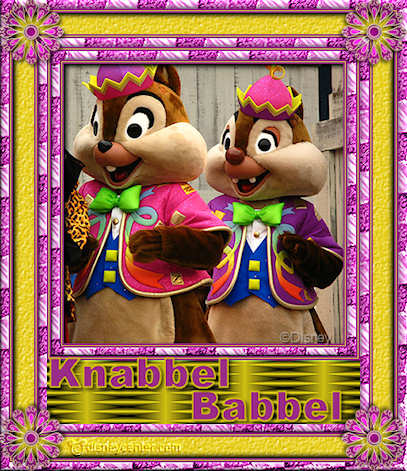
Open the image and accent in PSP
Frame Chip and Dale
Take 2 colors from the image - light foreground and dark background.
Use an image from about 330x330,
1.
Open your image - Shift+D - and close the original image.
Selections - select all - new raster layer
Effects - 3D Effects - Cutout - with this setting.
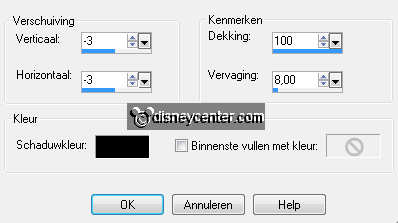
Repeat Cutout - now with -3.
selections - select none.
2.
Image - add border 2 pixels - symmetric - background color.
Image - add border 1 pixels - symmetric - foreground color.
Image - add border 2 pixels - symmetric - background color.
Image -add border 10 pixels - symmetric - color white.
3.
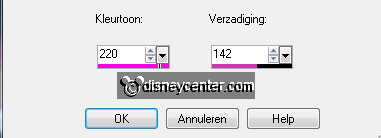
Open patroon2 - Adjust - Hue and Saturation - Colorize - with this setting.
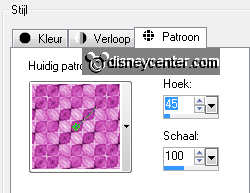
Set your foreground at patroon2 - with this setting.
Select the white border with the magic wand - with this setting.

Fill this with the pattern - let selection stay.
Effects - Edge Effects - Enhance.
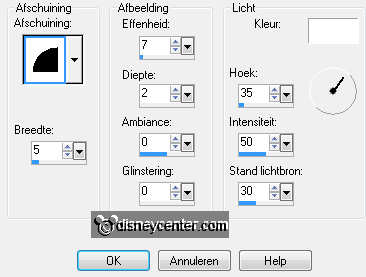
Effects - 3D Effects - Inner Bevel - with this setting.
selections - select none.
4.
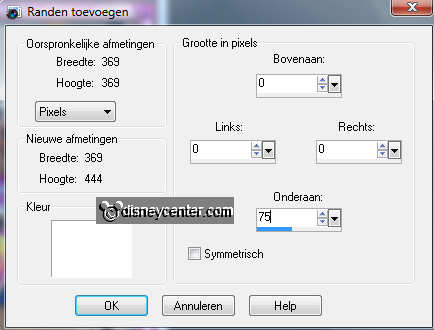
Image - add border 75 bottom - NOT symmetric - foreground color.
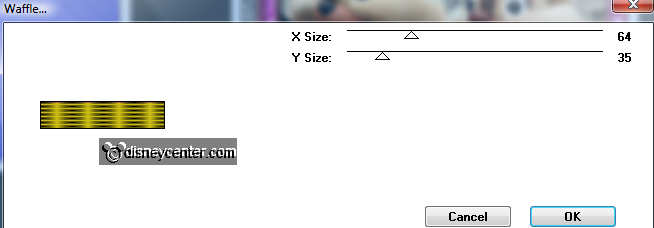
Select the border - Effects - Tramages - Waffle - with this setting.
Effects - Edge Effects - Enhance.
selections - select none.
5.
Image -add border 10 pixels - symmetric - color white.
Select the white border - fill this with patroon 2.
Effects - Edge Effects - Enhance.
Give the same Inner Bevel as in point 3.
selections - select none.
6.
Image - add border 2 pixels - symmetric - background color.
Image - add border 1 pixels - symmetric - foreground color.
Image - add border 2 pixels - symmetric - background color.
Image -add border 25 pixels - symmetric - color white.
7.
Select the white border - fill this with pattern bg3 - corner 0 - scale 100.
selections - select all.
Effects - Cutout - same setting as in point 1.
Repeat Cutout - now with -3.
selections - select none.
8.
Image - add border 2 pixels - symmetric - background color.
Image - add border 1 pixels - symmetric - foreground color.
Image - add border 2 pixels - symmetric - background color.
Image -add border 10 pixels - symmetric - color white.
9.
Image -add border 10 pixels - symmetric - color white.
Select the white border - fill this with patroon 2.
Effects - Edge Effects - Enhance.
Give the same Inner Bevel as in point 3.
selections - select none.
10.
Open Charme2 and select 1of the accents - selections - Freehand Selection -
free hand.
Draw a circle around the accent of your choice.
You can always colorize it to your fore- or background color.
11.
Copy this and paste as a new layer - place this left in the upper corner.
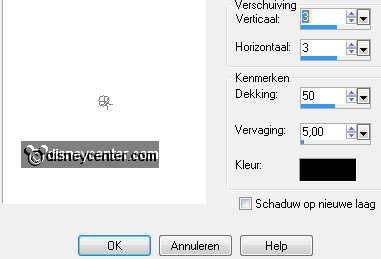
Effects - 3D Effects - Drop Shadow - with this setting.
Effects - Simple - Top Left Mirror - click OK.
12.
Go to text tool - size 48 - I use font Arial Black - stroke width
2 - fore- and background.
Write a text or put your name on it.
Place it in the lower part. see example.
Give the same drop shadow as in point 11.
13.
New raster layer -put your watermark into the image.
Layers - merge - merge all layers.
Image - resize format 85% - all layers checked.
14.
File - export - JPEG optimizer.
Ready is the tag
I hope you like this tutorial.
greetings Emmy,
Tested by Bep

Tutorial written
09-10-2011
