|

This
Tutorial is copyrighted to the Tutorial Writer, © Emmy Kruyswijk 2011.
This Tutorial
may
not be forwarded, shared or otherwise placed on any Web Site or group without written
permission from
Emmy Kruyswijk
Do you want to link my lessons?
Please send
me a mail.
Materials:
download
here
2 Disney tubes, 1
Frame, 1 font
Action Is Shaded JL
filters:
Filters Unlimited - Texture Papers - Papyrus
,
FM Tile Tools - Blend Emboss.
Download
here
Autochromatic - Namesuppressed. This filter
is
here to
download for 21 days
Before you begins.......
Filters : Install first your plug-ins before you open PSP and put
them in the folder plug-ins.
Open your tubes in PSP
Open the font and minimize
Lovely Friendship

Foreground color #474848 and background color
#971927.
1.
Open new image 700x600 - Fill this with the foreground color.
Effects - Filters Unlimited - Texture Papers - Papyrus - default setting.
Copy heartframe5 - and paste as a new layer.
Place this left at the top.
2.
Copy heartframe5 - and paste as a new IMAGE.
Select in the frame - Selections - modify - expand 28.
New raster layer - Fill this with the foreground color.
Layers - arrange - move down.
Go to Eraser Tool- put the size first at 14 and then 4 to go exact along the
frame.
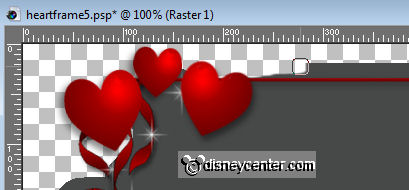
Enlarge the image with Zoom In.
Remove all the gray that stands above the frame - around. When it's done, it
looks like this
3.
Copy the tube Valentijn52 and paste as a new layer.
Move it to the middle - Layers - arrange - move down.
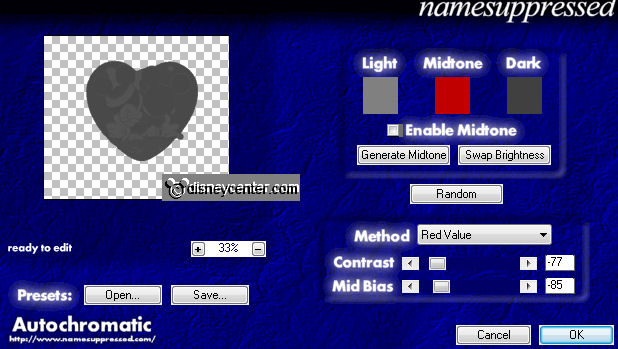
Effects - Autochromatic - Namesuppressed - with this setting.
Effects - FM Tile Tools - Blend Emboss - with this setting.
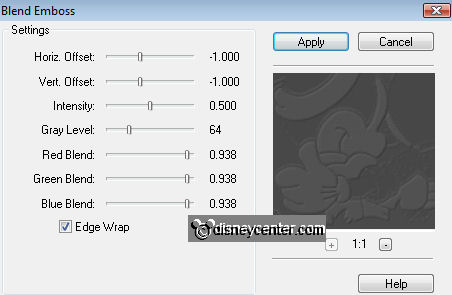
Repeat the Blend Emboss.
4.
Image - Resize 75% - Resize all layers checked.
Layers - merge - merge all visible layers.
5.
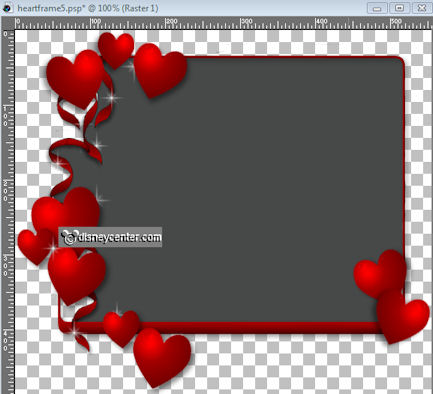
Copy the frame with the grey background - and paste as a new layer on the large
image.
Place it right - just over the bottom of the large frame.

6.
Activate the tube Valentijn52 - image - resize - width 150
pixels.
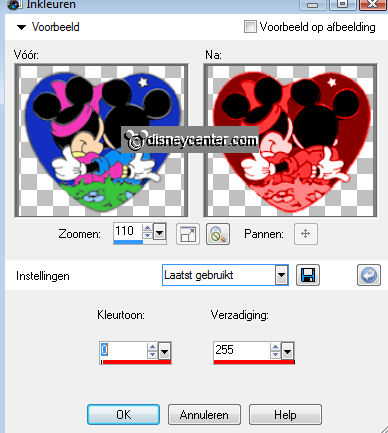
Adjust - Hue and Saturation - Colorize - with this setting.
7.
Copy this heart - and paste as a new layer.
Place this right in de top corner.
Effects - 3D Effects - drop shadow - with this setting.

Duplicate this layer - place this right at the bottom.
8.
Activate now the tube Mickey53.
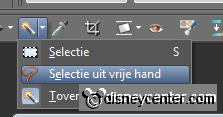
Go to Free Hans Selection Tool - and select the sections below.
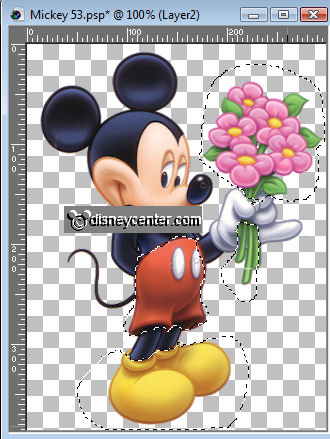
Hold down the shift key,
Adjust - Hue and Saturation - Colorize - with the same setting as in point 6.
Selections - select none.
9.
Copy this tube - and paste as a new layer.
Place this left at the bottom.
Give the same drop shadow as in point 7.
10.
Go to text tool - font Action Is Shaded JL - size 48 - Lock the foreground
color.

Write - Lovely - Convert to raster layer.
Give the same drop shadow as in point 7.
Place this in the large frame at the top (see example)
11.
Go again to the text tool - same setting - and write - Friendship.
Give the same drop shadow as in point 7.
Place this diagonally above lovely. (see example)
12.
Go again to the text tool - same setting - and write - Be my
Valentine.
Give the same drop shadow as in point 7.
Place this in the middle below. (see example)
13.
New raster layer - put your watermark into the image.
Layers - merge - merge all layers.
14.
Image - add border 1 - color black
Selections - select all - selections - modify - contract 1
Effects - 3D Effects - Cutout - with this setting.
Repeat Cutout, but now with -1.
Selections - select none.
15.
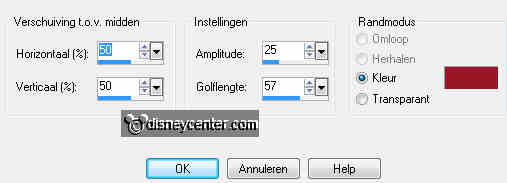
Image - add border 15 - foreground color.
Select the border - Effects - Distortion Effects - Ripple- with this setting.
Selections - Promote selection to layer -
Selections - select none.
Effects - FM Tile Tools - Blend Emboss - with the same setting as in point
3.
16.
Image - add border 1 - color black
Image - add border 15 - foreground color.
Select the border - Effects - Filters Unlimited - Texture Papers - Papyrus -
default setting.
Selections - select none.
17.
Image - add border 1 - color black
Repeat point 15.
Image - add border 1 - color black
18.
Image -Resize 65% - Resize all layer checked.
File - export - jpeg optimizer.
Ready is the tag
I hope you like this tutorial.
greetings Emmy,

Tutorial written 05-02-2011
| 