1.
File - open new transparent image 750x700.
Activate the background - edit - copy.
Edit - paste as a new layer on the image.
Effects - 3D Effects - drop shadow- with this setting.

2.
Activate the tube Emmyframe -
edit - copy.
Edit - paste as a new layer on the image.
Image - free rotate -
with this setting.

Effects - 3D Effects - drop shadow - setting is right.
3.
Activate the tube krans -
edit - copy.
Edit - paste as a new layer on the image.
4.
Activate the tube lantaarnpaal -
edit - copy.
Edit - paste as a new layer on the image.
Activate move tool - move this a little up and to the left - see example.
Effects - 3D Effects - drop shadow - setting is right.
Layers - arrange - move down.
5.
Activate the top layer.
Activate the tube hek -
edit - copy.
Edit - paste as a new layer on the image.
Place this left at the bottom - see example.
Effects - 3D Effects - drop shadow - setting is right.
6.
Activate the tube wiel -
edit - copy.
Edit - paste as a new layer on the image.
Place this before the tube hek - see example.
Effects - 3D Effects - drop shadow - setting is right.
7.
Activate raster 1.
Activate the tube kerstboom4 -
edit - copy.
Edit - paste as a new layer on the image.
Place this at the right side.
Effects - 3D Effects - drop shadow - setting is right.
8.
Activate the top layer.
Activate the tube bank -
edit - copy.
Edit - paste as a new layer on the image.
Image - mirror.
Place this at the right side before the Christmas tree.
Effects - 3D Effects - drop shadow - setting is right.
9.
Activate the tube sneeuwbes -
edit - copy.
Edit - paste as a new layer on the image.
Image - mirror.
Place this left at the bottom - see example.
Effects - 3D Effects - drop shadow - setting is right.
10.
Activate the tube frostyroos -
edit - copy.
Edit - paste as a new layer on the image.
Place this at the tube krans at the bottom in the middle.
11.
Activate the tube dennenappelsnow -
edit - copy.
Edit - paste as a new layer on the image.
Image - resize 75% - all layers not checked.
Place this for the tube sneeuwbes right.
Effects - 3D Effects - drop shadow - setting is right.
Layers - duplicate.
Image - resize 75% - all layers not checked.
Place this near the other.
12.
Activate the tube lantaarn1a -
edit - copy.
Edit - paste as a new layer on the image.
Layers - arrange - move down.
Place this as in the example in the middle at the bottom.
Effects - 3D Effects - drop shadow - setting is right.
13.
Activate the top layer.
Activate the tube vogel-
edit - copy.
Edit - paste as a new layer on the image.
Place this on the tube hek links.
Effects - 3D Effects - drop shadow - setting is right.
14.
Activate the tube strik1-
edit - copy.
Edit - paste as a new layer on the image.
Image - resize 75% - all layers not checked.
Place this on the Christmas tree - see example.
15.
Activate the tube kerstcluster2 -
edit - copy.
Edit - paste as a new layer on the image.
Place this right at the bottom before the bank.
16.
Activate raster 7 (Christmas tree).
Activate the tube duffychr -
edit - copy.
Edit - paste as a new layer on the image.
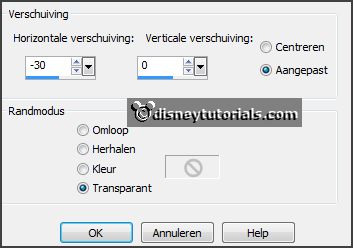
Effects - Image effects - offset -
with this setting.

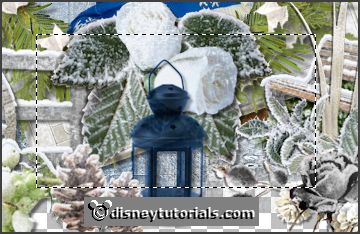
Activate selection tool - rectangle - and make a selection - as below
- click at the delete key.

Selections - select none.
17.
Layers - duplicate.
Layers - arrange - move up - place this above raster 3.
Effects - 3D Effects - drop shadow - setting is right.
18.
Layers - new raster layer - put your watermark into the image.
Layers - merge - merge all visible layers.
Image - resize 90% - all layers checked.
File - export - PNG Optimizer.