1.
File - open new transparent image 700x700.
Convert to rater layer.
Set in the material palette the foreground
color at #725741 and the background color
at
#371b0f.
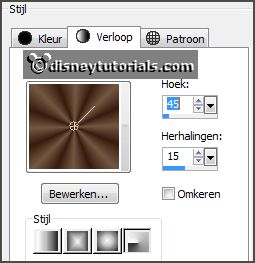
Make from the foreground a gradient radial
- with this setting.
2.
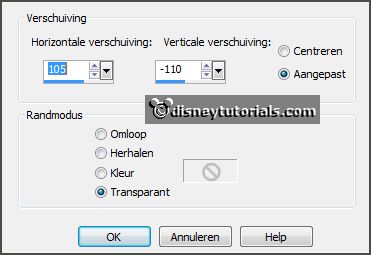
Activate selection tool - custom selection - with this setting.
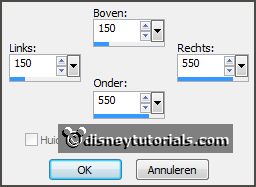
Fill the selection with the gradient.
Selections - select none.
Adjust - blur - Gaussian blur - radius 60.
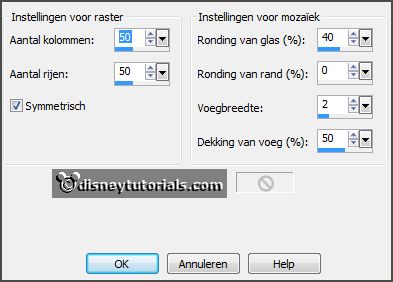
Effects - Texture effects - Mosaic Glass -
with this setting.
Effects - Edge effects - enhance more.
Image - resize 110% - all layers not checked.
3.
Activate the tube disneyhw6 - edit - copy.
Edit - paste as a new layer on the image.
Image - resize 85% - all layers not checked.
Activate move tool - place this up.
4.
Activate the tube houtenframe -
edit - copy.
Edit - paste as a new layer on the image.
Image - resize 95% - all layers not checked.
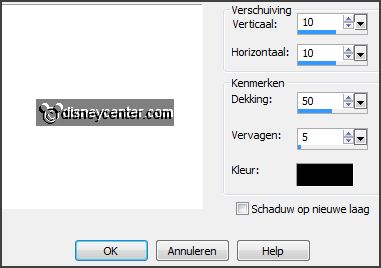
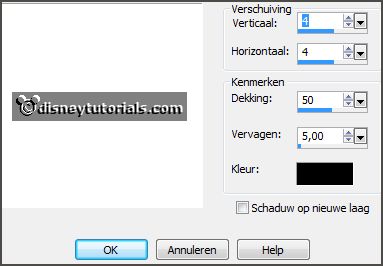
Effects - 3D Effects - drop shadow -
with this setting.
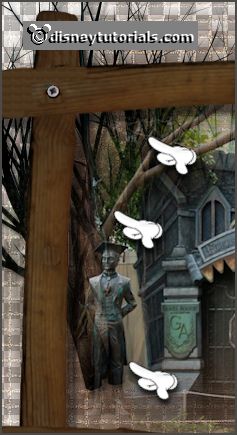
Watch now or raster 2 stays good. The clock should be about against the frame.
5.
Activate the tube DBV/TheWitchesDen_element(15) -
edit - copy.
Edit - paste as a new layer on the image.
Place this left to the top - see example.
Place this under raster 2.
Effects - 3D Effects - drop shadow -
with this setting.
Activate eraser tool - size 25 - and erase the tree in the frame.
6.
Activate the tube DBV_HMElement(39) -
edit - copy.
Edit - paste as a new layer on the image.
Effects - Image effects - offset -
with this setting.
Effects - 3D Effects - drop shadow - setting is right.
Erase also here the tree away in the frame.
7.
Activate the top layer.
Activate the tube stone -
edit - copy.
Edit - paste as a new layer on the image.
Place this left under the frame - see example.
Effects - 3D Effects - drop shadow - setting is right.
8.
Activate Pan tool.
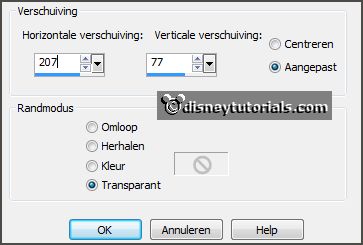
Press and hold down the Ctrl key and the right point under - see image below.

Set pan tool back to move tool.
9.
Activate the tube DBV_SOTW_element(27) -
edit - copy.
Edit - paste as a new layer on the image.
Image - resize 60% - all layers not checked.
Place this before the stone and under on the frame - see example.
Effects - 3D Effects - drop shadow - setting is right.
10.
Activate the tube sl_4 -
edit - copy.
Edit - paste as a new layer on the image.
Effects - Image effects - offset -
with this setting.
Effects - 3D Effects - drop shadow - setting is right.
11.
Activate the tube halwlamp -
edit - copy.
Edit - paste as a new layer on the image.
Place this at the hand of the skeleton - see example.
12.
Activate de tube halwgras -
edit - copy.
Edit - paste as a new layer on the image.
Place at the bottom of the frame.
Effects - 3D Effects - drop shadow - setting is right.
13.
Activate the tube halwgras1 -
edit - copy.
Edit - paste as a new layer on the image.
Place it down on the grass.
Effects - 3D Effects - drop shadow - setting is right.
14.
Activate the tube graspompoen -
edit - copy.
Edit - paste as a new layer on the image.
Image - resize 85% - all layers not checked.
Place this left at the bottom of the stone - see example.
15.
Activate the tube spider-web -
edit - copy.
Edit - paste as a new layer on the image.
Place this in the frame - right at the top.
Place this layer under raster 3.
16.
Activate the top layer
Activate the tube minniehalw3 -
edit - copy.
Edit - paste as a new layer on the image.
Image - mirror.
Place this right at the bottom- see example.
Effects - 3D Effects - drop shadow - setting is right.
17.
Set in the material palette the foreground back to color #a18d73.
Activate text tool -
with this setting - write Graveyard - convert to raster layer.

Effects - 3D Effects - drop shadow - setting is right.
Place this in the middle up the frame - see example.
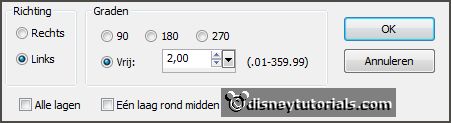
Image - free rotate -
with this setting.
18.
Image - resize 85% - all layers checked.
Layers - new raster layer - put your watermark into the image.
Layers - merge - merge all layers.
File - export - PNG Optimizer.


