1.
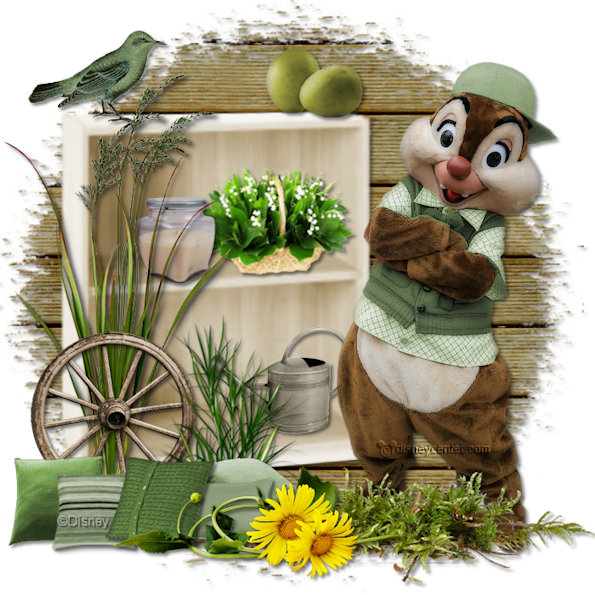
File – open new transparent image 700x700
Put in the material palette the foreground on #927e4d.
2.
Activate flood fill tool and fill the layer with the foreground color.
Activate image achtergrond – edit - copy.
Edit - paste as a new layer on the image.
3.
Layers – load/save mask – load mask from disk – look Emmymask12 – with this
setting.
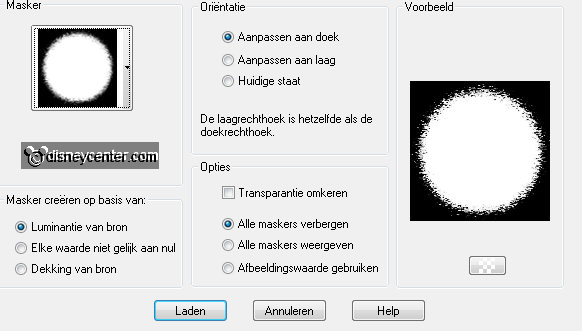
Layers – merge – merge group.
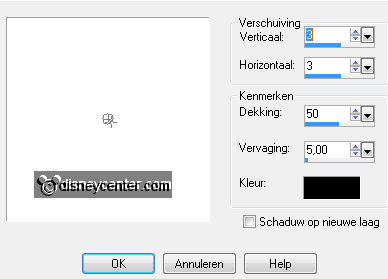
Effects – 3D Effects – drop shadow – with this setting.
4.
Activate the tube kastje1 – edit - copy.
Edit - paste as a new layer on the image.
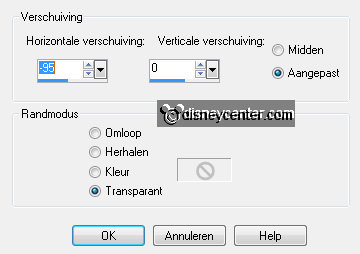
Effects – Image effects – offset – with this setting.
Effects – 3D Effects – drop shadow - setting is right.
5.
Activate the tube gieter1 – edit - copy.
Edit - paste as a new layer on the image.
Image – resize 85% - all layers not checked.
Activate move tool and put thee tube on the bottom shelf right.
Effects – 3D Effects – drop shadow - setting is right.
Activate the tube kaarsinpot – edit - copy.
Edit - paste as a new layer on the image.
Image – resize 85% - all layers not checked.
Effects – 3D Effects – drop shadow - setting is right.
Put the tube on the middle shelf left.
7.
Activate the tube lelietjes – edit - copy.
Edit - paste as a new layer on the image.
Image – resize 85% - all layers not checked.
Effects – 3D Effects – drop shadow - setting is right.
Put the tube on the middle shelf right.
8.
Activate the tube vogel5 – edit - copy.
Edit - paste as a new layer on the image.
Image – resize 75% - all layers not checked.
Effects – 3D Effects – drop shadow - setting is right.
I have colorized the bird a little.
Put the tube on the top of the small closet left.
9.
Activate the tube gras1 – edit - copy.
Edit - paste as a new layer on the image.
Image – resize 115% - all layers not checked.
Effects – 3D Effects – drop shadow - setting is right.
10.
Activate the tube wiel2 – edit - copy.
Edit - paste as a new layer on the image.
Effects – 3D Effects – drop shadow - setting is right.
Put the tube left of the small closet – see example.
11.
Activate the tube gras – edit - copy.
Edit - paste as a new layer on the image.
Image – resize 85% - all layers not checked.
Effects – 3D Effects – drop shadow - setting is right.
Put the tube right next to the wheel – see example.
12.
Activate the tube kussens1 – edit - copy.
Edit - paste as a new layer on the image.
Image – resize 115% - all layers not checked.
Effects – 3D Effects – drop shadow - setting is right.
Put the tube before the wheel and the grass- see example.
13.
Activate the tube Mango – edit - copy.
Edit - paste as a new layer on the image.
Image – resize 75% - all layers not checked.
Effects – 3D Effects – drop shadow - setting is right.
Put the tube on the top of the small closet right.
14.
Activate the tube knabbel – edit - copy.
Edit - paste as a new layer on the image.
I have colorized the tube.
Effects – 3D Effects – drop shadow - setting is right.
Put the tube right at the image – see example.
15.
Activate the tube mos – edit - copy.
Edit - paste as a new layer on the image.
Put the tube right at the bottom.
16.
Activate the tube zonnebloem – edit - copy.
Edit - paste as a new layer on the image.
Effects – 3D Effects – drop shadow - setting is right.
Put the tube before the moss in the middle at the bottom – see example.
17.
Delete the bottom layer (foreground color).
Layers – new raster layer – put your watermark into the image.
Layers – merge – merge all visible layers.
18.
Image – resize 85% - all layers checked.
File – export – PNG Optimizer.