Before you begins.......
Plug-ins : Install first your plug-ins before you open PSP and put
them in the folder plug-ins.
Open your tube and template PSP.
I love music

Foreground color #a81900 and background #e4ba9d
1.
Open new transparent image 650x650.
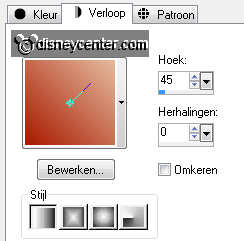
Fill this gradient linear.
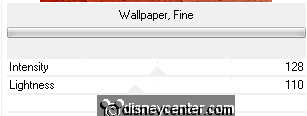
Effects - IC Net Software - Filters Unlimited 2.0 - Paper Texture - Wall paper
Fine - with this setting.
2.
Copy vert.strepen 1 and paste as a new layer.
Select the vert.strepen - fill this with the background color.
Selections - select none.
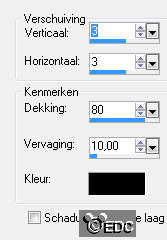
Effects - 3D Effects - drop shadow - with this setting.
3.
Duplicate this layer - image - mirror.
Copy horz.strepen and paste as a new layer.
Select the horz.strepen - fill this with the background color.
Selections - select none.
Give the same drop shadow as in point 2.
4.
Copy vert.rechthoek and paste as a new layer.
Select the vert.rechthoek and fill this with the foreground color.
Selections - select none.
5.
Copy rand vert.rechthoek and paste as a new layer.
Select the borders - fill this with the background color.
Selections - select none.
Effects - 3D Effects - Inner Bevel - with this setting.

Layers - merge - merge down.
Give the same drop shadow as in p0int 2.
6.
Copy vierkant and paste as a new layer.
Select the black vierkant - fill this with the foreground color.
Selections - select none.
7.
Copy rand vierkant and paste as a new layer.
Select the randen (borders) - fill this with the background color.
Selections - select none.
Give the same Inner Bevel as in point 5.
Layers - merge - merge down.
8.
Copy ruitjesrand and paste as a new layer.
Selections - select none.
Selections - select all - selections - float - selections - defloat.
fill this with the background color.
Selections - select none.
Give the same Inner Bevel as in point 5.
9.
Stay at raster 1.
Copy doodle and paste as a new layer.
Go to selection tool - selection - rectangle - and select the part below.
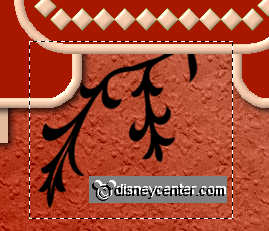
Click on the delete key of your keyboard.
Selections - select none.
10.
Selections - select all.
Selections - select all - selections - float - selections - defloat.
Fill the border with the foreground color. You can also do it with your brush at
20.
Selections - select none.
Give the same drop shadow as in p0int 2.
11.
Copy muzieknoot2 and paste as a new layer.
Place this right at the bottom.
Go to selection tool - selection - rectangle - and select the left part.
Click on the delete key of your keyboard.
Selections - select none.
12.
Selections - select all.
Selections - select all - selections - float - selections - defloat.
Fill the border with the foreground color. You can also do it with your brush at
20.
Selections - select none.
Give the same drop shadow as in p0int 2.
Duplicate this layer - place this near the left side and slightly down. see
example.
13.
Copy muzieknoot and paste as a new layer.
Place this left at the top.
Selections - select all.
Selections - select all - selections - float - selections - defloat.
Fill the border with the foreground color. You can also do it with your brush at
20.
Selections - select none.
Give the same drop shadow as in p0int 2.
14.
Copy Donald-boys01 and paste as a new layer.
Place this left at the bottom.
Give the same drop shadow as in p0int 2.
15.
Copy wordart and paste as a new layer.
Place this on the right vert.rectangle.
Selections - select all - selections - float.
Go to brush - set the size on 20 - go with the background color about the
letters.
Selections - select none.
Give the same drop shadow as in p0int 2.
16.
Image - add border 1 - foreground color.
Image - add border 25 - background color.
Select the border - fill this with gradient from point 1 - invert checked.
Effects - Filter Factory Gallery J - Twister - with this setting.

17.
Selections - invert -
Give the same drop shadow as in p0int 2.
Repeat the drop shadow with -3.
Selections - select none.
Image - add border 1 - foreground color.
18.
New raster layer - put your watermark into the image.
Layers - merge - merge all.
Image - resize 75% - all layers checked.
File - export - JPEG optimize.
Ready is the tag
I hope you like this tutorial.
greetings Emmy

Tutorial written
14-08-2011
