Indian
Village
1.
File - open new transparent image
700x550.
Set in the material palette the foreground color on #3b483a and the background color on #b6af9d.
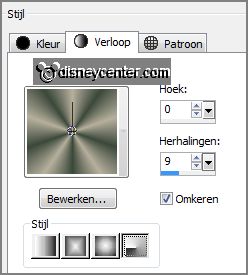
Make from the foreground a gradient radial - with this setting.
2.
Activate flood fill tool - fill the layer with the gradient.
Adjust - blur - Gaussian blur - radius 20.
3.
Layers - new raster layer.
Fill the layer with the foreground color.
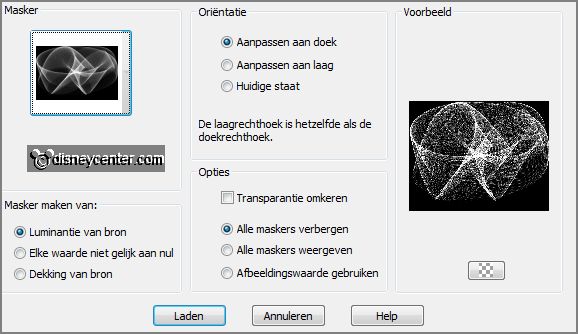
Layers - load/save mask - load mask from disk - look Emmymask11 - with this
setting.
Layers - merge - merge group.
4.
Layers - duplicate.
Image - flip.
Layers - merge - merge down.
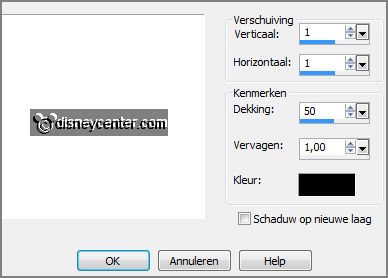
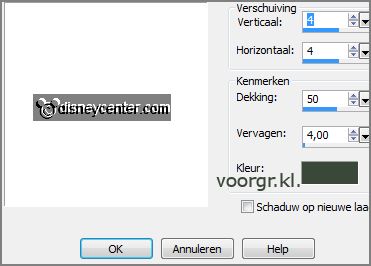
Effects - 3D Effects - drop shadow -
with this setting.
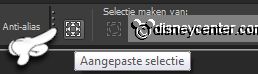
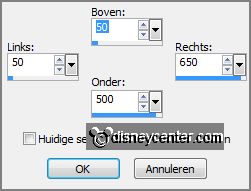
5.
Activate selection tool - custom selection -
with this setting.
Click on the delete key.
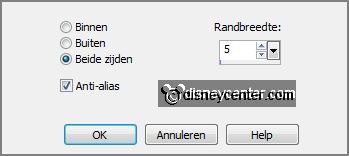
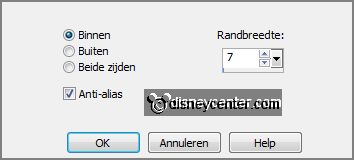
Selections - modify - select selected borders -
with this setting.
6.
Layers - new raster layer.
Fill the selection with the foreground color.
Effects - 3D Effects - Inner bevel -
with this setting.
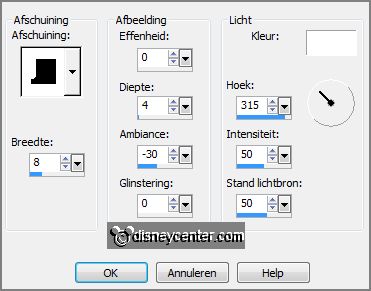
Image - add borders 9 pixels - symmetric - color
black.
7.
Activate the magic wand - with setting below - select the black border.

Fill the selection with thee foreground color.
Effects - 3D Effects - drop shadow
-
with this setting.
Selections - select none.
8.
Image - add borders 50 pixels - symmetric - background color.
Select the border with the magic wand - setting is right.
Fill the selection with the gradient.
Selections - select none.
9.
Image - add borders 9 pixels -
symmetric - color black.
Select the border with the
magic wand - setting is right.
Fill the selection with
thee foreground color.
Effects - 3D Effects -
drop shadow - setting is
right.
Selections - select none.
10.
Activate the misted tube indianboat - edit - copy.
Edit - paste as a new layer on the image.
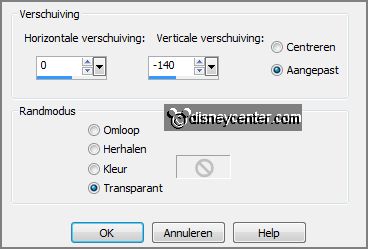
Effects - Image effects - offset -
with this setting.
11.
Activate the misted tube indiantent -
edit - copy.
Edit - paste as a new layer on the image.
Activate move tool - place the tube against the top side - see example.
12.
Activate misted tube cactus -
edit - copy.
Edit - paste as a new layer on the image.
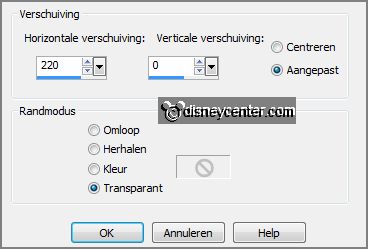
Effects - Image effects -
offset -
with this setting.
Set in the layer palette the opacity to 65.
13.
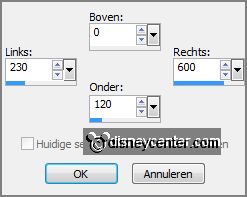
Activate selection tool - costum -
with this setting.
Layers - new raster layer.
Fill the selection with the gradient.
Adjust - blur - Gaussian blur - radius 20.
Selections - modify - select selected borders -
with this setting.
14.
Layers - new raster layer.
Fill the selection with the
foreground color.
Effects - 3D Effects - drop shadow - setting is right.
Selections - select none.
Layers - merge - merge down.
15.
Activate word-art-indianvillage -
edit - copy.
Edit - paste as a new layer on the image.
Place this in the middle of the little rectangle - see example.
Effects - 3D Effects - drop shadow - setting is right.
16.
Activate the tube micindiaan -
edit - copy.
Edit - paste as a new layer on the image.
Place this to the left side - see example.
Effects - 3D Effects - drop Shadow - setting is right -
change only the color in black.
17.
Activate the tube vaasenkan -
edit - copy.
Edit - paste as a new layer on the image.
Place this at the bottom right.
Effects - 3D Effects - drop shadows - setting is right.
18.
Layers - new raster layer -
put your watermark into the image.
Layers - merge - merge all.
19.
Image - resize 85% - all layers checked.
File - export - JPEG Optimizer.
Ready is the tag
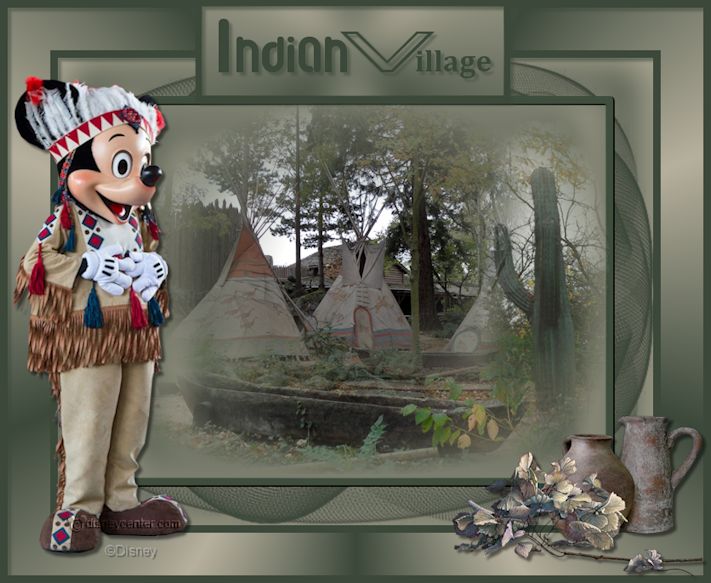
I hope you like this tutorial.
greetings Emmy
Tested by Nelly