
This
Tutorial is copyrighted to the Tutorial Writer, © Emmy Kruyswijk 2009.
This Tutorial
may
not be forwarded, shared or otherwise placed on any Web Site or group without written
permission from
Emmy Kruyswijk
Do you want to link my lessons?
Please send
me a mail.
Materials:
Download
here
1
Disney
tube,
6 tubes 2 masks, 1 animation bling, Animation Shop.
filter: Penta.com - Dot and Cross,
Graphics Plus - Panel Stripes, VDL-Adrenaline.
Download here
Put the plug-ins in the folder plug-ins and the masks in the
folder mask.
Christmas Magic.
1. Open
new image 700x700.
2. Fill this with foreground color #9ca0b6
3. New raster layer - fill this with background color white.
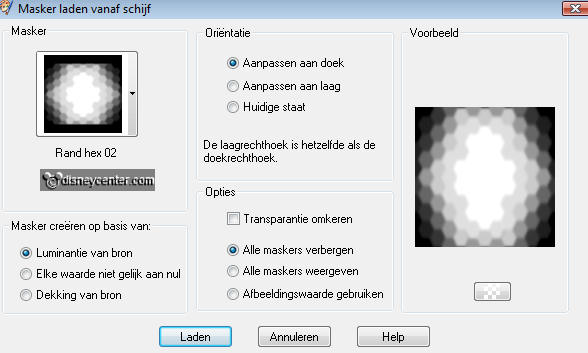
4. Layers - Load/Save Mask - Load mask from disk - Rand hex 02 with
this setting.
5. Layers - merge - merge group.
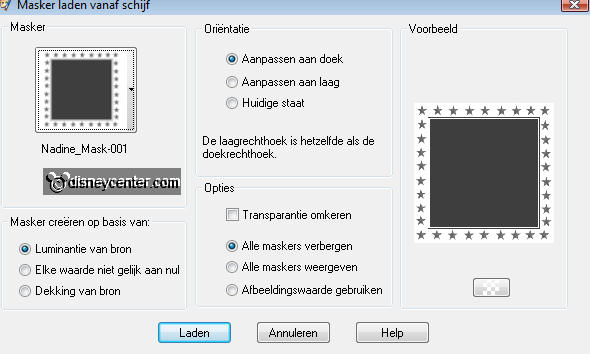
6. Layers - Load/Save Mask - Load mask from disk - Nadine mask 001
with this setting.
7. Layers - merge - merge group.
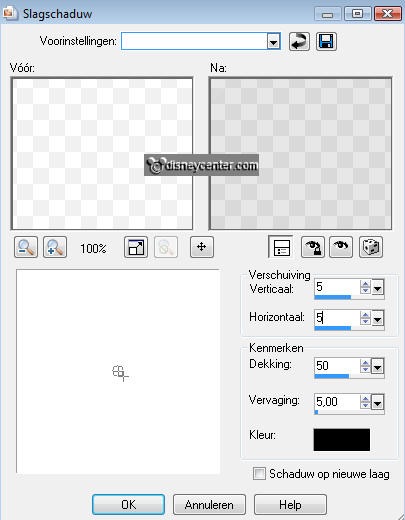
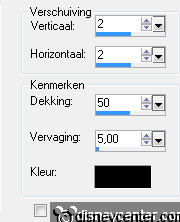
8. Effects - 3D Effects - drop shadow with this setting.
9. Copy the tube kerstbal and paste as a new layer.
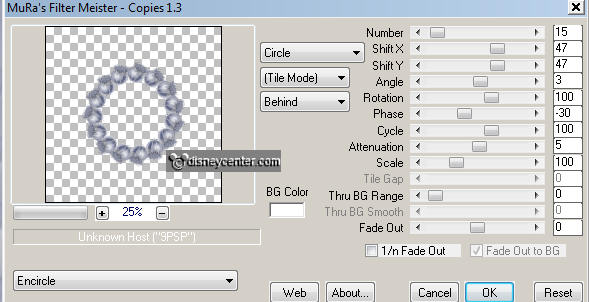
10. Effects - MuRa's Meister - Copies - with this setting.
11. Effects - 3D Effects - drop shadow with this setting.
12. Copy the tube rs_frame and paste as a new layer.
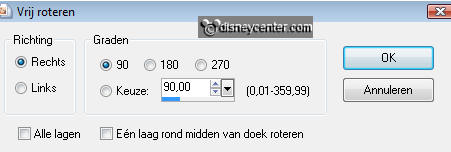
13. Image - free rotate 90 right.
14. Image - Resize 110% - Place it at the top.
15. Select the middle of the frames.
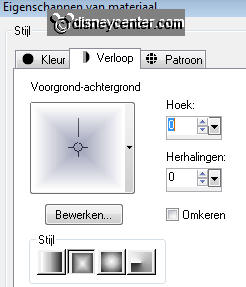
16. New raster layer - fill this with gradient Rectangular.
17. Layers - arrange - move down.
18. Selections - select none.
19. Go to raster 3 (top) give the same drop shadow as in point
11.
20. Copy the tube kerstbal1 and paste as a new layer.
21. Place this at the left rectangle left - remove the remaining
cord.
22. Give the same drop shadow as in point
11.
23. Duplicate this layer and paste near the other one to the right
side. Remove here also the remaining cord.
24. Lock all layers, except the top 2
25. Stay at 1 of the other layers - Layers - merge - merge all
visible.
26. Duplicate this layer - image - mirror.
27. Unlock all layers.
28. Stay at raster 2 - Go to selection tool - selection -
circle.
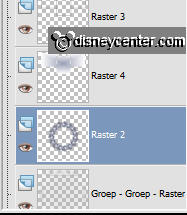
29. Draw a circle on the rounded edge of about 300 pixels.
30. New raster layer - fill this with #597f5a.
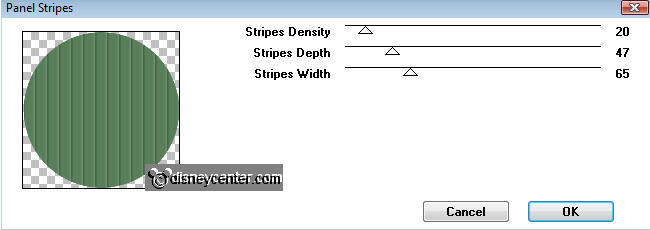
31. Let selection stay - Effects - Graphics Plus - Panel Stripes
with this setting.
32. Layers - arrange - move down.
33. Selections - select none.
34. Copy the tube SMMSantaMickey and paste as a new layer.
35. Give the same drop shadow as in point
11.
36. Place this to the right at the bottom.
37. Copy the tube N_40_Sl and paste as a new layer.
38. Give the same drop shadow as in point
11.
39. Place this to the left at the bottom.
40. Copy the tubes rs_gift 1 and paste as a new layer.
41. Give the same drop shadow as in point
11.
42. Copy the tubes rs_gift 2 and paste as a new layer.
43. Give the same drop shadow as in point
11.
44. Copy the tubes rs_gift 4 and paste as a new layer.
45. Give the same drop shadow as in point
11.
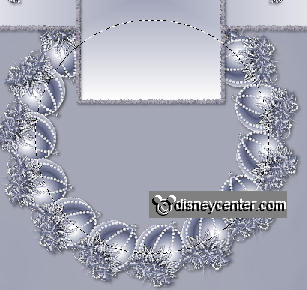
46. Place all 3 by the Christmas tree right.
47. Lock now raster 2,3 and 4.
48. Stay at raster 5 ( green circle)
49. Go to selection tool - circle - and make a circle just to the
green circle.
50. Duplicate this 2 more times.
51. Lock the copy layers and stay at raster 5.
52. Effects - VDL Adrenaline - Snowflakes with this setting.
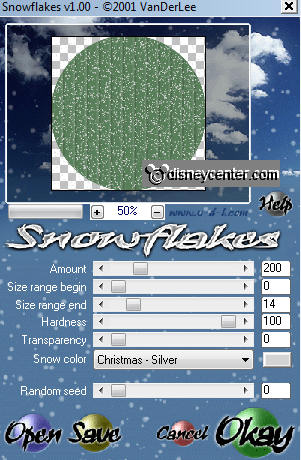
53. Lock raster 5 and open copy of raster 5.
54. Repeat point 52, but now with random seed 455
55. Lock copy of raster 5 and open copy(2) of raster 5.
56. Repeat point 52, but now with random seed 182
57. Selections - select none.
58. Open all layers and lock the copy layers of raster 5. Stay at
the top layer.
59. Put your watermark into the image.
60. Image - Canvas size 720x720.
61. New raster layer - Selections - modify - contract 10
62. Selections - invert - fill with #50556d.
63. Effects - Penta.com - Dot and Cross default setting.
64. Open in animation shop BlingChristmasStocking2
65. Edit - select all.
66. Go back to PSP - Edit - Copy merged.
67. Back to animation shop - paste as a new animation.
68. Back in PSP - Lock raster 5 and open copy of raster 5.
69. Edit - Copy merged.
70. Back to animation shop - paste after current frame. Make sure the
last frame is selected.
71. Back in PSP - Lock copy of raster 5 and open copy(2)
of raster 5.
72. Edit - Copy merged.
73. Back to animation shop - paste after current frame.
74. Edit - select all.
75. Go to the bling animation - copy
76. This should come in the middle rectangle.
77. Click in the big image - paste in selected frame.
78. Animation - Resize animation 75%.
79. File - save as - give a name - click 3 times at next and than at
finish'.
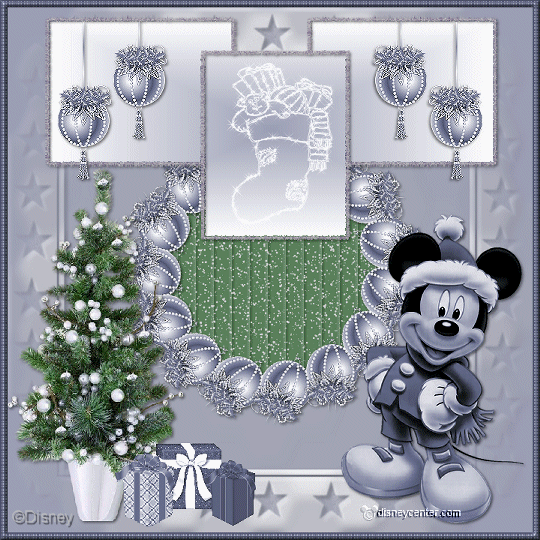
Ready is the tag
I hope you like this tutorial.
greetings Emmy,

Tutorial written
30-11-2009
