1.
File - open new transparent image 700x500.
Set in the material palette the foreground color at #79a5c2
and the background color at #263749.
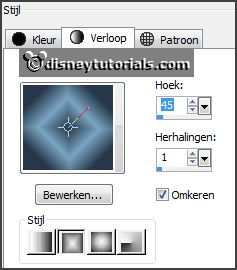
Make from the foreground a gradient rectangular - with this setting.
Activate flood fill tool - fill the layer with the gradient.
2.
Layers - duplicate.
Image - mirror.
Set in the layer palette the opacity to 50.
Layers - merge - merge down.
3.
Effects - plug-ins - dsb Flux - Lineair Transmission - with this setting - click OK.
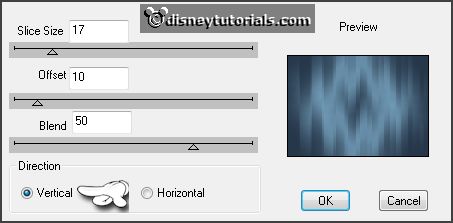
Effects -
plug-ins - dsb Flux - Lineair Transmission - change vertical
in horizontal - click OK.
Effects - Edge effects - enhance.
4.
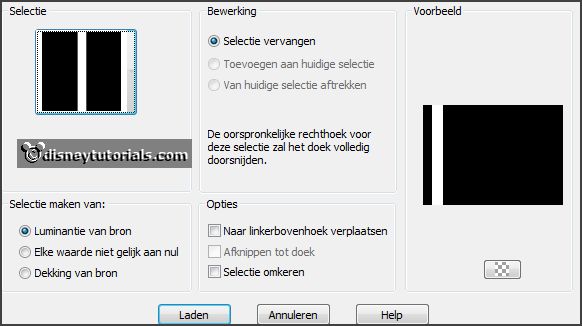
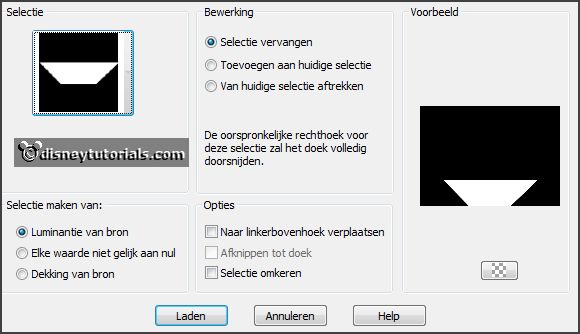
Selections - load/save selection - load selection from disk - look
Emmykuiken- with this setting.
Layers - new raster layer.
Fill the selection with the gradient.
Selections - select none.
Layers - duplicate.
Image - mirror.
Layers - merge - merge down.
5.
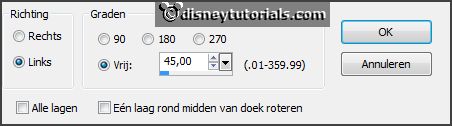
Layers - duplicate.
Image - free rotate - with this setting.
Layers -
duplicate.
Image - mirror.
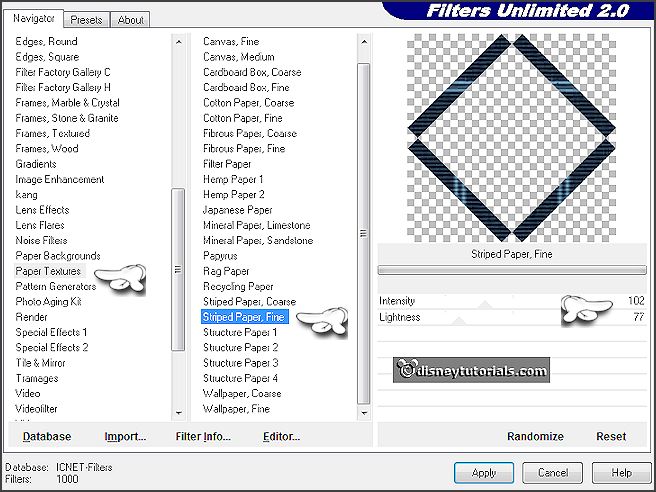
Effects - plug-ins - I.C.NET Software - Filters Unlimited 2.0 - Paper Textures - Stipped
Paper Fine - with this setting - click Apply.
6.
Activate raster 2.
Repeat the plug-ins - with this setting - click Apply.
Activate the top layer.
Layers - merge - merge down.
7.
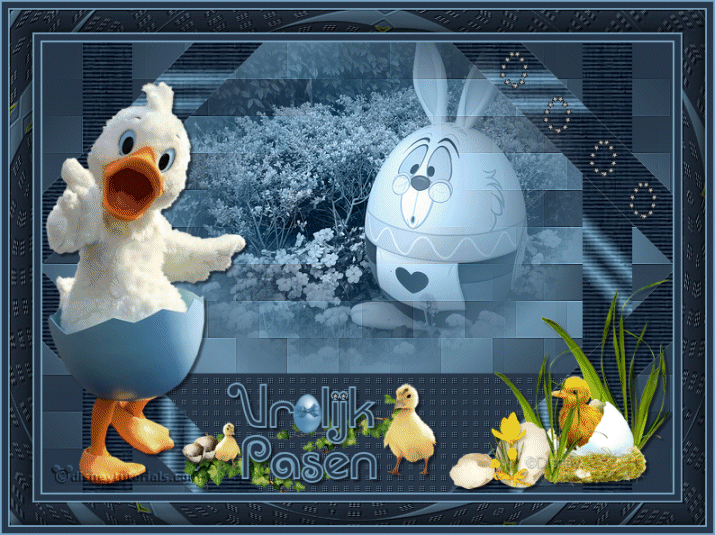
Activate the misted tube disneyegg - edit - copy.
Edit - paste as a new layer on the image.
Set the blend mode of this layer to Luminance (Legacy).
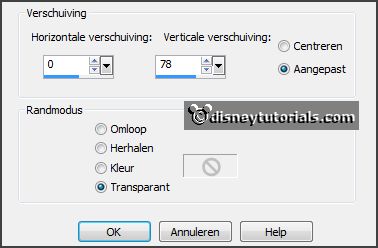
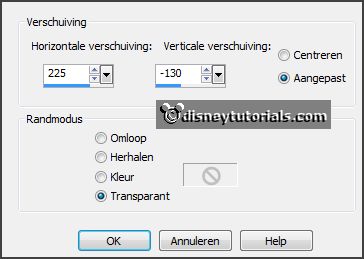
Effects - Image effects - offset - with this setting.
8.
Selections - load/save selection - load
selection from disk - look
Emmykuiken1- with this setting.
Layers - new raster layer.
Fill the selection with the background color.
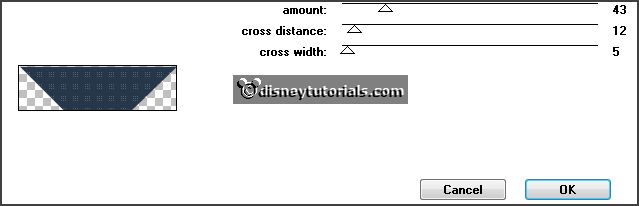
Effects - plug-ins - Penta.com - Dot and Cross - with this setting -
click OK.
Effects - plug-ins - FM Tile Tools - Blend Emboss - with this setting -
click Apply.

Selections
- select none.
9.
Activate the tube pasencluster -
edit - copy.
Edit - paste as a new layer on the image.
Effects - Image effects - offset - with this setting.
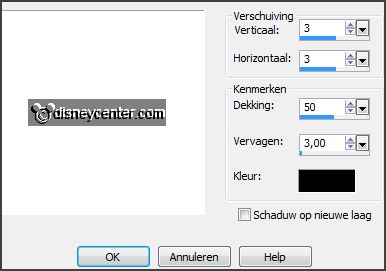
Effects - 3D Effects - drop shadow - with this setting.
10.
Activate the tube disneykuiken -
edit - copy.
Edit - paste as a new layer on the image.
Activate move tool - put this left at the bottom - see example.
Effects - 3D Effects - drop shadow -
setting is right.
11.
Activate the word-art-happyeaster -
edit - copy.
Edit - paste as a new layer on the image.
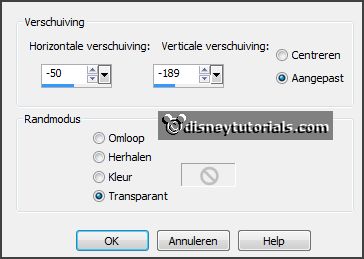
Effects - Image effects - offset - with this setting.
Layers - new raster layer -
put your watermark into the image.
12.
Image - add borders 2 pixels - symmetric - foreground color.
Image - add borders 7 pixels - symmetric -
background color.
Image - add borders 2 pixels - symmetric -
foreground color.
Image - add borders 25 pixels - symmetric -
background color.
Image - add borders 2 pixels - symmetric -
foreground color.
Image - add borders 7 pixels - symmetric -
background color.
Image - add borders 2 pixels - symmetric -
foreground color.
13.
Activate the magic wand - with this setting below - select the width border.

Fill the selection with the gradient.
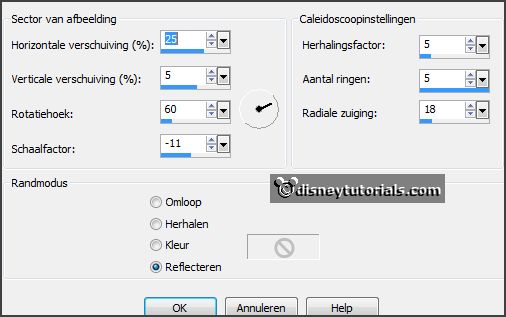
Effects - Reflection Effects - Kaleidoscoop - with this setting.
Effects -
plug-ins - FM Tile Tools - Blend Emboss - setting is right
- click Apply.
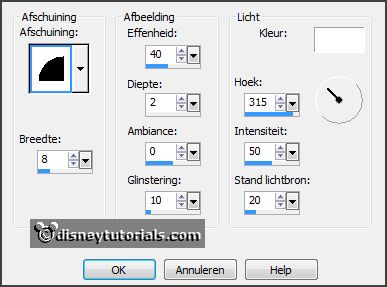
Effects - 3D Effects - Inner Bevel - with this setting.
14.
Edit - copy.
Open Animation Shop - paste as a new animation.
Edit - selection duplicate.
Edit - select all.
16.
Open animation eiEmmy - edit - select all.
Edit - copy - paste in selected frame.
Place this right at the top at the diagonal bar - see below.
Repeat 2 or 3 times - what you like the most.
17.
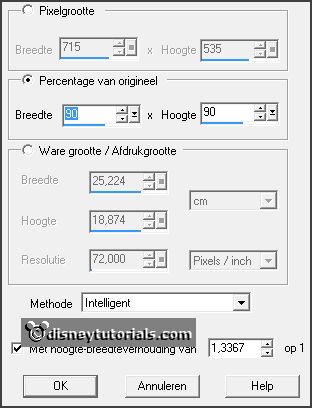
Animation - resize format of animation - with this setting.
File - save as - give name - click 3 times at next and than finish.