
This
Tutorial is copyrighted to the Tutorial Writer, © Emmy Kruyswijk 2009.
This Tutorial
may
not be forwarded, shared or otherwise placed on any Web Site or group without written
permission from
Emmy Kruyswijk
Do you want to link my lessons?
Please send
me a mail.
Materials:
Download
here
3Disney
tubes,
1 mask,
filters: Screenworks - Point Array,
Alien Skin - Glow 2.1
.
Download
here
Put the plug-ins in the folder plug-ins and the mask in the
folder mask.
Magic.
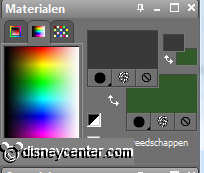
Foreground color #32592a and background
color #393939
1. Open
new image 600x600
2. Fill this with the foreground color.
3. New raster layer - fill this with the background color.
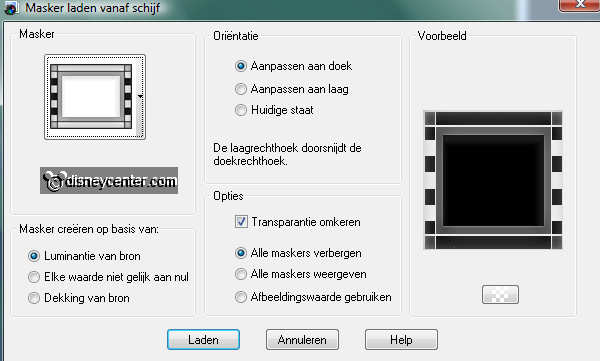
4. Layers - Load/Save Mask - Load Mask from Disk with this setting.
5. Layers - merge - merge group.
6. Image - Resize 75%- Resize all layers not checked..
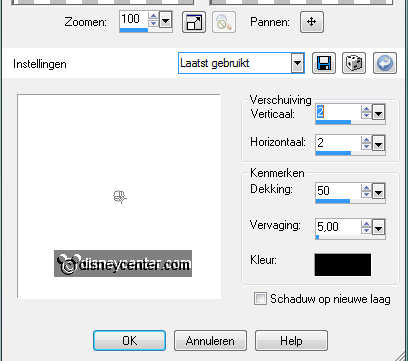
7. Effects - 3D Effects - drop shadow with this setting.
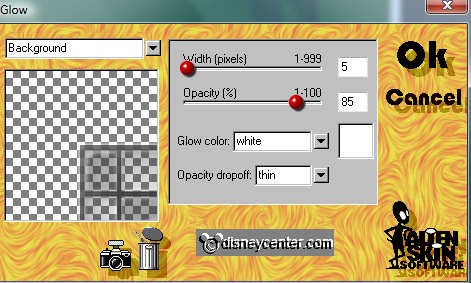
8. Effects - Alien Skin - Glow 2.1 with this setting.
9. Select now the large rectangles (1 top and 1 bottom)
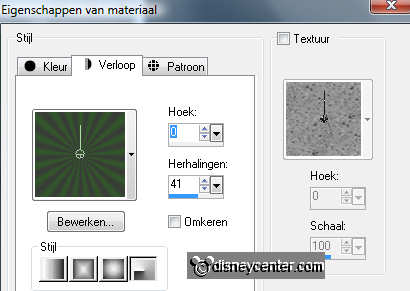
10. New raster layer - fill this with gradient radial with this
setting.
11. Go to selection tool - selection - rectangle - and draw a
rectangle in de middle.
12. New raster layer and fill this with the foreground color.
13. Layers - arrange - move down.
14. Stay at
the bottom layer.
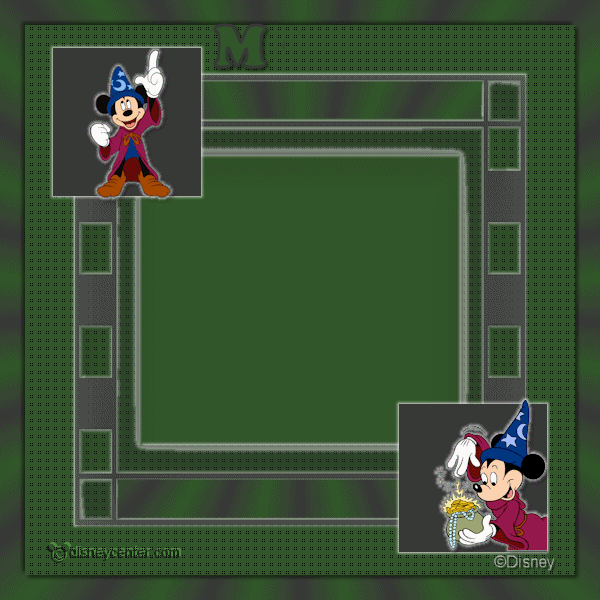
15. Effects -
Screenworks - Point Array.
16. Go to selection tool - selection - square and draw a square of
150x150.
50 pixels from the left and top side.

17. New raster layer - fill this with the background color.
18. Selections - select none.
19. Effects - Alien Skin - Glow 2.1 with the same setting as in
point 8.
20. Duplicate this layer - Image - flip - image - mirror.
21. Copy the tube Fantasia 10 and paste as a new layer.
22. Place this in the right square at the bottom.
23. Effects - Alien Skin - Glow 2,1 with the same setting as in
point 8.
24. Give the same drop shadow as in point 7.
25. Copy the tube Fantasia 7 and paste as a new layer.
26. Place this in the left square at the top.
27. Effects - Alien Skin - Glow 2,1 with the same setting as in
point 8.
28. Give the same drop shadow as in point 7.
29. Copy the tube MagicanMickey_Moonstar and paste as a new layer.
30. Duplicate this layer 5 times.
31. Change the opacity of these layers - the first
(raster 7) at 0.
32. Do by the next layers - 100 at 20, 100 at 40, 100 at 60, 100 at
80 and the last one stays at 100.
33. Lock the 5 top layers, so that the layer opacity to 0 is just
open.
34. Selections - select all - selections - contract 25 - selections
- invert.
35. New raster layer - fill this with the gradient radial from point
11.
36. Selections - select all - selections - contract 25.
37. Effects - 3D Effects - drop shadow with this setting.
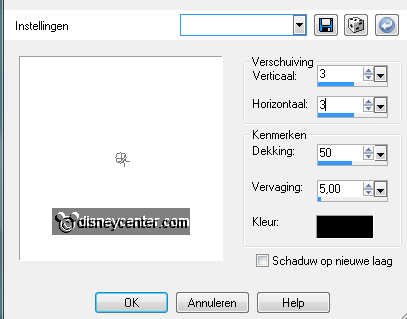
38. Do the drop shadow again, but now horz. and vert. at -3.
39. Put your watermark into the image.
40. Stay at the top layer.
41. Go to text tool - font Cooper Black - size 60 - turn the colors.
see below.

42. Write M a g i c ... - put a space between each letter.
43. Give the same drop shadow as in point 7.
44. Place this at the top near the left square. see example.
45. Duplicate this layer 5 times.
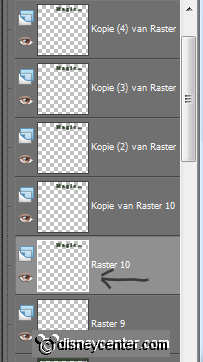
46. Lock the top 5 layers.
47. Stay at the first layer of the word (raster 10)
48. Go to eraser tool - size 14 - square - and remove the letters
agic...
49. Stay at the second layer - lock the first layer - open layer
2(copy) - and remove the letters gic...
50. Stay at the third layer - lock the second layer - open layer
3(copy2) - and remove the letters ic...
51. Stay at the fourth layer - lock the third layer - open layer
4(copy3) - and remove the letters c...
52. Stay at the fifth layer - lock the fourth layer - open layer
5(copy4) - and remove the ...
53. Layer 6(copy5) is good there stays Magic...
54. Lock the top 5 layers again and open raster 10 (the first layer
of the letters).
55. Look also of the copy - layers of the middle tube
(MagicanMickey_Moonstar) are locked - the first layer must open.
56. Open Animation shop.
57. Edit - Copy Merged.
58. Go to animation shop - paste as a new animation.
59. Back in PSP - Lock the first layers and open the copy of
raster 7 and raster 10.
60. Edit - Copy Merged.
61. Back in animation shop - paste after current frame. Make sure
the last frame is always selected.
62. Back in PSP - Lock the copy layers of raster 7 and raster
10 and open the copy(2) of raster 7 and raster 10.
63. Edit - Copy Merged.
64. Back in animation shop - paste after current frame.
65. Back in PSP - Lock the copy(2) layers of raster 7 and
raster 10 and open the copy(3) of raster 7 and raster 10.
66. Edit - Copy Merged.
67. Back in animation shop - paste after current frame.
68. Back in PSP - Lock the copy(3) layers of raster 7 and raster
10 and open the copy(4) of raster 7 and raster 10.
69. Edit - Copy Merged.
70. Back in animation shop - paste after current frame.
71. Back in PSP - Lock the copy(4) layers of raster 7 and raster
10 and open the copy(5) of raster 7 and raster 10.
72. Edit - Copy Merged.
73. Back in animation shop - paste after current frame.
74. Edit - select all.
75. Animation - Frame Properties at 50.
76. Click now at the last frame (6) - Frame Properties at 200.
77. File - save as - give name - click 3 times at next - and than at
finish
Ready is the tag
I hope you like this tutorial.
greetings Emmy,

Tutorial written 07-07-2009
