Open your - shift D - and close the original
Open your font Vivaldi and minimize it.
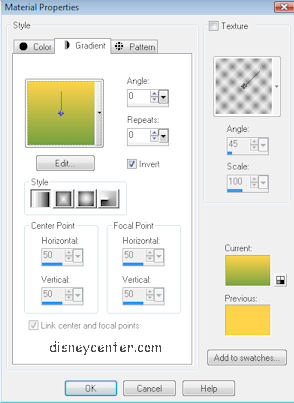
1. Take a light color #ffd34a for the foreground and a dark color
#75a241 for
the background from your tube and make a gradient.
2. Open a new transparent image 500x350
3. Fill this with the gradient see below.
4. Go to Effects-Texture Effects-Blinds width 4, Opacity 20
color black, horizontal unchecked.
5. Repeat this with horizontal checked.
6. Copy your tube and paste as a new layer right of top of the image.
7. Duplicate this layer. Close the duplicate layer
8. Go the the tube layer;
9. Effects - Distortion Effects - Wind -Left 100
10. Open de duplicate tube layer, this one is now active,
11. Effects - 3D Effects - Drop shadow H&V 3, Opacity 50, Blur 5.
12. Open the corner - Shift D - and close the original.
13. Go to the change to target tool see below
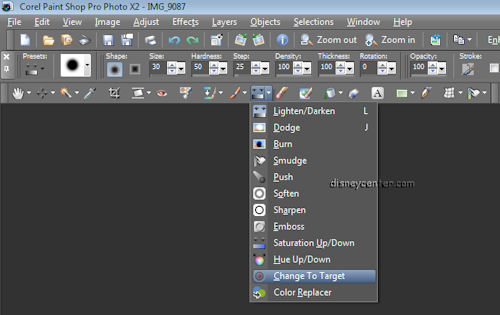
14.
With this settings.

15.
Use the dark color and the light color from the tube.
16.
Make the corner bigger by using the zoom option so that you could see what you
doing.
17.
I use the dark color for de borders of the corner. Click at the dark color with
the change tool and move over the borders of the corner.
18.
Do the same with the light color for the inside of the corner.
This is what you should have now. I've make the little square also green. But
that's up to you.
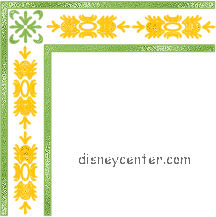
19. Edit - Copy the colored corner and paste as a new layer in the left upper
corner of the image. Resize with 90 %. All layers not checked.
20. Effects - 3D Effects - Drop Shadow with the same setting as in 11.
21. Duplicate this layer - Image Mirror - Image Flip
22. Close your foreground and put the gradient for the background.
23. Go to Present Shape - the Rectangle tool - and draw a small
square 90x90.
Convert to raster layer.
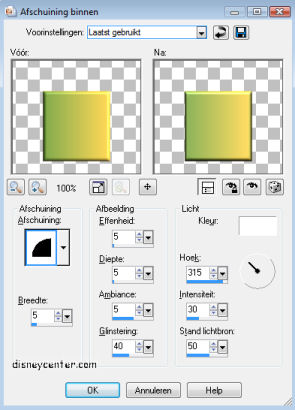
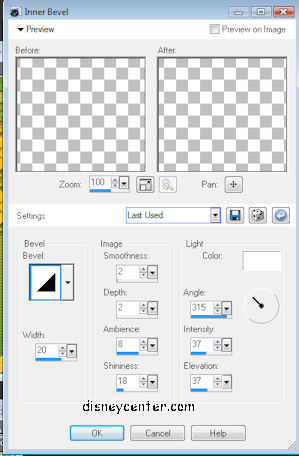
Effects - 3D Effects - Inner Bevel
24. Duplicate this layer twice.
(3 total)
25. first square is good, second square go to Image - flip, third square
go to image - Rotate 90 right. Make the 3 together. See tag in header.
26. Go to raster 3 (corner) copy and paste as a new IMAGE.
27. Go to the selection tool and select a tile of the corner.

Activate the top layer
28. Copy and paste as a new layer of one of the squares on the image.
29. Duplicate this layer twice and place it at the other squares. 1 rotate left
90. See tag header.
30. Close the layers 1,2, copy of 2, 3, copy of 3 and make one of the other
layers active (blue)
31. Layers - Merge - merge visible.
32. Go to the text tool. Look for Vivaldi size 48 stroke 1.0, vector, foreground at dark color,
background at light color.
33. Write your name of whatever you want. I've write It's Raining.
34. Convert to raster layer. Give the same Drop Shadow as in 11.
35. Layers - Merge - Merge all.
36. Image - Add border 3, symmetric checked, dark color.
37. Select the border with the magic wand and give a Inner Bevel
38. Bevel2, w15, sm5, d5, am5, sh40, An315, In30, Ev50, color white.
39. Selection None.
40. Image - Add border 20, symmetric checked, color white.
41. Go to the magic wand and select this border and fill it with the gradient.
Invert unchecked.
42. Adjust - Add/Remove Noise - Gaussian 10 Monochrome checked
43. Let the selection stay, Effects - Graphics Plus - Cross Shadow - Default.
44. Effects - 3D Effects - Inner Bevel
45. Selection none.
46. Image - Add border 3, symmetric checked, dark color.
47. Select the border with the magic wand and give a Inner Bevel
48. Same as before 38. (Bevel2, w15, sm5, d5, am5, sh40, An315, In30, Ev50, color white.)
49. Selection None.
50. Add your watermark and go to Image - Resize 75 % all layers checked.
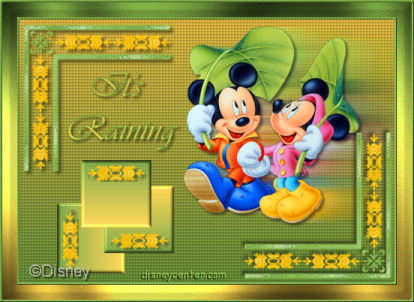
The tag is finished
I hope you like this lesson.
greetings Emmy