
This
Tutorial is copyrighted to the Tutorial Writer, © Emmy Kruyswijk 2009.
This Tutorial
may
not be forwarded, shared or otherwise placed on any Web Site or group without written
permission from
Emmy Kruyswijk
Do you want to link my lessons?
Please send
me a mail.
Materials:
Download
here
1
Disney
tube,
5 tube van Marie Louise,
filter:
Filter Unlimited - Edges Square,
VM Natural - Sparkle.
Download
here
Put the plug-ins in the folder plug-ins.
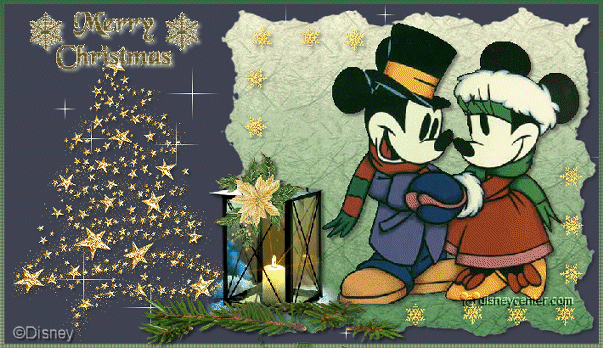
Mickey and Minnie
Christmas.
Foreground color #48874e and background
color
#faf6d9
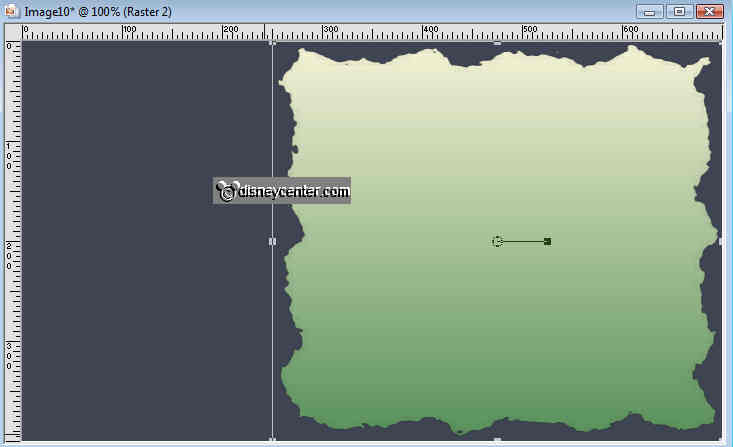
1. Open new image 700x400
2. Fill this with #404453
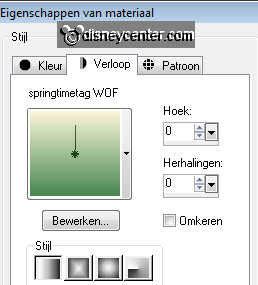
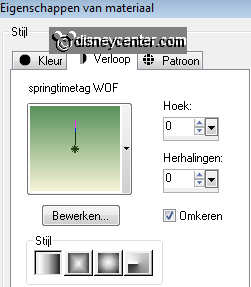
3. New raster layer - fill this gradient linear.
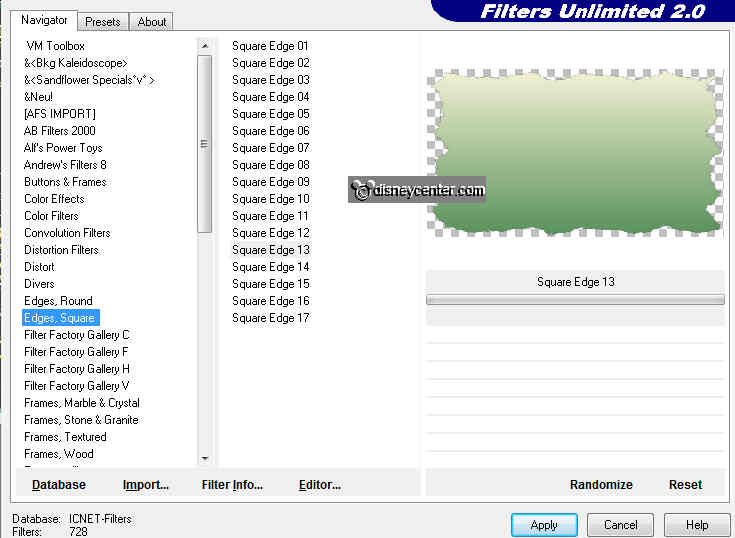
4. Effects - Filter Unlimited 2.0 - Edges Square - Square edge 13.
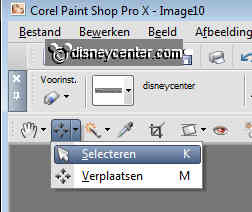
5. Go to Pick Tool - Select and set it to 250. See images below.
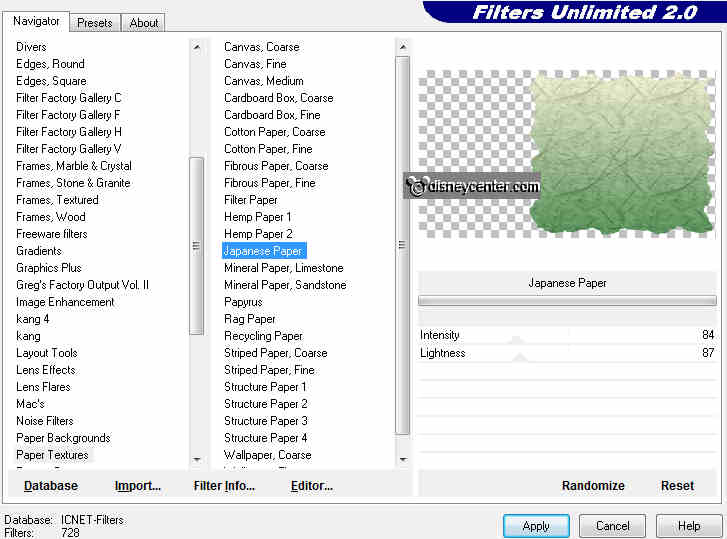
6. Effects - Filter Unlimited 2.0 - Paper Texture - Japanese paper with this
setting.
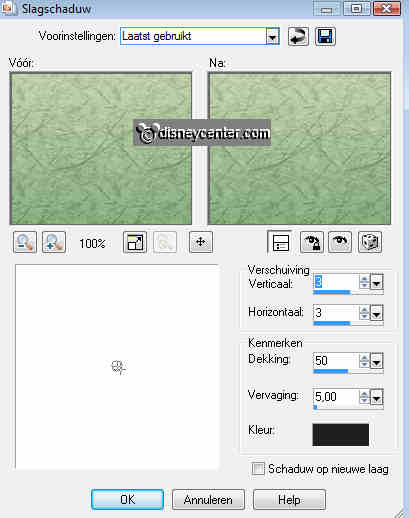
7. Effects 3D Effects - drop shadow - with this setting.
8. Go back to raster 1 and duplicate this layer twice.
9. Lock the copy layers and stay at raster 1.
10. Effects - VM Natural - Sparkle with this setting.
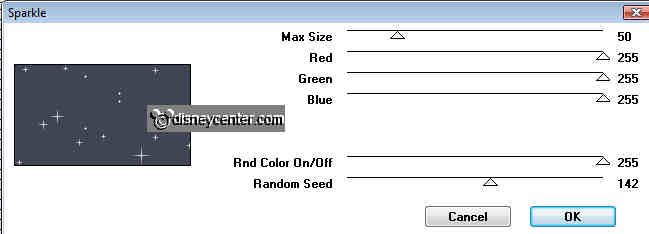
11. Lock the first layer and open the copy of raster 1.
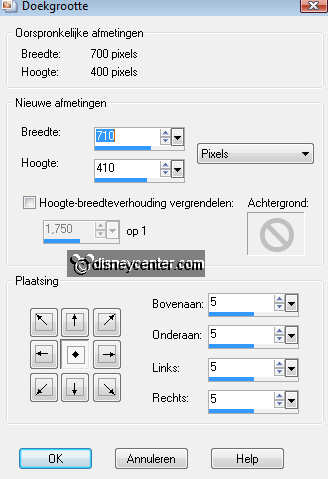
12. Repeat point 11 and change max. size in 35.
13. Lock the copy of raster 1 and open the copy(2) of raster 1.
14. Repeat point 11 and change max. size in 20.
15. Copy the tube SterrenGold-MPD and paste as a new layer.
16. Give the same drop shadow as in point 7.
17. Place it in green square top left.
18. Duplicate this layer - Image - Mirror - Flip. Place this right at the bottom
of the green square.
19. Copy the tube mmwinter and paste as a new layer.
20. Place this right in the green square.
21. Give the same drop shadow as in point 7.
22. Copy the tube 049_(XMAS)_GOLD_CHRISTMAS... and paste as a new layer.
23. Give the same drop shadow as in point 7.
24. Place this left at the bottom of the image.
25. Copy the tube MerryChr. and paste as a new layer.
26. Give the same drop shadow as in point 7. Watch...you change the color black
in #f6f3d6.
27. Place left above the golden tree.
28. Copy the tube swanja_xmas_lantern and paste as a new layer.
29. Give the same drop shadow as in point 7. Watch...you change the color #f6f3d6
in black.
30. Go to selection tool - free hand selection - and select the flame.
You can make it bigger by clicking the zoom button.

31. Duplicate this layer twice.
32. Lock the copy layers and stay at raster 7.
33. Effects - Alien Skin Eye Candy 5 Nature - Fire with this setting.
Settings op Small Candle. Basic see below.
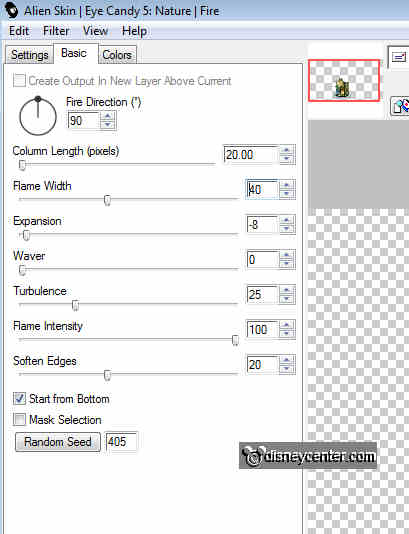
34. Repeat point 33 and press random seed.
35. Repeat point 33 and press random seed.
36. Selections - select none.
37. Copy the tube takjes and paste as a new layer.
38. Give the same drop shadow as in point 7.
39. Place this below the lantern.
40. New raster layer - Image - Canvas size - 710x410.
41. Selections - select all - selections - modify - contract 5.
42. Selections - Invert and fill with the gradient linear. see below. invert
checked.
43. Let selection stay. Effects - texture effects - blinds with this setting.
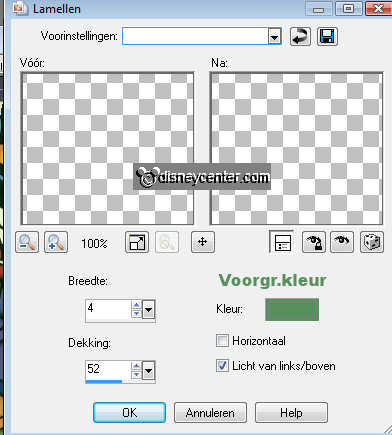
44. Repeat point 44 but now horizontal also checked.
45. Put your watermark or name into the image.
Now we create the animation.
Open Animation Shop.
Make sure the copy layers of raster 1 and 7 are locked.
Stay at the top layer
46. Edit - Copy Merged.
47. Go to animation shop and paste as a new animation.
48. Back in PSP - Lock the raster 1 and 7 and open the copy of raster 1
and
7.
49. Edit - Copy Merged.
50. Go to animation shop and paste after current frame. Select the latest frame.
51. ack in PSP - Lock the copy of raster 1 and 7 and open the copy(2)
of raster 1 and
7.
52. Edit - Copy Merged.
53. Go to animation shop and paste after current frame.
54. Animation - Resize animation 85%
55. File - save as - give name - click 3 times at next and than finish.
Ready is the tag
I hope you like this tutorial.
greetings Emmy,

Tutorial written 28-10-20
