
This
Tutorial is copyrighted to the Tutorial Writer, © Emmy Kruyswijk August 2010
This Tutorial may not be forwarded, shared or otherwise placed on any Web Site
or group without written
permission from
Emmy Kruyswijk
Do you want to link
my lessons?
Please send
me a mail.
Materials:
download here
1 tube Mickey en Minnie, 1 rand tube, 1 sterren tube, 1 accent.
tube
filters: AB Filters 2000 - Galactic
Crunch, VM Instant Art - Spiderweb, Xero- simplicity, Unplugged
Tools - Wavemaker, MuRa's Seamless - Tile frame.
Put the plug-ins the in folder plug-ins.
Mickey en Minnie Purple
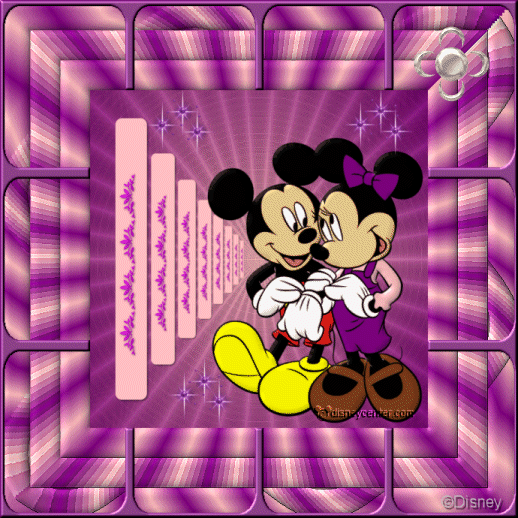
1. Open a new image600x600
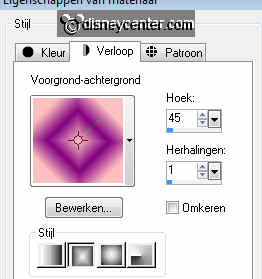
2. Foreground color at #ffc0c0 and the background at #800080
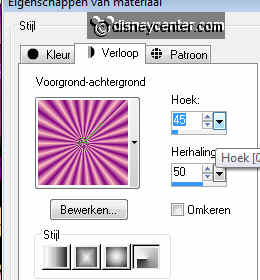
3. Make a gradient....rectangle
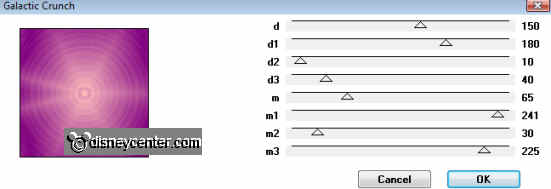
4. Go to Effects....AB Filters 2000.....Galactic Crunch
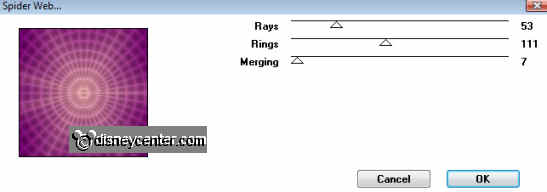
5. Go to Effects....VM Instant Art....Spiderweb default settings.
6. Go to selection tool.....selections.....rounded rectangle.
7. Pull a rectangle 50 pix. from left, top and bottom, width 50 pix.
8. New raster layer flood fill this with the foreground color..
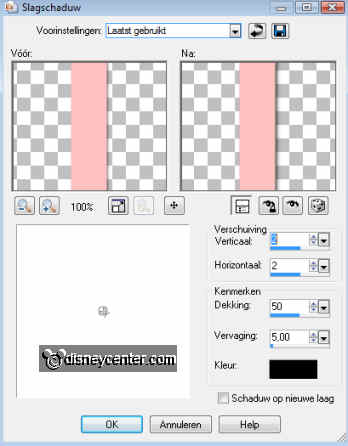
9. Effects.....3D Effects....drop shadow
10. Duplicate this layer...resize 75%. All layers not checked.
11.
Duplicate this layer...resize 75%. All layers not checked.
12.
Duplicate this layer...resize 75%. All layers not checked.
13.
Duplicate this layer...resize 75%. All layers not checked.
14.
Duplicate this layer...resize 75%. All layers not checked.
15.
Duplicate this layer...resize 75%. All layers not checked.
16.
Duplicate this layer...resize 75%. All layers not checked.
17. Copy the tube Mickey-Minnie01b_cmh and paste as a new layer.
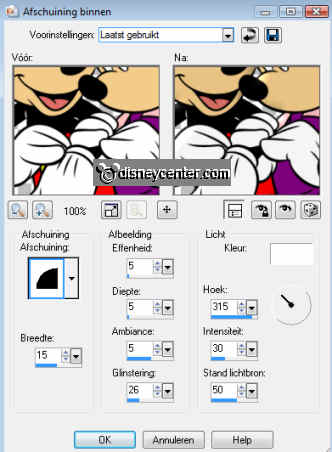
18. Effects.....3D Effects....Inner Bevel
19. The same drop shadow as in point 9.
19a. Copy the tube sterren and paste as a new layer. Do this 2 more times (see example)
20. Copy the tube rand and paste as a new layer at the first rectangle.
21. Repeat point 10 t/m 16.
22. Layers...Merge.....Merge all layers.
23. Image.....Resize 75%. Resize all layers checked.
24. Image.....Add Border 40 flood fill this with the foreground color.
25. Select the border and make a gradient Radial with the background color.
26. Flood fill the border with the gradient.
27. The same Inner Bevel as in point 18.
28. Selections....select none.
29. Image.....Add Border 40 flood fill with the foreground color.
30. Select he border and flood fill with the same gradient as in point 25
31. Let selection stay. Effects....Xero......simplicity......default settings.
32.
The same Inner Bevel as in point 18.
33. Selections....select none.
34.
Image.....Add Border 40 flood fill with the foreground color.
35.
Select he border and flood fill with the same gradient as in
point 25
36. Let selection stay. Effects....Unplugged
Tools......Wavemaker.....default settings.
37.
The same Inner Bevel as in point 18.
38. Selections....select none.
39. Selections.....select all.....Modify....Contract 120
40. Selections.....Invert
41. Effects.....Mura's Seamless.....Tile frame.....default settings.
42. Select the grey part....flood fill this with the background color.
43. Effects....3D Effects.....Inner Bevel.

44. Selections.....select none.
45. Put your watermark into the image.
46. Image....Resize 75%.
47. Copy the tube accent and paste as a new layer.
48. Place this in the right upper corner. (see below). Watch the figures. Put
that in order 1-2-3-4 etc.

49. Repeat until there is an accent in each box. (10 total)
50. Lock all layers, except the 2 bottom layers
51. Stay at the bottom layer.....Copy Merge
52. Open animation shop.
53. Paste as a new animation.
54. Back in PSP...lock raster 2 and open layer 3.....Copy Merge.
55. Back in animation shop....paste after current frame (Always ensure that you
click on the last frame)
56. Back in PSP...lock layer 3 and open layer 4.....Copy Merge.
57. Back in animation shop....
paste
after current frame
58. Do this so you've had all the layers.
59. In animation shop you have now 10 frames.
60. Go to Edit....select all
61. Animation......Properties of frames put this at 40.
62. Click to view animation and save your image.
63. File....save as.....give a name.
Ready is the tag
I hope that you like this tutorial.
greetings Emmy,

Tutorial written 14-05-20