2.
Copy cirkel2 and paste as a new layer.
If it is right - than it stays good.
Layers - merge - merge down.
3.
Copy the tube Fantasia 10 and paste as a new layer.
Place this in the middle of the circle.
Go to selection tool - Free hand selection - free hand.
And make a selection as here below.
Click at the delete key of your keyboard.
Selections - select none.
4.
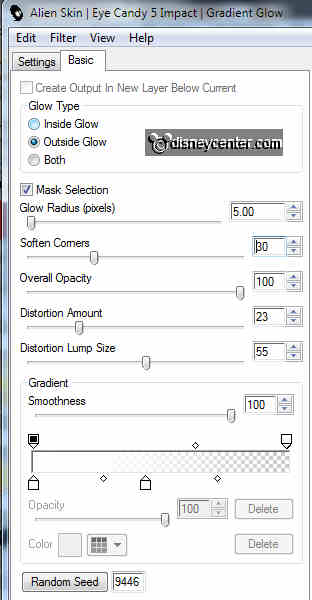
Effects - Alien Skin Eye Candy5 Impact- Gradient Glow with this setting.
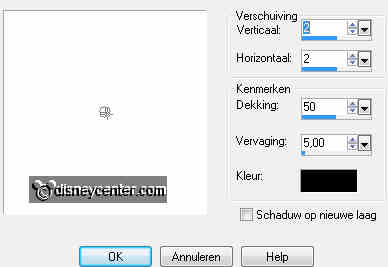
Effects - 3D Effects - Drop shadow with this setting.
5.
Copy from the Template - driehoek1 and paste as a new layer.
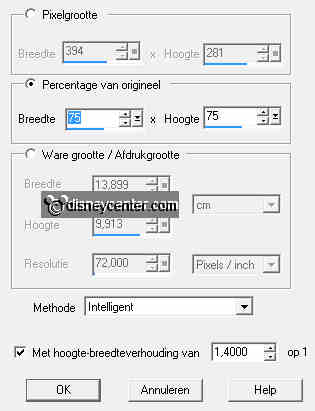
Image - resize format 90% - format all layers not checked.
Place this left upper corner.
Duplicate this layer - image - flip - mirror.
6.
Copy from the Template - zeshoek1 and paste as a new layer.
Image - resize format 90% - format all layers not checked.
Place this right upper corner.
Duplicate this layer - image - flip - mirror.
7.
Go to text tool - background on silver pattern - foreground locked.
Font Dodger - size 36.

Ans write - FAN - Convert to raster layer. Place this on the left triangle.
Give the same drop shadow as in point 4.
write - TA - Convert to raster layer. Place this on the right hexagon.
Give the same drop shadow as in point 4.
write - SIA - Convert to raster layer. Place this on the right triangle.
Give the same drop shadow as in point 4.
write - MAGIC - Convert to raster layer. Place this on the left hexagon.
Give the same drop shadow as in point 4.
Lock the 4 layers.
8.
Go to selection tool - rectangle - and select from the Template as below.
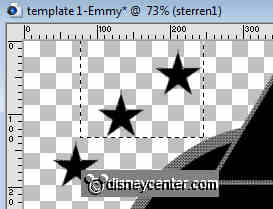
Copy and paste as a new image -
Select the 2 stars.
Set foreground color at #0829a5 - and the background color at #be1414
Fill one star with the foreground color and the other star with the background
color.
9.
Place this in the left black triangle. Duplicate this layer.
Image - Mirror - Duplicate this layer.
Image - flip - image - mirror - Duplicate this layer.
Image - Mirror. Look if they stays right at the triangles and hexagons.
Lock the 4 layers
10.
Select the left black triangle - copy the tube Fantasia 25 and paste as a
new layer.
Move this - as you like it - Selections - invert - Click at the delete key of
your keyboard.
Selections - select none.
Select the right black hexagon - copy the tube Fantasia 23 and paste as a new
layer.
Selections - invert - Click at the delete key of your keyboard.
Selections - select none.
Select the right black triangle - copy the tube Fantasia 24 - image
- mirror - and paste as a new layer.
Selections - invert - Click at the delete key of your keyboard.
Selections - select none.
Select the left black hexagon - copy the tube Fantasia 26 -and paste as a new
layer.
Selections - invert - Click at the delete key of your keyboard.
Selections - select none.
12.
Layers - new raster layer - put your watermark into the image.
Open Animation Shop.
Lock the 8 Fantasia tube layers and the 4 stars layers and open the text layers.
Stay at the bottom layer
Edit - copy merged.
13.
In animation shop - paste as a new animation.
Back in PSP - lock the 4 text layers - and open the 4 stars layers - Edit -
copy merged.
Back in animation shop - paste after current frame.
Back in PSP - lock the 4 stars layers - and open the first 4 Fantasia tube
layers - Edit -
copy merged.
Back in animation shop - paste after current frame.
(Watch the the last frame is selected.)
Back in PSP - lock the first 4 Fantasia tube layers - and open the second 4
Fantasia tube layers - Edit -
copy merged.
Back in animation shop - paste after current frame.
(Watch the the last frame is selected.)
14.
In animation shop - Edit - select all - Properties of Frame at 100.
Animation - Resize format of animation 75%.
File - save as- give name - click 3 times at next and than at finish.
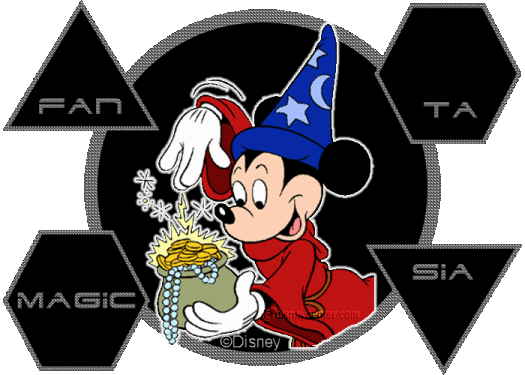
Ready is the tag
I hope you like this tutorial.
greetings Emmy,