#fde7f2
and background color #3c7dd9.
1. Open new image 700x700
2. Fill this with the foreground color.
3. Copy the tube Daisy Duck 34 and paste as a new layer.
4. Adjust - Blur - Gaussian Blur - Radius 25.
5. Set the opacity of this layer at 50.
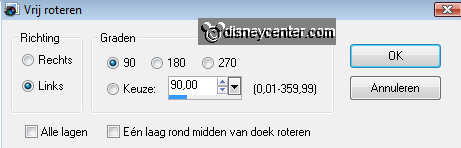
6. Duplicate this layer - Image - free rotate

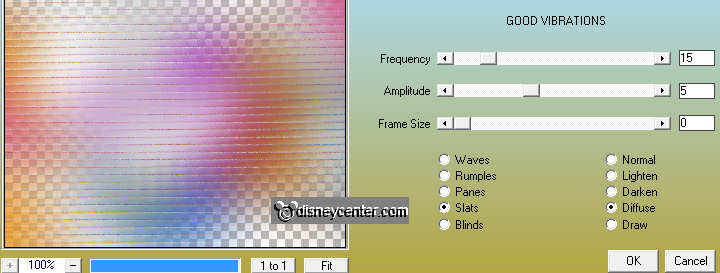
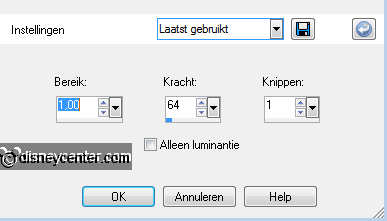
7. Effects - AAA Filters - Good Vibration with this setting.
8. Effects - Edge Effects - Enhance More.
9. Copy smalle rechthoek 2 and paste as a new layer.
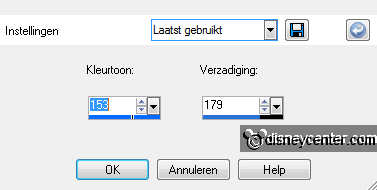
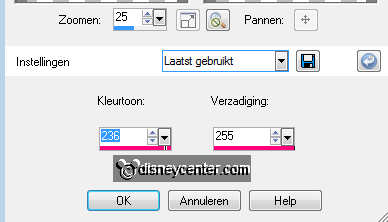
10. Adjust - Hue and Saturation - Colorize.
11. Place this tight at the top. About 50 pix. of the side and 100 pix. of the
top.
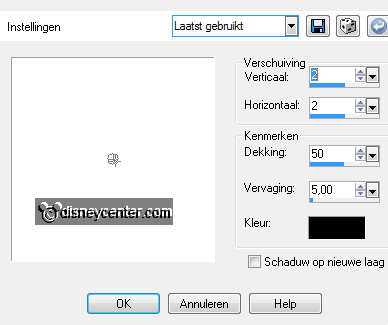
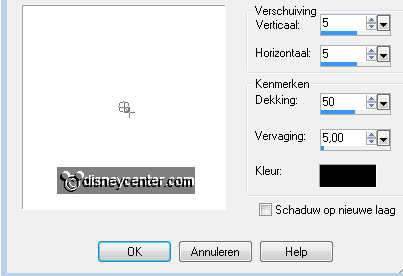
12. Effects - 3D Effects - Drop Shadow with this setting.
13. Copy the smalle rechthoek 1 and paste as a new layer.
14. Repeat point 10.
15. Place this left at the bottom. About 50 pix. of the side and 100 pix. of the
bottom.
16. Give the same drop shadow as in point 12.
17. Copy rechthoek 1 and paste as a new layer.
18. Repeat point 10 - Give the same drop shadow as in point 12.
19. Copy frame rechthoek and paste as a new layer.
20. Adjust - Hue and Saturation - Colorize.
21. Place this left - about 100 pix of the side and 60 pix of the bottom and top.
22. Select inside the frame - selections - modify - expand 2.
23. New raster layer - fill this with the background layer.
24. Layers - Arrange - Move down.
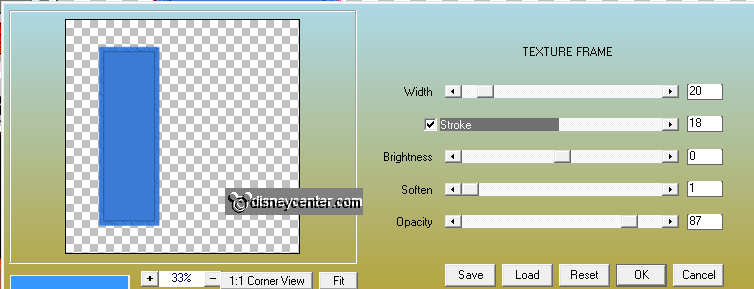
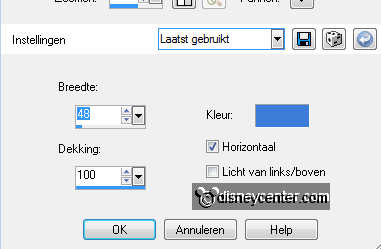
25. Select the blue part - Effects - AAA Frames - Texture Frame - with this
setting.
26, Lock all layers, except the top 2.
27. Stay at raster 7 - Layers - merge - merge all visible.
28. Give the same drop shadow as in point 12.
29. Open the other layers again.
30. Copy hartje rood and paste as a new layer.
31. Repeat point 20. - Give the same drop shadow as in point 12.
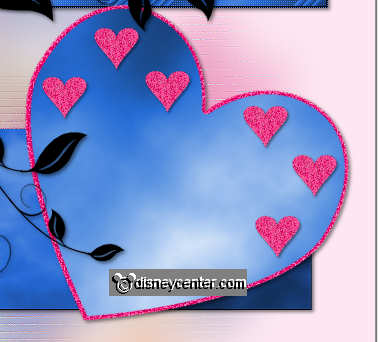
32. Place this right on the rectangle with frame at the top. see example.
33. Duplicate this layer and place this left of the rectangle with frame at the
bottom.
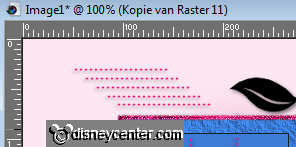
34. Copy the doodle and paste as a new layer.
35. Give the same drop shadow as in point 12.
36. Place this in the middle at the top.
37. Layers - Arrange - Move down 3 layers, so that it is under the merge layer.
38. Make the top layer active.
39. Copy dots 2 and paste as a new layer.
40. Repeat point 20. - Give the same drop shadow as in point 12.
41. Place this left at the rectangle with frame.
42. Duplicate this layer - image - mirror - Place this right at the rectangle
with frame.
43. Open new image 320x75.
44. Go to text tool - font Marque - size 60 - stroke width
2.0.

45. And write ONLY LOVE - copy - and paste as a new layer.
46. Image - free rotate.
47. Give the same drop shadow as in point 12.
48. Place this between the dots at the rectangle with frame. see example.
49. Copy hart1 and paste as a new layer - Repeat point 20.
51. Copy hart2 and paste as a new layer - Repeat point 10
52. Lock all layers, except the top 2.
53. Stay at 1 of the heart layers - Layers - merge - merge all visible.
54. Give the same drop shadow as in point 12.
55. Layers - Arrange - Move down 7 layers (under the doodle layer).
56. Duplicate 1 of the little pink hearts- image - resize 75% -
all layers resize not checked.
57. Place this in the large heart. Duplicate this 5 more times.
58. Copy the tube Daisy Duck 34 and paste as a new layer.
59. Place this right at the bottom on the rectangle.
60. Give the same drop shadow as in point 12.
61. Copy dots1 and paste as a new layer.
62. Repeat point 20 - Give the same drop shadow as in point 12.
63. Place this left at the top.
64. Image - free rotate as in point 6 (right 90)
65. Duplicate this layer - Image - flip. (at the bottom)
66. Put your watermark into the image.
67. Layers - merge - merge all layers.
68. Image - Resize 75% - all layers resize checked.
69. Image - add border 1 - background color.
70. Image - add border 25 foreground color.
71. Select the border - Effects - Texture effects - Blinds with this setting.
72. Effects - Edge Effects - Enhance More.
73. Selections - select none.
74. Image - add border 1 background color.
75. Image - Resize 500x500 - all layers resize checked.
76. Selections - modify - contract 25.
77. Effects - 3D Effects - drop shadow with this setting.
78. Repeat drop shadow but now horz.- and vert. op -5.
79. Adjust - Sharpness - Unsharp mask with this setting.
80. Edit - Copy.
81. Open animation shop - paste as a new animation.
82. Edit - duplicate selected- edit - select all - edit -
duplicate selected. (4 frames)
83. Open the animation love - edit - select all - edit - copy
84. Go to the image - edit - select all.
85. Edit - paste into selected frames. Place this at the top of the large heart.
86. File- save as - give name - click 3 times at next and than at finish.