Put the mask in the folder mask
Open your tubes,
wordart and
scrapkit in PSP.
Oriental
foreground color #907e99 and background color #70b7d5
1.
Open new transparent image 750x600.
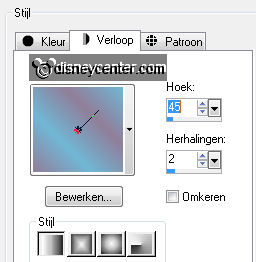
Fill this with the background gradient linear.
New raster layer - fill this with the foreground color.
2.
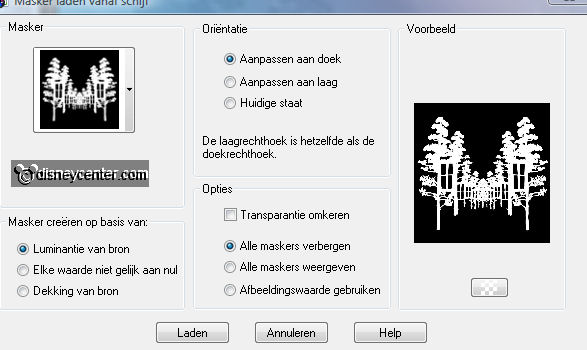
Layers - Load/Save mask - load mask from disk
Look for mask 174a(220) with this setting.
Layers - merge - merge group.
3.
Effects - Edge Effects - enhance.
Set the opacity of this layers at 50 - blend mode at luminance (old).
Effects - texture effects - emboss.
4.
Open the scrapkit Tiki's Oriental.
Look 01(17) - image - resize 50% - all layers checked.
paste as a new layer - place this left at the bottom.
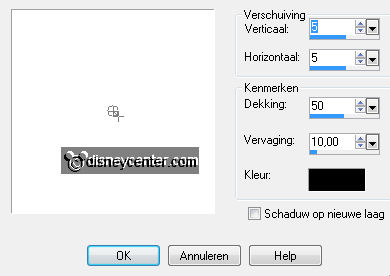
Effects - 3D Effects - drop shadow - with this setting.
5.
Open Oriental kit and look 02.
Image - resize 50% - image - resize 50% - all layers checked.
Place this left at the bottom in the corner.
Give the same drop shadow as in point 4.
6.
Copy from Oriental - kit 08 - and paste as a new layer.
Image - resize 50% - all layers not checked.
Image - mirror - Place this right at the bottom.
Give the same drop shadow as in point 4.
7.
Open 13 from Oriental kit - image - resize 50% - all layers checked.
Repeat this 2 more times.
Paste as a new layer. - and place this at the cabinet.
Give the same drop shadow as in point 4.
8.
Copy minniekimono and paste as a new layer.
Image - resize 75% - all layers not checked.
Place this at the bottom near the folding screen. (see example)
Adjust - sharpness - sharpen.
Give the same drop shadow as in point 4.
9.
Open from Tiki's scrapkit 01(24) - image - resize 50% - all layers checked.
Repeat this 2 more times.
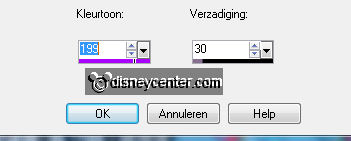
Adjust - hue and saturation - colorize - with this setting.
Place this left at the bottom near the bonsai.
Give the same drop shadow as in point 4.
10.
Copy from the scrapkit Tiki's 01(2) - image - resize 50% - all layers
checked.
Repeat this 2 more times.
Place this at the cabinet left.
Give the same drop shadow as in point 4.
11.
Layers - merge - merge all.
Copy wordart Oriental and paste as a new layer.
Place this left at the top.
12.
Image - add border 1 - color black.
Image - add border 25 - background color.
Select the border - selections - invert.
Give the same drop shadow as in point 4.
Repeat the drop shadow with -5.
Selections - select none.
13.
Effects - AAA Frames - Foto Frame - with this setting.
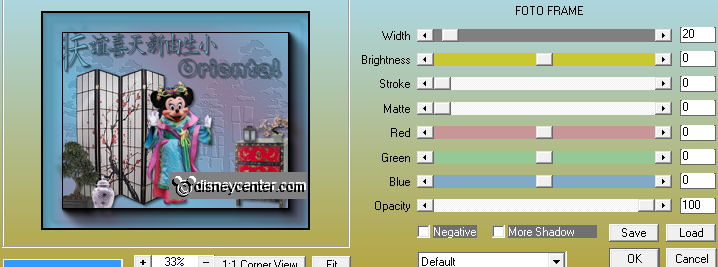
Image - add border 1 - color black.
New raster layer - put your watermark into the image.
Layers - merge - merge all.
Image - resize 75% - all layers checked.
14.
Open from the scrapkit Tiki's 01(18)
Move it to the bottom - put your brush size to 12 - and make the line to the
top.

Image - resize 50% - image - resize 50% - image - resize 50% - all layers
checked.
Copy and paste as a new layer.
Place this at the E of Oriental.
Duplicate this layer - and place this at the A of Oriental. (see example)
Layers - merge - merge down.
Duplicate this layer.
15.
Stay at the duplicated layer.
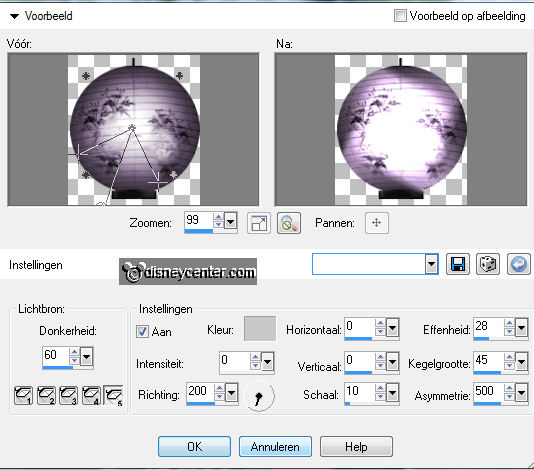
Effects - Illumination Effects - lights - with this setting.
Lock the copy of raster1 - edit - copy merged
Open animation shop - paste as a new animation.
Back in PSP - lock raster 1 and open copy of raster1
Edit - copy merged.
Back in AS - paste after current frame.
16.
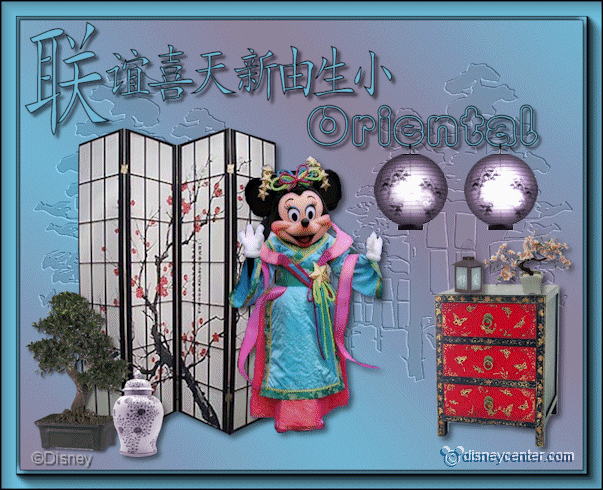
File - save as - give name - click 3 times at next and than at finish.
Ready is the tag
I hope you like this tutorial.
greetings Emmy

Tutorial written
21-07-2011
