1.
Open the template 3.
Shift+D and close the original - delete the top layer.
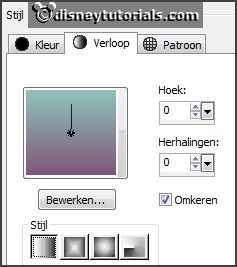
Set in the material palette the foreground color at #90c2ba
and the background color at #4a2e47.
Make from the foreground a gradient linear -
with this setting.
2.
Activate flood fill tool - fill the layer
achtergrond with
the gradient.
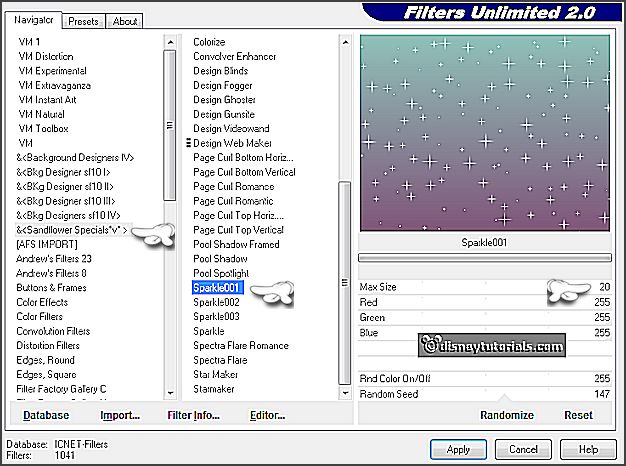
Effects - plug-ins - I.C.NET Software Filters Unlimited 2.0 - &<Sandflowers
Special - Sparkle001 - with this setting - click - Apply.
Edit - copy.
Edit - paste as a new image.
3.
Go further with this new image.
Image - add borders 3 pixels - symmetric - background color.
Image - add borders 10 pixels -
symmetric - foreground color.
Image - add borders 3 pixels - symmetric -
background color.
Image - add borders 30 pixels -
symmetric - foreground color.
Image - add borders 3 pixels - symmetric -
background color.
Image - add borders 10 pixels -
symmetric - foreground color.
Image - add borders 3 pixels - symmetric -
background color.
4.
Activate the magic wand - with settings below - select the width border.

Fill the selection with the gradient - now with invert not checked.
Promote selection to layer.
Selections - select none.
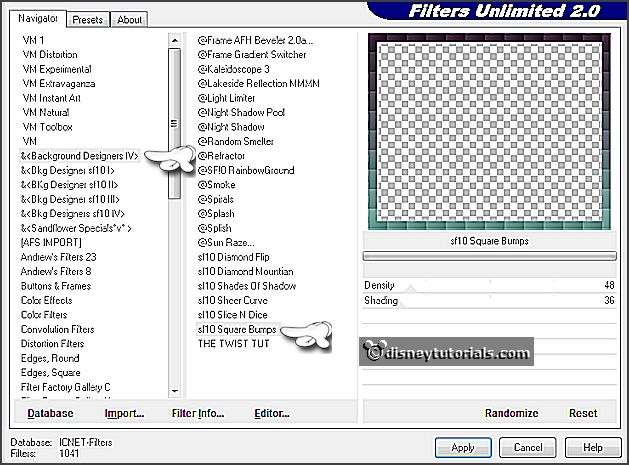
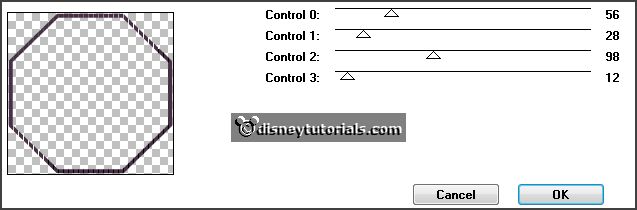
Effects - plug-ins - I.C.NET Software
Filters Unlimited 2.0 - &Background Designer IV - sf10 - Square Bumps -
with this setting - click Apply.
5.
Layers - duplicate.
Image - flip.
Set in the layer palette the opacity to 50.
Layers - merge - merge down.
Effects - Edge effects - enhance.
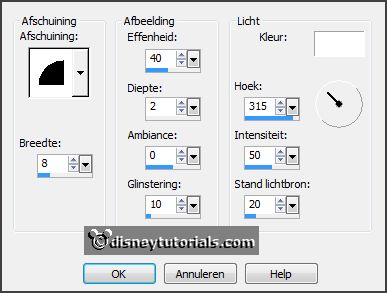
Effects - 3D Effects - Inner Bevel - with this
setting.
6.
Layers - merge - merge down.
Edit - copy.
Activate the template image - go further with this.
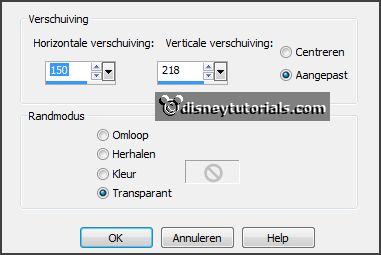
Image - canvas size - with this setting.

7.
Edit - paste as a new layer on the image.
Delete the bottom layer.
Set in the material palette the foreground back to color.
8.
Activate from the template - the layer - zw_rand - fill this with the foreground
color.
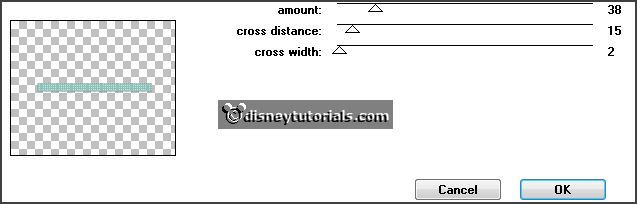
Effects - plug-ins - Penta.com - Dot
and Cross - with this setting -
click OK.
Effects -
Edge effects - enhance.
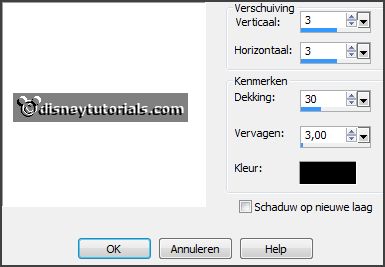
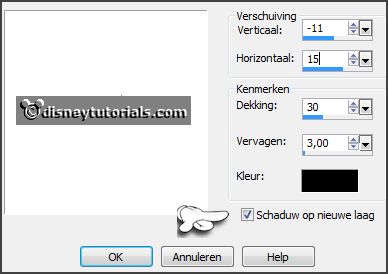
Effects - 3D Effects - drop shadow - with this
setting.
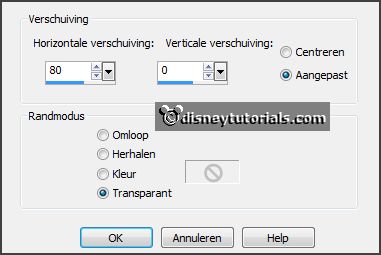
Effects - Image effects - offset - with this
setting.

9.
Lock the 5 bottom layers.
Layers - merge - merge all visible.
Open the other layers again.
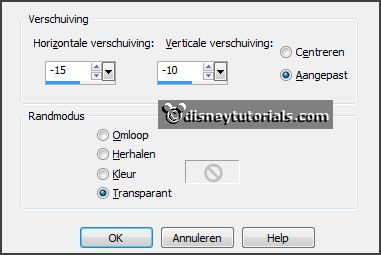
Effects - Image effects - offset -
with this setting.
10.
Activate from the template - the layer - wit.
Layers - merge - merge down.
Effects - Image effects - offset -
setting is right.
11.
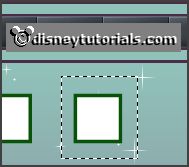
Activate from the template - the layer - blokjes.
Activate selection tool - rectangle - and make a selection - as below.
Edit - copy.
Selections - select none.
Edit - paste as a new layer on the image.
You see them yet, but that's the next step.
12.
Effects - Image effects - offset -
with this setting.
Layers -
merge - merge down.
Effects - Image effects - offset -
with this setting.
Select
with the magic wand the green borders of the boxes.
Fill the selection with the background color.
Selections - select none.
13.
Activate text tool - with this setting.

Lock the foreground.
Click in the middle of the 1st box 1 box from left and then further.
Write with capital - P - convert to raster layer.
Write with capital - A -
convert to raster layer.
Write with capital - R -
convert to raster layer.
Write with capital - A -
convert to raster layer.
Write with capital - D -
convert to raster layer.
Write with capital - E -
convert to raster layer.
14.
Activate move tool - put them so that the white area is gone, but they should be
equal.
Lock the bottom layer, then you have something more visibility on it.
If it's done open the bottom layer.
Lock also the 3 top layers.
Layers - merge - merge all visible.
Rename this layer - merge1.
Effects - 3D Effects - drop shadow -
setting is right.
Open the other layers.
15.
Activate from the template - the layer - groen_groot.
Select with the magic wand the green border.
Edit - cut.
Layers - new raster layer.
Edit - paste into selection.
Fill the selection with the background color.
Selections - select none.
Effects - plug-ins - Tramages - Tow the
Line - with this setting - click
OK.
16.
Activate from the template - the layer - groen_groot.
Select with the magic wand the white
square.
Activate the image pasen1 - edit - copy.
Edit - paste as a new layer on the image.
Selections - invert - click at the delete key.
17.
Activate the image pasen2 - edit - copy.
Edit - paste as a new layer on the image.
click at the delete key.
18.
Activate the image pasen3 -
edit - copy.
Edit - paste as a new layer on the image.
click at the delete key.
19.
Activate the image pasen4 -
edit - copy.
Edit - paste as a new layer on the image.
click at the delete key.
Selections - select none.
20.
Activate raster 2.
Effects - 3D Effects - drop shadow -
setting is right.
Delete the layer groen_groot.
Set the blend mode of the layers - raster 3,4,5 and 6 op Luminance (Legacy).
Lock raster 4,5 and 6.
21.
Activate the layer merge. (green - black hexagon).
Select with the magic wand the black
squares - fill this with the foreground color.
Effects - plug-ins - Penta.com - Dot and Cross -
setting is right -
click OK.
Selections - select none
22.
Select with the magic wand the green
borders - fill this with the background color.
Effects - plug-ins - Tramages - Tow the Line -
setting is right - click OK.
Selections - select none.
23.
Activate the tube parade1 - edit - copy.
Edit - paste as a new layer on the image.
Place this in the bottom hexagon.
Effects - 3D Effects - drop shadow -
setting is right.
24.
Activate the tube parade2 - edit - copy.
Edit - paste as a new layer on the image.
Place this in the middle hexagon.
Effects - 3D Effects - drop shadow -
setting is right.
25.
Activate the tube parade3 - edit - copy.
Edit - paste as a new layer on the image.
lace this in the top hexagon.
Effects - 3D Effects - drop shadow -
setting is right.
Layers - merge - merge down and 2 more
time.
Effects - 3D Effects - drop shadow -
setting is right.
26.
Activate the tube disneypasen1 - edit - copy.
Edit - paste as a new layer on the image.
Place this left at the bottom - see example.
Effects - 3D Effects - drop shadow -
with this setting.
Activate raster 7 schaduw1.
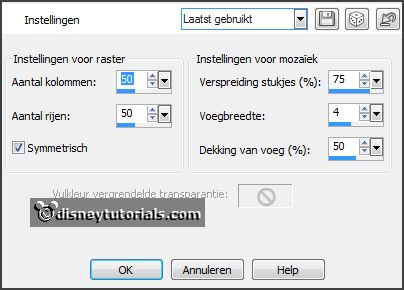
Effects - Texture effects - Mosaic Antique -
with this setting.
27.
Activate text tool - with this setting -
lock the foreground.

Write Wonderland - convert to raster layer.
Place this at the green bar -see example.
Effects - 3D Effects - drop shadow -
with this setting.
Don't forget to uncheck the shadow on new layer. .
28.
Turn in the material palette the colors - lock the foreground and open
background.
Write Easter - convert to raster layer.
Place this above the green bar - see example.
Effects - 3D Effects - drop shadow -
setting is right.
Layers - merge - merge down.
29.
Layers - new raster layer - put your watermark into the image.
Edit - copy merged.
Open Animatie Shop - paste as a new animation.
30.
Back in PSP.
Doe raster 3 op slot en open raster 4.
Edit - copy merged.
In AS - paste after active frame.
31.
Back in PSP.
Doe raster 4 op slot en open raster 5.
Edit - copy merged.
In AS - paste after active frame. Be sure that the last frame is selected .
32.
Back in PSP.
Doe raster 5 op slot en open raster 6.
Edit - copy merged.
In AS - paste after active frame.
33.
Edit - select all.
Animatie - Frame properties - at 100.
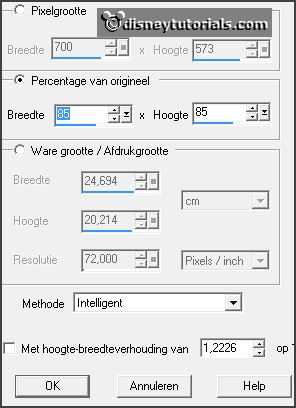
Animation - resize format of animation
- with this setting.
File - save as - give name - click 3 times at next and than finish.
Ready is the tag
I hope you like this tutorial.
greetings Emmy
Thank you Nelly for testing.


