|

This
Tutorial is copyrighted to the Tutorial Writer, © Emmy Kruyswijk
23-10-2012.
This Tutorial may not be forwarded, shared or otherwise placed on any Web Site
or group without written
permission from
Emmy Kruyswijk
At all Disney creations must be copyrighted.
Do you want to link my lessons?
Please send
me a mail.
Needing:
1
tubes, 1 selection - and 1 preset Alien Skin all made by me.
1 scrapkit from HorsePlay's Pasture Designs -
download
here.
Filters:
Alien Skin Eye Candy 5.0 -Nature - Fire,
Ulead Effects GIF X2.0 - download
here.
Before you begins.......
Open the tubes in PSP,
put the plug-in in the folder
plug-ins and put the selection in the folder selections.
Double click the
preset Alien Skin (Emmyperfectscare), he imports itself in the plug-in.
Material

Perfect Scare
1.
File – open new transparent
image 800x800.
Set in the material palette the foreground on #4f5553 and the
background on #453623.
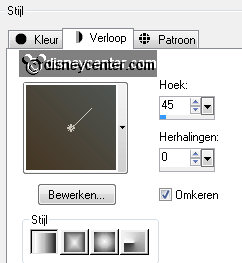
Make from the foreground a gradient linear – with this setting.
2.
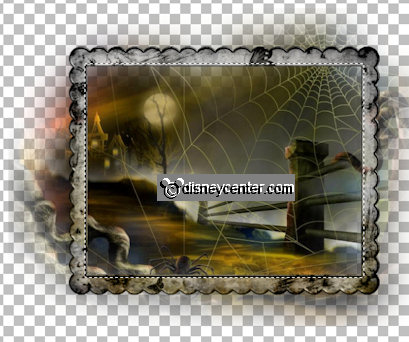
Open from the scrapkit - HPD_ThePerfectScare_24 – edit - copy.
Edit - paste as a new layer on the image.
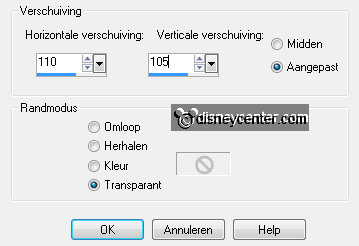
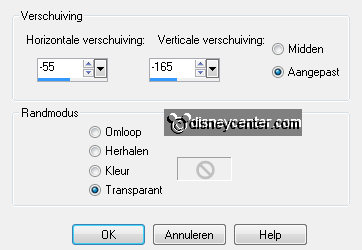
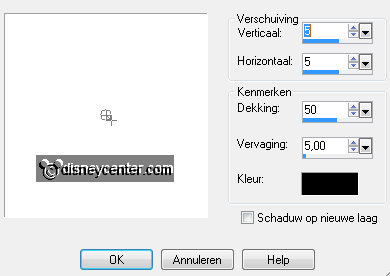
Effects – Image effects – Off Set – with this setting.
3.
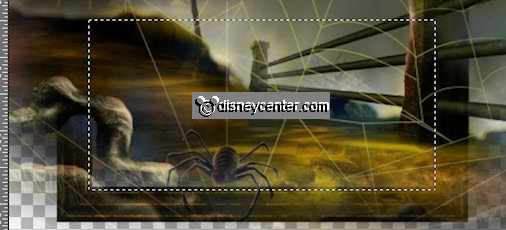
Activate the magic wand – with this setting below – and select
in the frame.

Selections – modify –
expand - 5 pixels.
Activate the bottom layer.
4.
Activate Sept Series Halloween 3-3 – edit - copy.
Edit - paste as a new layer on the image.
Activate move tool – and move the tube as below.
5.
Selections – invert – click on the delete key.
Selections – select none.
Activate the top layer.
6.
Open from the scrapkit - HPD_ThePerfectScare_22 - edit - copy.
Edit - paste as a new layer on the image.
Effects – Image effects – Off Set – with this setting.
7.
Activate the magic wand - setting is right – and select in
the frame.
Selections – modify –
expand - 5 pixels.
Activate Sept Series Halloween 3-3.
8.
Image – resize 150% - all layers checked.
Edit - copy.
Edit - paste as a new layer on the image.
Move the tube as below.
9.
Selections – invert – click on the delete key.
Selections – select none.
Layers – arrange – move down.
Activate the top layer.
10.
Open from the scrapkit - HPD_ThePerfectScare_27 - edit - copy.
Edit - paste as a new layer on the image.
11.
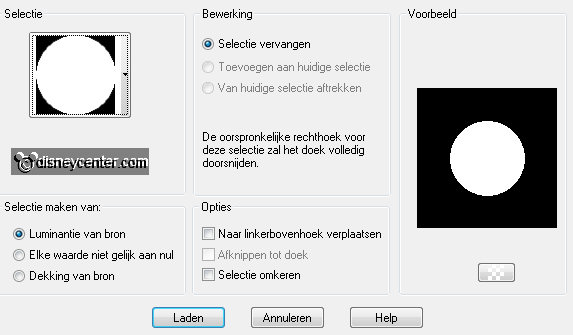
Selections – load/save selection – load selection from disk –
look Emmyperfectscare – with this setting.
Layers – new raster layer.
Activate flood fill tool – fill the selection with the gradient.
12.
Layers – arrange – move down.
Let selection stay and activate Sept Series Halloween again.
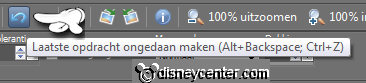
Click on Undo Last Command – see below.
13.
Layers – new raster layer.
Edit - copy.
Edit - paste in selection.
Put in the layer palette the Blend mode on Luminance (Legacy).
Selections – select none.
14.
Layers – duplicate.
Activate the top layer.
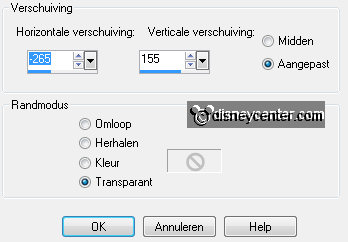
Effects – 3D Effects – drop shadow – with this setting.
15.
Open from the scrapkit - HPD_ThePerfectScare_13 - edit - copy.
Edit - paste as a new layer on the image.
Effects – Image effects – Off Set – with this setting.
Layers – arrange – send to
bottom
– move up 1 time.
Effects – 3D Effects – drop shadow – setting is right.
16.
Open from the scrapkit - HPD_ThePerfectScare_28.
Image – resize 75% - all layers checked.
Stay at the tree layer - edit - copy.
Edit - paste as a new layer on the image.
17.
Effects – Image effects – Off Set – with this setting.

Layers – arrange – move down.
Layers – duplicate.
Activate the top layer.
18.
Open from the scrapkit - HPD_ThePerfectScare_3 - edit - copy.
Edit - paste as a new layer on the image.
Image – resize 50% - all layers not checked.
Put the tube left at the top – see example.
Effects – 3D Effects – drop shadow – setting is right.
19.
Open from the scrapkit - HPD_ThePerfectScare_31 - edit - copy.
Edit - paste as a new layer on the image.
Put the tube in the middle at the bottom - see example.
Effects – 3D Effects – drop shadow – setting is right.
20.
Open from the scrapkit - HPD_ThePerfectScare_7 - edit - copy.
Edit - paste as a new layer on the image.
Set the tube left at the bottom - see example.
Effects – 3D Effects – drop shadow – setting is right.
21.
Activate the tube katrienhw1- edit - copy.
Edit - paste as a new layer on the image.
Image – mirror.
22.
Put the tube right below.
Effects – 3D Effects – drop shadow – setting is right.
Layers – new raster layer – put your watermark on the image.
23.
Now we make the animation.
24.
Go to raster 11 (the lamp).
Go to selection free hand selection tool – free hand – and make a selection
as below.
Layers – duplicate.
25.
Activate raster 11.
Effects – plug-ins – Alien Skin Eye Candy 5.0 Nature - Fire.
Click on – Settings – User Settings – click on Emmyperfectscare –
click
OK.
26.
Activate copy of raster 11.
Effects – plug-ins – Alien Skin Eye Candy 5.0 Nature - Fire.
Click on – Basic – click on Random Seed – click OK.
Selections – select none.
27.
Activate raster 10.
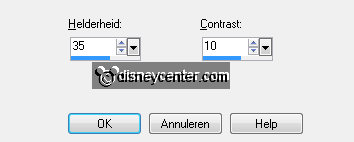
Adjust – brightness and contrast – brightness/contrast – with this
setting.
Activate copy of raster 10.
Adjust – brightness and contrast – brightness/contrast – now with
brightness on 60 – contrast the same.
28.
Activate raster 8.
Effects – plug-ins - Ulead Effects – GIF X 2.0 – click on
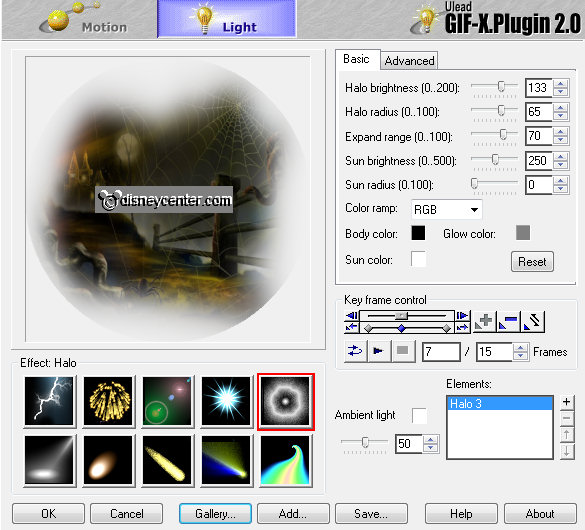
Lights – click on Gallery – click on Hallo1 – click OK.
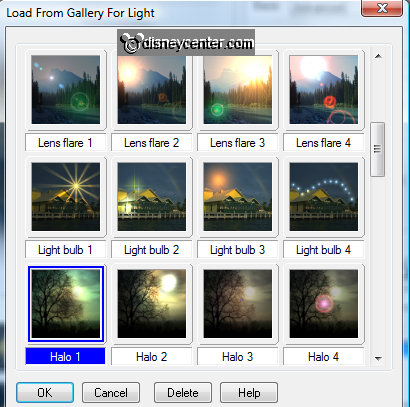
You come back on tab Lights – make
this setting - click OK.
29.
Activate copy of raster 8.
Effects – plug-ins - Ulead Effects – GIF X 2.0 – click on
Lights – click on Gallery – click on Hallo2 – click OK.
You come back on tab Lights – make this setting -
click OK.
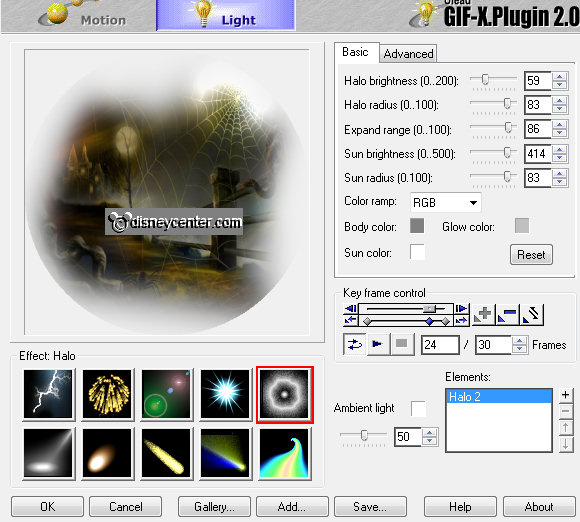
Image – resize 85% - all
layers checked.
30.
Lock in the layer palette the follow layers – copy of raster 8, copy
of raster 10 and copy of raster 11.
Activate the bottom layer – edit – copy merged.
31.
Open Animation Shop – edit / paste as a new animation.
Back tor PSP – Lock the layers – raster 8, raster 10 and raster 11
and open the layers – copy of raster 8, copy of raster 10 and copy
of raster 11.
Edit – copy merged.
32.
Back in AS – paste after active frame.
Edit – select all.
Animation – Frame Properties on 20.
33.
File – save as – give name – click 3 times at next and than
at finish.
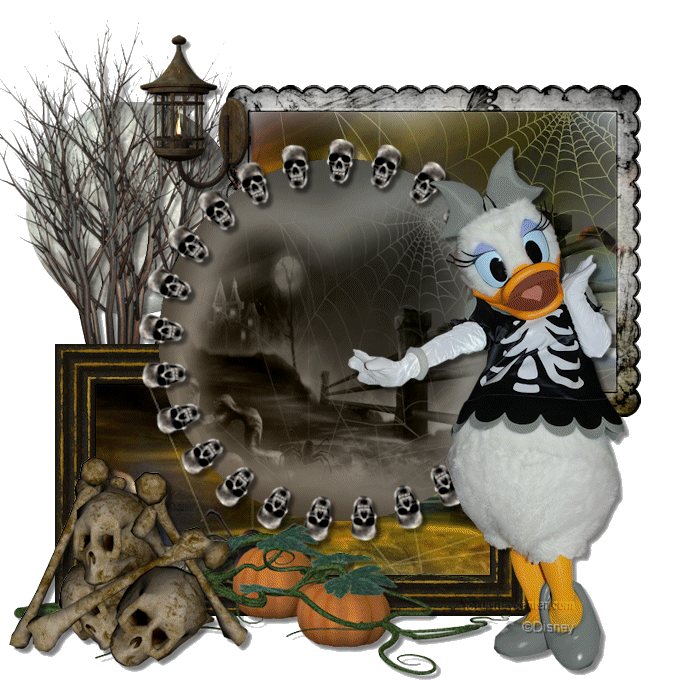
Ready is the tag
I hope you like this tutorial.
greetings Emmy
Tested by Nelly

tutorial written 23-10-2012
| 