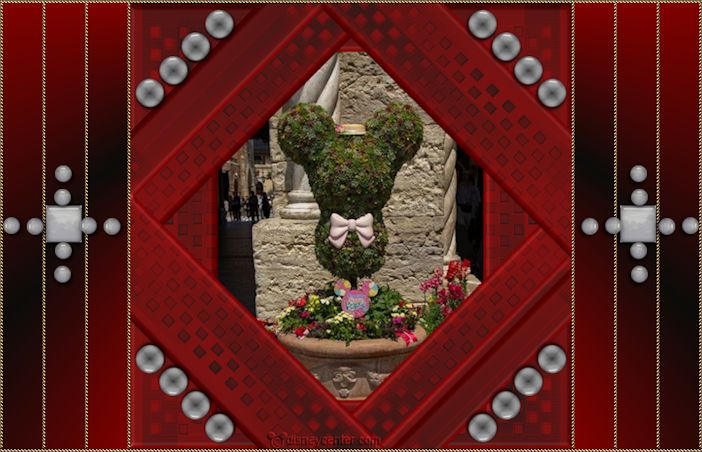
Disney Plant
1.
File - open new transparent image
700x700.
Set in the material palette the foreground color at
black
and the background color at
#800000.
Activate flood fill tool - fill the layer with the
background color.
2.
Layers - new raster layer.
Fill
the layer with the foreground color.
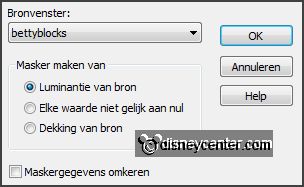
Layers - new mask layer - from image - with this setting.
Layers - merge - merge group.
3.
Activate the magic wand - with setting below - select in the black part.

Click at the delete key.
Activate raster 1 - click at the delete key.
4.
Let selection stay.
Activate the top layer.
Layers - merge - merge down
Selections - invert.
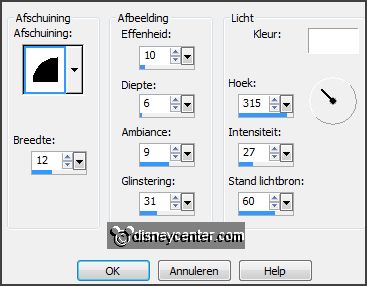
Effects - 3D Effects - Inner Bevel -
with this setting.
Selections - select none.
5.
Layers - duplicate.
Image -
flip.
Layers - merge - merge down.
6.
Layers - duplicate.
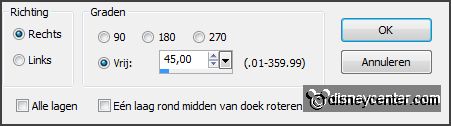
Image - free rotate -
with this setting.
Layers - duplicate.
Image - mirror.
Layers - merge - merge down
- and 1 more time.
7.
Activate the tube decoEmmy4 -
edit - copy.
Edit - paste as a new layer on the image.
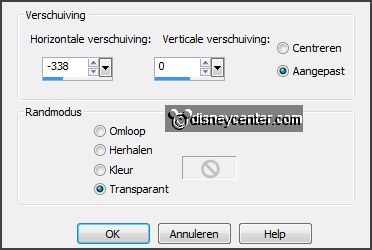
Image - mirror.
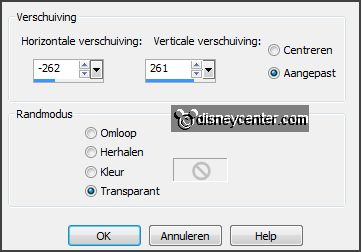
Effects - Image effects - offset -
with this setting.
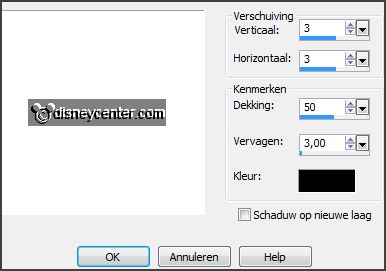
Effects - 3D Effects - drop shadow -
with this setting.
Effects - plug-ins - Simple - Top Left Mirror -
click OK.
8.
Activate the image disneyplant -
edit - copy.
Edit - paste as a new layer on the image.
Layers - arrange - move down - and 1 more time.
Activate move tool - move the image a little down.
9.
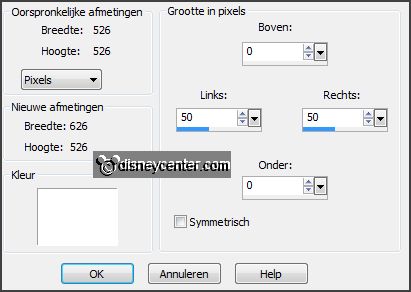
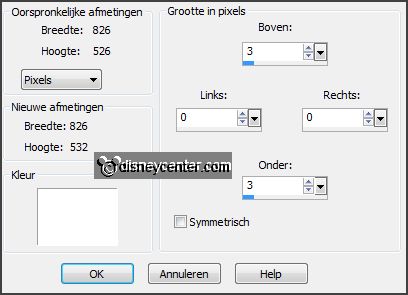
Image - add borders 1 pixel - symmetric - foreground color.
Image - resize 75% - all layers checked.
Image - add borders -
symmetric not checked -
with this setting.
10.
Activate the magic wand -
setting is right - the white borders.
Make in the material palette from the foreground a gradient radial
-
with this setting.

Fill the selection with the gradient radial.
Selections - select none.
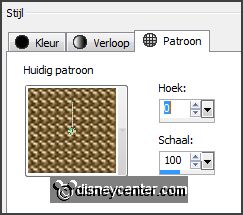
Set the background to pattern gold gd1 -
with this setting.
11.
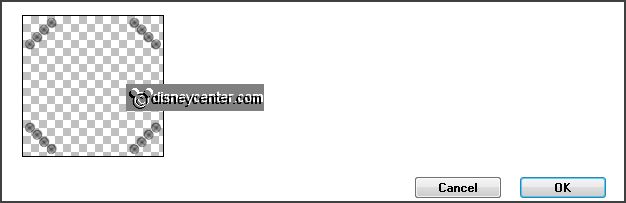
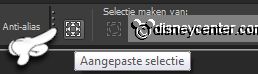
Activate selection tool - custom selection -
with this setting.
Layers - new raster layer.
Fill the selection with the gold pattern.
Selections - select none.
12.
Activate selection tool - custom selection -
with this setting.
Layers - new raster layer.
Fill the selection with the gold pattern.
Selections - select none.
Layers - duplicate.
Image - mirror.
Layers - merge - merge down.
13.
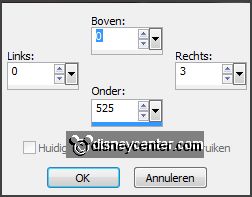
Image - add borders - symmetric not checked -
with this setting.
Select with the
magic wand the white borders.
Fill the selection with the gradient radial.
Selections - select none.
14.
Activate selection tool - custom selection -
with this setting.
Layers - new raster layer.
Fill the selection with the gold pattern.
Selections - select none.
Layers - duplicate.
Image - mirror.
Layers - merge - merge down.
15.
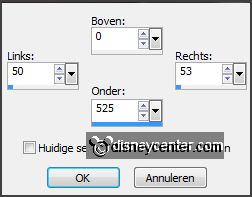
Image - add borders - symmetric not checked
-
with this setting.
Select with the magic wand the white borders.
Fill the selection with the gradient radial.
Selections - select none.
16.
Activate selection tool - custom selection -
with this setting.
Layers - new raster layer.
Fill the selection with the gold pattern.
Selections - select none.
Layers - duplicate.
Image - mirror.
Layers - merge - merge down.
17.
Image - add borders - symmetric not checked -
with this setting.
Select with the magic wand the white borders.
Fill the selection with the gold pattern.
Selections - select none.
18.
Activate the tube decoEmmy6 - edit - copy.
Edit - paste as a new layer on the image.
Effects - Image effects - offset - with
this setting.
Effects - 3D Effects - drop shadow - setting is right.
Layers - duplicate.
Image - mirror.
Layers - merge - merge down.
19.
Layers - new raster layer - put your watermark into the image.
Layers - merge - merge
all.
Image - resize 85% - all layers checked.
File - export - JPEG Optimizer.
Thank you Nelly for testing.

