|

This
Tutorial is copyrighted to the Tutorial Writer, © Emmy Kruyswijk 2009.
This Tutorial
may
not be forwarded, shared or otherwise placed on any Web Site or group without written
permission from
Emmy Kruyswijk
Do you want to link my lessons?
Please send
me a mail.
Materials:
download here,
plug-ins
here
3
tubes , 1 goud patroon
Filters: VM Toolbox - Trimosaic, Xero
- Tekstya, FM Tile Tools - Collage Lineair, Graphics Plus
- Cross Shadow
Put the plug-ins in the folder plug-ins,
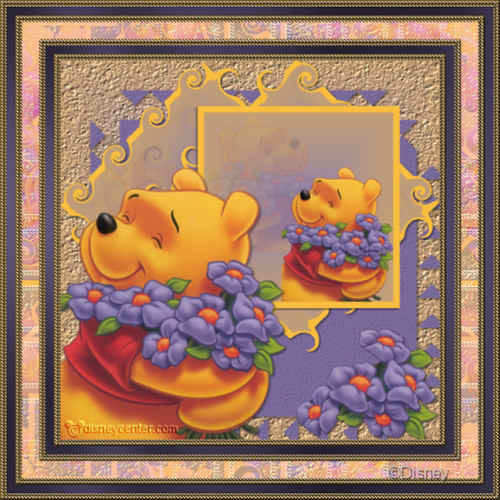
Pooh with Flowers
foreground color #7b6b9a and background color #f9be3f
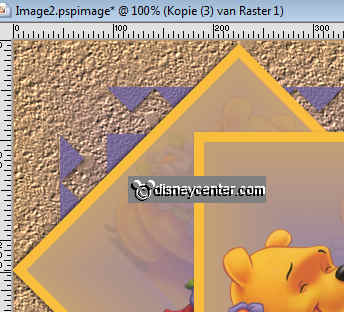
1. Open new image 600x600
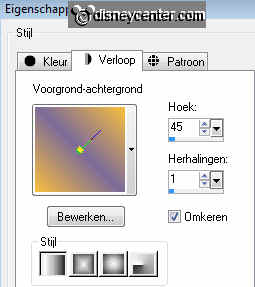
2. Fill this with the gradient radial
3. Duplicate this layer -Image - mirror
4. Put the opacity of this layer on 50
5. Copy the tube new Pooh 6 and paste as a new layer
6. Place this in the right upper corner
7. Put the opacity of this layer on 15
8. Copy the tube 1 more time and paste as a new layer.
9. Place this left at the bottom.
10. Layers - Merge - Merge all.
11. Image - Resize 50%.
11. Image - Add border 10 background color.
12. Open new image 600x600
13. Fill this with the gradient from point 2.
14. Repeat 3 and 4
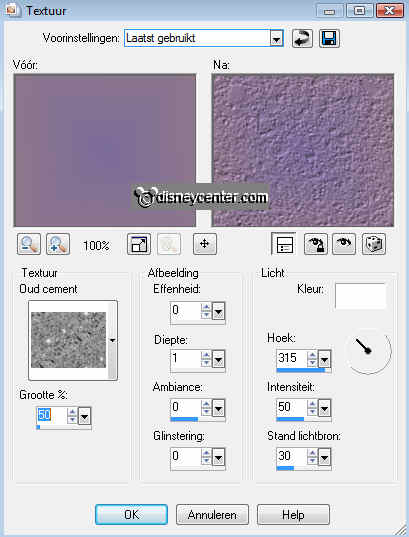
15. Effects - Texture effects - texture - old cement
16. Do this 1 more time.
17. Go to selection tool - selection - rounded square.
18. Start50 pix. from the top and right side and draw a square.
19. New raster layer - fill this with the foreground color. Selections - Select
none.
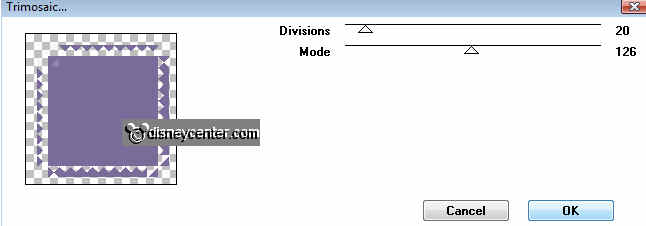
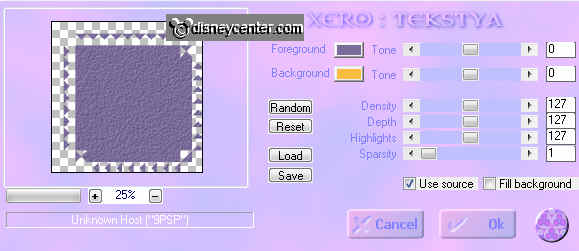
20. Effects - VM Toolbox - Trimosaic with this setting.
21. Effects - Xero - Tekstya with this setting.
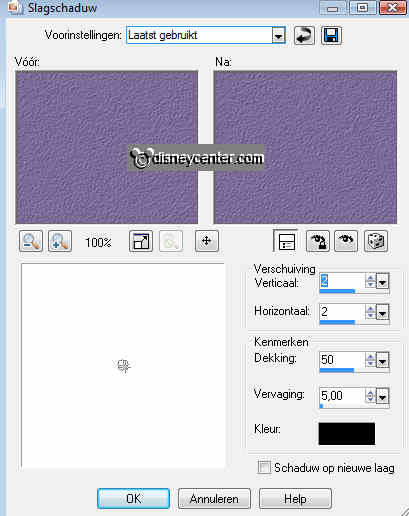
22. Effects - 3D Effects - drop shadow
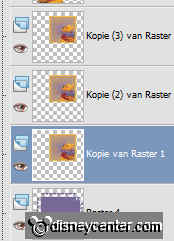
23. Copy the little image and paste as a new layer.
24. Duplicate this layer twice.
25. Stay on the first layer.
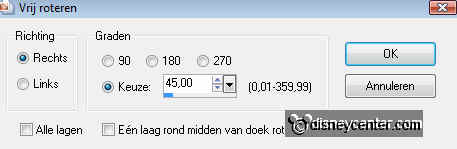
26. Image - free rotate
27. Image - mirror and place this in the left upper corner.
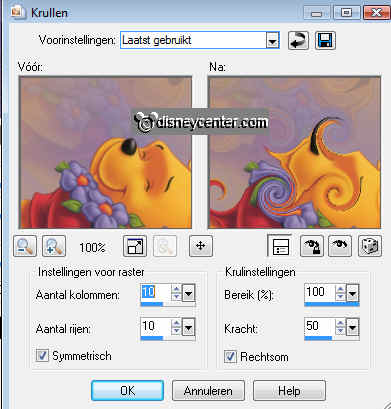
28. Effects - Distortion Effects - Curlicues with this setting.
29. Give the same drop shadow as in point 22.
30. Stay at the second layer (copy)
31. Image - free rotate, same as in point 26.
32. Slide it to the top right corner.
33.Repeat point 28 and 29.
34. Stay at the top layer - Image - mirror.
35. Place it slightly to the right and the top. see example.
36. Give the same drop shadow as in point 22.
37. Copy the tube new pooh 6 and paste as a new layer.
38. Place at the bottom left.
39. Give the same drop shadow as in point 22.
40. Copy the tube phbloemen and paste as a new layer.
41. Place at the bottom right
42. Give the same drop shadow as in point 22.
43. Layers - Merge - Merge all.
44. Image - Resize 75%.
45. Image - Add border 3 color white.
46. Select the white border - fill with gold pattern.
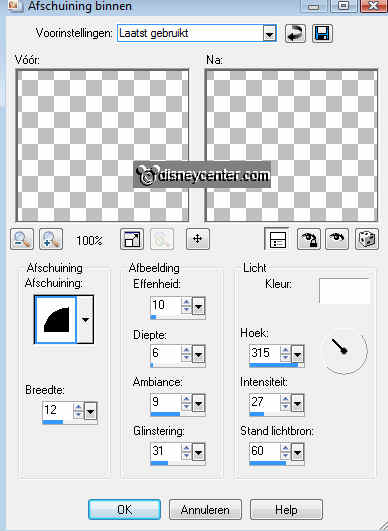
47. Effects - 3D Effects - Inner Bevel.
48. Selections - select none.
49. Image - Add border 5 color white.
50. Select the white border - fill with gold pattern.
51. Give the same Inner Bevel as in point 47.
52. Selections - select none.
53. Image - Add border 10 color #655a80
54. Select the border
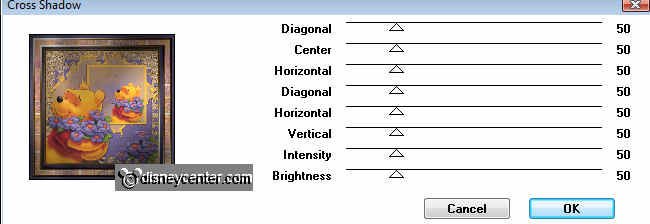
55. Effects - Graphics Plus - Cross Shadow with this setting.
56. Selections - select none.
57. Repeat point 45 to 52
58. Image - Add border 20 color #655a80
59. Select the border
60. Effects - FM Tile Tools - Collage Linear with this setting.

61. Repeat point 45 to 56.
62. Repeat point 45 to 52.
63. Put your watermark into the image.
64. Image - Resize to 500x500 pixels.
65. File - export -JPEG
Ready is the tag
I hope you like this tutorial.
greetings Emmy,

Tutorial written
22-10-2009
| |
