3.
Activate the tube element14 -
edit - copy.
Edit - paste as a new layer on the image.
Place it at the bottom - see example.
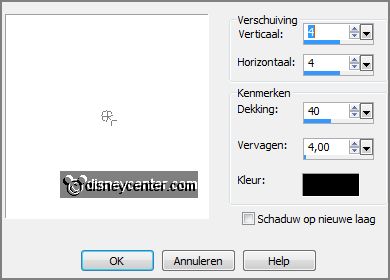
Effects - 3D Effects - drop shadow - setting is right.
4.
Activate the tube ial_fis_snow3 -
edit - copy.
Edit - paste as a new layer on the image.
Place it left at the bottom - above the other snow -see example.
Effects - 3D Effects - drop shadow - setting is right
Layers - duplicate.
Place it near the other.
5.
Activate the tube tp-tablelamp1 -
edit - copy.
Edit - paste as a new layer on the image.
Place it right of the window - see example.
Effects - 3D Effects - drop shadow - setting is right.
6.
Activate the tube lantaarnpaal -
edit - copy.
Edit - paste as a new layer on the image.
Place it at the right side - see example.
Effects - 3D Effects - drop shadow - setting is right.
7.
Activate the tube noel tree -
edit - copy.
Edit - paste as a new layer on the image.
Place it at the right side - see example.
Effects - 3D Effects - drop shadow - setting is right.
8.
Activate the tube GoldenSun_HO!HO!HO!_element77 -
edit - copy.
Edit - paste as a new layer on the image.
Place it right under the window - see example.
Effects - 3D Effects - drop shadow - setting is right.
9.
Activate the tube kado's -
edit - copy.
Edit - paste as a new layer on the image.
Place it right befor the Christmas tree - see example.
Effects - 3D Effects - drop shadow - setting is right.
Layers - duplicate.
Place it near the other - see example.
10.
Activate the poser tube -
edit - copy.
Edit - paste as a new layer on the image.
Place it at the left side - see example.
Effects - 3D Effects - drop shadow - setting is right.
11.
Activate the tube xmas -
edit - copy.
Edit - paste as a new layer on the image.
Place it left at the top - see example.
Effects - 3D Effects - drop shadow - setting is right.
12.
Layers - new raster layer - set your watermark into the image.
Layers - merge - merge all visible layers.
File - export - PNG Optimizer.
Ready is the tag
I hope you like this tutorial.
greetings Emmy