|

This
Tutorial is copyrighted to the Tutorial Writer, © Emmy Kruyswijk.
This Tutorial may not be forwarded, shared or otherwise placed on any Web Site
or group without written
permission from
Emmy Kruyswijk.
Please respect my work and from others, don't change the file
names.
Do you want to link my lessons?
Please send
me a mail.
Needing:
The poser tube is from me. My site you can find
here.
If you use my tubes put than
the copyright render at the image.
I use parts of different scrapkits.
Before you begins.......
Open the tubes in PSP.
Material

MardiGras

1.
File - open new transparent image 700x700.
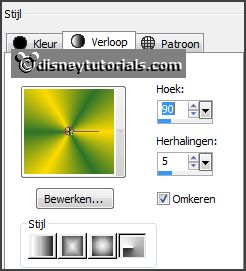
Set the foreground color to #2c732a and the background color to #fedb00.
Make from the foreground a gradient radial - with this setting.
2.
Activate the tube BWC_Mardigras_EL32 -
edit - copy.
Edit - paste as a new layer on the image.
Image - free rotate - with this setting.

3.
Activate the tube BWC_Mardigras_EL31 -
edit - copy.
Edit - paste as a new layer on the image.
Image - free rotate - setting is right.
Layers - merge - merge down.
Layers - new raster layer.
Select with the magic wand in the middle of the frame.
Selections - modify - expand 10 pixels.
Fill the selection with the gradient.
Adjust -blur - Gaussian blur - radius to 10.
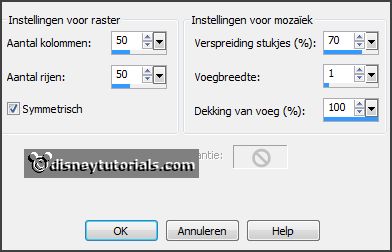
Effects - Texture effects - Mosaic Antique - with this setting.
Selections - select none.
Layers - arrange - down.
4.
Activate the bottom layer.
Activate the tube rs_glitter_gold -
edit - copy.
Edit - paste as a new layer on the image.
Layers - duplicate.
Image - mirror.
Activate the top layer.
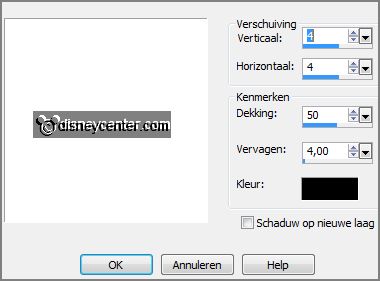
Effects - 3D Effects - drop shadow - with this setting.
5.
Activate the tube rs_feather3 -
edit - copy.
Edit - paste as a new layer on the image.
Image - free rotate - with this setting.

Effects - 3D Effects - drop shadow - setting is right.
Activate move tool - place it right at the top.
Layers - arrange - down - under raster 2.
Activate the top layer.
6.
Activate the tube 57080 -
edit - copy.
Edit - paste as a new layer on the image.
7.
Activate the tube BWC_Mardigras_EL18 -
edit - copy.
Edit - paste as a new layer on the image.
Place it right - see example.
Effects - 3D Effects - drop shadow - setting is right.
8.
Activate the tube BWC_Mardigras_EL23 -
edit - copy.
Edit - paste as a new layer on the image.
Place it in the middle at the top.
Effects - 3D Effects - drop shadow - setting is right.
9.
Activate the tube Mardi gras_coins1 -
edit - copy.
Edit - paste as a new layer on the image.
Place it in the middle at the bottom
Layers - duplicate.
Image - mirror.
Layers - duplicate.
Place it above - move it if it is necessary.
Effects - 3D Effects - drop shadow - setting is right.
10.
Activate the poser tube -
edit - copy.
Edit - paste as a new layer on the image.
Place it at the left side.
Effects - 3D Effects - drop shadow - setting is right.
11.
Layers - new raster layer - set your watermark into the image.
Layers - merge - merge all visible layers.
File - export - PNG Optimizer.
Ready is the tag
I hope you like this tutorial.
greetings Emmy
Thank you Nelly for testing.


tutorial
written 07-01-2016
|