|

This
Tutorial is copyrighted to the Tutorial Writer, © Emmy Kruyswijk.
This Tutorial may not be forwarded, shared or otherwise placed on any Web Site
or group without written
permission from
Emmy Kruyswijk.
Please respect my work and from others, don't change the file
names.
Do you want to link my lessons?
Please send
me a mail.
Needing:
The poser tube is from me. My site you can find
here.
If you use my tubes put than
the copyright render at the image.
I use parts of different scrapkits.
Before you begins.......
Open the tubes in PSP.
Material

Easter

1.
File - open new transparent image 700x700.
Activate the tube mask -
edit - copy.
Edit - paste as a new layer on the image.
2.
Activate the tube grond -
edit - copy.
Edit - paste as a new layer on the image.
Place it down.
3.
Activate the tube frame -
edit - copy.
Edit - paste as a new layer on the image.
Select with the magic wand in the middle of the frame.
Selection - modify - expand 10 pixels.
4.
Activate the image Hase -
edit - copy.
Edit - paste as a new layer on the image.
Place it exactly in the selection.
Selection - invert - click on the delete key.
Selections - select none.
Layers - arrange - down.
Activate the top layer.
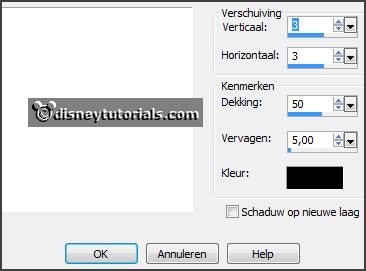
Effects - 3D Effects - drop shadow - with this setting.

5.
Activate the tube branch leaves -
edit - copy.
Edit - paste as a new layer on the image.
Place it at the left side.
Effects - 3D Effects - drop shadow - setting is right.
6.
Activate the poser tube -
edit - copy.
Edit - paste as a new layer on the image.
Place it at the left side at the bottom.
Effects - 3D Effects - drop shadow - setting is right.
7.
Activate the tube takjes1 -
edit - copy.
Edit - paste as a new layer on the image.
Place it at the right side.
Effects - 3D Effects - drop shadow - setting is right.
8.
Activate the tube plant -
edit - copy.
Edit - paste as a new layer on the image.
Place it at the right side at the bottom.
Effects - 3D Effects - drop shadow - setting is right.
9.
Activate the tube gans -
edit - copy.
Edit - paste as a new layer on the image.
Place it right at the bottom.
Effects - 3D Effects - drop shadow - setting is right.
10.
Activate the tube element14 -
edit - copy.
Edit - paste as a new layer on the image.
Place it right at the bottom for the goose.
Effects - 3D Effects - drop shadow - setting is right.
11.
Activate the tube easter -
edit - copy.
Edit - paste as a new layer on the image.
Place it right at the top.
Effects - 3D Effects - drop shadow - setting is right.
12.
Layers - new raster layer - set your watermark into the image.
Layers - merge - merge all visible layers.
File - export - PNG Optimizer.
Ready is the tag
I hope you like this tutorial.
greetings Emmy
Thank you Nelly for testing.


tutorial
written 27-01-2016
|