|

This
Tutorial is copyrighted to the Tutorial Writer, © Emmy Kruyswijk.
This Tutorial may not be forwarded, shared or otherwise placed on any Web Site
or group without written
permission from
Emmy Kruyswijk.
Please respect my work and from others, don't change the file
names.
Do you want to link my lessons?
Please send
me a mail.
Needing:
The poser tube is from me. My site you can find
here.
If you use my tubes put than
the copyright render at the image.
I use parts of different scrapkits.
Before you begins.......
Open the tubes in PSP.
Material

Spring is Coming

1.
File - open new transparent image 700x700.
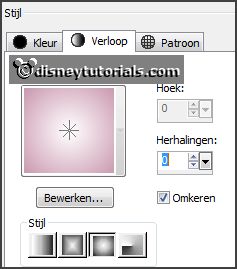
Set the foreground color to #d8b3c4 and the background color to white.
Make from the foreground a gradient sunburst - with this setting.
2.
Activate the tube mask -
edit - copy.
Edit - paste as a new layer on the image.
3.
Activate the tube gras -
edit - copy.
Edit - paste as a new layer on the image.
4.
Activate the tube Lilas_Lovely_spring_add-on(7) -
edit - copy.
Edit - paste as a new layer on the image.
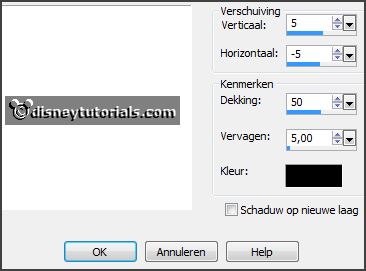
Effects - 3D Effects - drop shadow - with this setting.
Select with the magic wand in the middle of the frame.
Selections - modify - expand 10 pixels.
5.
Layers - new raster layers.
Fill the selection with the gradient.
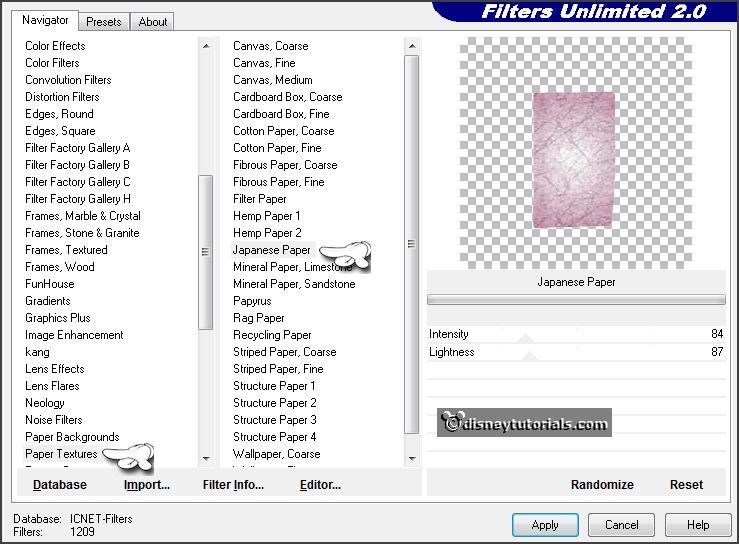
Effects - plug-ins - I.C.Net Software - Paper Textures - Japanese paper - with
this setting - click Apply.
Selections - select none.
Layers - arrange - down.
Activate raster 4.
6.
Activate the poser tube -
edit - copy.
Edit - paste as a new layer on the image.
Erase all what comes under the frame.
Layers - duplicate.
Layers - arrange - up.
Effects - 3D Effects - drop shadow - setting is right.
Erase all what stays on the frame.
7.
Activate the tube 77 -
edit - copy.
Edit - paste as a new layer on the image.
Activate move tool - place it left at the bottom.
Select with the magic wand in the middle of the frame.
Selections - modify - expand 20 pixels.
Layers - new raster layers.
Fill the selection with the gradient.
Selections - select none.
Layers - arrange - down.
Activate the top layer.
Effects - 3D Effects - drop shadow - setting is right.
8.
Activate the tube Happy-Easter-Bunny-on-sign -
edit - copy.
Edit - paste as a new layer on the image.
Place it in the frame.
Effects - 3D Effects - drop shadow - setting is right.
9.
Activate the tube branche1 -
edit - copy.
Edit - paste as a new layer on the image.
Place it at the left side - see example.
Layers - arrange - down - under raster 4.
Layers - duplicate.
Image - mirror.
Place it left and a little down - see example.
Layers - merge - merge down.
Effects - 3D Effects - drop shadow - setting is right.
10.
Activate the tube florju_springbunnies-elmt(101) -
edit - copy.
Edit - paste as a new layer on the image.
Place it left at the top on the staff.
Effects - 3D Effects - drop shadow - setting is right.
11.
Activate the tube 069 -
edit - copy.
Edit - paste as a new layer on the image.
Place it left at the top
Effects - 3D Effects - drop shadow - setting is right.
12.
Activate the tube Lilas_Lovely_spring_add-on(3) -
edit - copy.
Edit - paste as a new layer on the image.
Place it right at the top.
Effects - 3D Effects - drop shadow - setting is right.
13.
Activate the tube mus -
edit - copy.
Edit - paste as a new layer on the image.
Place this right at the bottom on the cage.
Effects - 3D Effects - drop shadow - setting is right.
14.
Activate the tube 'strik1 -
edit - copy.
Edit - paste as a new layer on the image.
Place it right at the top.
15.
Activate the tube herbe oeuf -
edit - copy.
Edit - paste as a new layer on the image.
Place it right at the bottom.
Effects - 3D Effects - drop shadow - setting is right.
16.
Activate the tube IndigoD_BreathOfSpring_el(38) -
edit - copy.
Edit - paste as a new layer on the image.
Place it at the bottom in the middle on the frame.
Effects - 3D Effects - drop shadow - setting is right.
17.
Activate the tube florju_springbunnies-elmt(48) -
edit - copy.
Edit - paste as a new layer on the image.
Place it in the middle at the bottom.
Effects - 3D Effects - drop shadow - setting is right.
18.
Activate the tube eieren -
edit - copy.
Edit - paste as a new layer on the image.
Place it right at the bottom.
Effects - 3D Effects - drop shadow - setting is right.
19.
Layers - new raster layer - set your watermark into the image.
Layers - merge - merge all visible layers.
File - export - PNG Optimizer.
Ready is the tag
I hope you like this tutorial.
greetings Emmy
Thank you Nelly for testing.


tutorial
written 27-01-2016
|