|

This
Tutorial is copyrighted to the Tutorial Writer, © Emmy Kruyswijk.
This Tutorial may not be forwarded, shared or otherwise placed on any Web Site
or group without written
permission from
Emmy Kruyswijk.
Please respect my work and don't change the file names.
Do you want to link my lessons?
Please send
me a mail.
Needing:
The beautiful poser tube is from Leilana - Her site you
can find
here.
The tube should I not share.
I have used parts of the
scrapkit of Magicnight from
Cajoline.
Before you begins.......
Open the tubes in PSP.
Set the texture in the folder textures.
Material

Golden Magic

1.
File - open new transparent image 700x700.
Activate the tube cajoline_magicnight_el98 -
edit - copy.
Edit - paste as a new layer on the image.
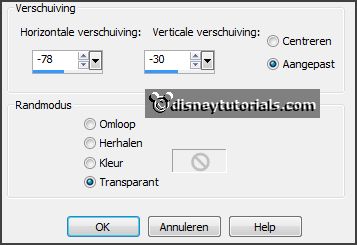
Effects - Image effects - offset - with this setting.
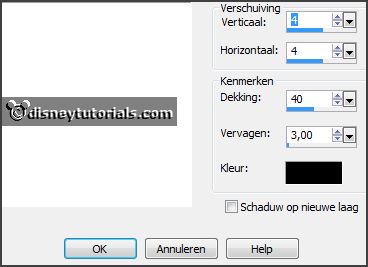
Effects - 3D Effects - drop shadow - with this setting.
2.
Set the foreground color to #efddb9.
Layers - new raster layer.
Activate selection tool - circle - make a selection - as below.
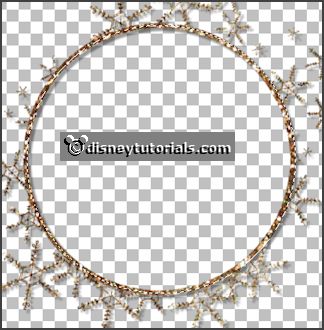
Fill the selection with the foreground color.
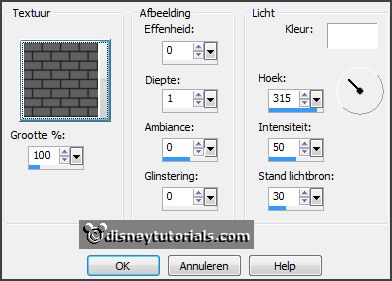
Effects - Texture effects - Texture - bakstenen middlebrow - with this setting.
Layers - arrange - down.
Selections - select none.
3.
Activate the tube cajoline_magicnight_el4 -
edit - copy.
Edit - paste as a new layer on the image.
Active move tool - place it at the right side- see example.
Effects - 3D Effects - drop shadow - setting is right.
4.
Activate the tube cajoline_magicnight_el9 -
edit - copy.
Edit - paste as a new layer on the image.
Image - free rotate - with this setting.

Place it at the right side at the bottom - see example.
Effects - 3D Effects - drop shadow - setting is right.
5.
Activate the tube tak -
edit - copy.
Edit - paste as a new layer on the image.
Place it in the middle at the bottom - see example.
Effects - 3D Effects - drop shadow - setting is right.
6.
Activate the tube cajoline_magicnight_el54 -
edit - copy.
Edit - paste as a new layer on the image.
Place it at the right side - see example.
Effects - 3D Effects - drop shadow - setting is right.
7.
Activate the tube cajoline_magicnight_el8 -
edit - copy.
Edit - paste as a new layer on the image.
Image - mirror.
Place it at the left side - see example.
Effects - 3D Effects - drop shadow - setting is right.
8.
Activate the tube cajoline_magicnight_el32 -
edit - copy.
Edit - paste as a new layer on the image.
Place it at the left side on the harp - see example.
Image - free rotate - with this setting.

Effects - 3D Effects - drop shadow - setting is right.
9.
Activate the tube cajoline_magicnight_el55 -
edit - copy.
Edit - paste as a new layer on the image.
Place it near the guitar rat the right side. - see example.
Effects - 3D Effects - drop shadow - setting is right.
10.
Activate the tube cajoline_magicnight_el86 -
edit - copy.
Edit - paste as a new layer on the image.
Place it next to the broom left - see example.
Effects - 3D Effects - drop shadow - setting is right.
Layers - arrange - down - set this under raster 5.
11.
Activate the tube knuddelinoswinter_03 -
edit - copy.
Edit - paste as a new layer on the image.
Image - mirror.
Place it as in the example.
Effects - 3D Effects - drop shadow - setting is right.
12.
Layers - new raster layer - set your watermark into the image.
Layers - merge - merge all visible layers.
File - export - PNG Optimizer.
Ready is the tag
I hope you like this tutorial.
greetings Emmy
Thank you Nelly for testing.


les geschreven
12-11-2014 |