This
Tutorial is copyrighted to the Tutorial Writer, © Emmy Kruyswijk.
This Tutorial may not be forwarded, shared or otherwise placed on any Web Site
or group without written
permission from Emmy Kruyswijk.
Please respect my work and from others, don't change the file names.
Do you want to link my lessons?
Please send me a mail.
Needing:
The poser tube is a buy tube of me. Is not by the material. You can buy it
here.
Before you begins.......
Open the tubes in PSP.
Material

Sinterklaas en Zwarte Piet

1.
File - open new transparent image 700x700.
Activate the tube leny-frame-sintenpiet -
edit - copy.
Edit - paste as a new layer on the image.
Activate move tool - place it right at the top.
2.
Select with the magic wand in the middle of the frame.
Selections - modify - expand 5 pixels.
Layers - new raster layer - fill this with the color white.
Layers - arrange - down.
Layers - new raster layer.
3.
Activate the tube sinterklaas en pieten -
edit - copy.
Edit - paste in selection.
Selections - select none.
Set the opacity of this layer to 46.
4.
Activate the tube lied2 -
edit - copy.
Edit - paste as a new layer on the image.
Layers - arrange - under raster2.
Activate the top layer.
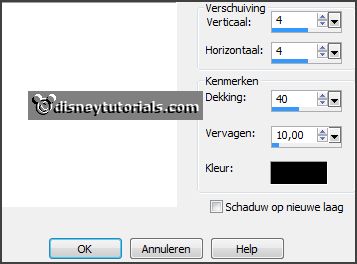
Effects - 3D Effects - drop shadow - with this setting.

5.
Activate the tube DI_Sinterklaas3 -
edit - copy.
Edit - paste as a new layer on the image.
Image - free rotate - with this setting.

Place it as in the example.
Effects - 3D Effects - drop shadow - setting is right.
6.
Activate the tube DI_Sinterklaas5 -
edit - copy.
Edit - paste as a new layer on the image.
Place it as in the example.
Effects - 3D Effects - drop shadow - setting is right.
7.
Activate the tube zak1 -
edit - copy.
Edit - paste as a new layer on the image.
Place it left near the book.
Effects - 3D Effects - drop shadow - setting is right.
8.
Activate the poser tube -
edit - copy.
Edit - paste as a new layer on the image.
Place it left at the bottom
Effects - 3D Effects - drop shadow - setting is right.
9.
Layers - new raster layer - set your watermark into the image.
Layers - merge - merge all visible layers.
File - export - PNG Optimizer.
Ready is the tag
I hope you like this tutorial.
greetings Emmy
Thank you Nelly for testing.