This
Tutorial is copyrighted to the Tutorial Writer, © Emmy Kruyswijk.
This Tutorial may not be forwarded, shared or otherwise placed on any Web Site
or group without written
permission from Emmy Kruyswijk.
Please respect my work and from others, don't change the file names.
Do you want to link my lessons?
Please send me a mail.
Needing:
I use parts of different scrapkits.
The poser tube is a buy tube of me. Is not by the material. You can buy it
here.
Before you begins.......
Open the tubes in PSP.
Material

Joy

1.
File - open new transparent image 900x700.
Set the foreground color at #8a0f14 and the background color at white.
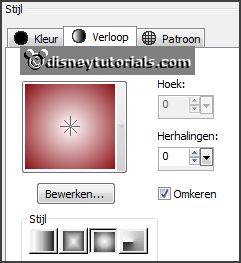
Make from the foreground a gradient sunburst - with this setting.

2.
Activate the tube background -
edit - copy.
Edit - paste as a new layer on the image.
3.
Activate the tube HPD_CIMH_36 -
edit - copy.
Edit - paste as a new layer on the image.
Activate move tool - place it up.
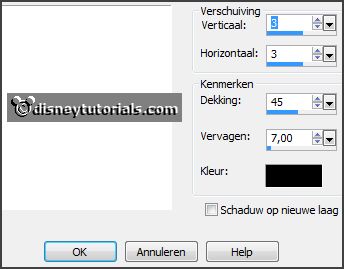
Effects - 3D Effects - drop shadow - with this setting.

4.
Activate the tube 6-
edit - copy.
Edit - paste as a new layer on the image.
Place it in the middle - see example.
Effects - 3D Effects - drop shadow - setting is right.
5.
Activate the tube Sier-Marijke-CP-
edit - copy.
Edit - paste as a new layer on the image.
Place it in the middle at the bottom.
Effects - 3D Effects - drop shadow - setting is right.
Activate raster 2.
Lock raster 1.
6.
Click with the magic wand in the 4 frames.
Selection - modify - expand - 5 pixels.
Layers - new raster layer.
Fill the selection with the gradient.
Layers - arrange - down.
Selections - select none.
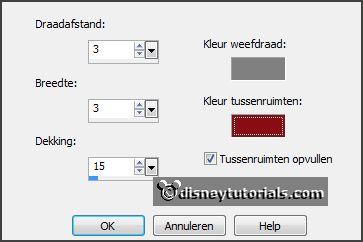
Effects - Texture effects - weave - with this setting.

7.
Activate the tube cajoline_magicnight_el82-
edit - copy.
Edit - paste as a new layer on the image.
Place it in the second frame of left.
Effects - 3D Effects - drop shadow - setting is right.
8.
Activate the tube bel-
edit - copy.
Edit - paste as a new layer on the image.
Place it in the third frame of left.
Effects - 3D Effects - drop shadow - setting is right.
9.
Activate the tube cajoline_magicnight_el80-
edit - copy.
Edit - paste as a new layer on the image.
Place it in the last frame.
Effects - 3D Effects - drop shadow - setting is right.
10.
Activate the poser tube -
edit - copy.
Edit - paste as a new layer on the image.
Place it at the left side.
Effects - 3D Effects - drop shadow - setting is right.
11.
Layers - new raster layer - set your watermark into the image.
Layers - merge - merge all visible layers.
File - export - PNG Optimizer.
Ready is the tag
I hope you like this tutorial.
greetings Emmy
Thank you Nelly for testing.